DOEPFER MUSIKELEKTRONIK DREHBANK Drehbank : The machine with the licence to turn. Owners manual, 2nd edition.
Doepfer Musikelektronik Doepfer Musikelektronik GmbH Geigerstr.13 • 82166 Graefelfing, Germany. Phone +49 89 89809510 • Fax +49 89 89809510 Internet http://www.doepfer.com C R E D I T S : Project Manager Programmers: Hardware design Programmer of the Drehbank systems software for the EditorAdaption and EMAGIC SoundDiver. Programmer of the Drehbank Editor for PC & Presets Owners manual designers : Translation Dieter Doepfer Christian Assall, Roland Mayer. Dieter Doepfer. ! hardware@doepfer.
Foreword You will have received your Drehbank with software version 1.xx (where xx is the current revision number of the version 1 software). This software has been checked by Doepfer and by our beta-testers, and is believed to be practically bugfree. But in any new software of such complexity, we know that it‘s possible that hidden bugs may still exist. If you find one, we would be grateful if you could let us know the exact details. We will try to remove the bug as quickly as possible.
CONTENTS Contents CREDITS FOREWORD ............................................................................................................................ 2 CONTENTS ............................................................................................................................. 5 CHAPTER 1 ............................................................................................................................. 7 INTRODUCTION..............................................................
Init Bank 2 ....................................................................................................................... 24 Exchange Bank 1 <---> 2 ................................................................................................ 24 OPTIONS .............................................................................................................................. 25 Event Thru ........................................................................................................
CHAPTER 1 INTRODUCTION 1 Chapter Introduction About the Owner`s manual This manual is intended for those who enjoy to browse through instruction manuals, and for those of you who have picked this book up for the very first time, only because something doesn`t work or through misuse of the Drehbank irreparable damage has been caused to the future of all mankind. ☺ But jokes aside, systems damage through use of the Drehbank is almost impossible.
INSTALLATION Presets / Files There are several preset files incuded on the Editor Disc ! README.TXT file. These can be used directly or used as a basis for creating your own preset libraries. We at Doepfer are continually creating new presets that will be available for downloading from the InterNet. Site address: http:// www.doepfer.de/pub/download.htm NOTE Information that we feel is of extra importance is printed in boxes of grey and black like this one throughout the manual.
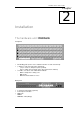
INSTALLATION 2 Chapter Installation The hardware unit: Drehbank Front panel • • • • 64 control knobs 64 labelling pads (for the user to label the function of each control knob). 3 switches (on the left side of the unit; black): (one) to create a „Snapshot“ (the top switch) (two) to switch from one bank to the other (the lower 2 switches) 3 L.E.D.
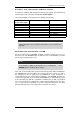
INSTALLATION O PT I ONS: T HE 8 EXT ERN AL C O NT R OL I N PUT S If you have a unit fitted with the optional external control inputs, you will find the 8 external inputs at the rear of the unit (labelled external inputs) The 8 external inputs are assigned to the following control knobs; External input (at rear, left to right) 1 2 3 4 5 6 7 8 Control knob on front panel Default settings 31 15 47 63 32 48 16 64 Control voltage Control voltage Control voltage Control voltage Foot controller Foot controller
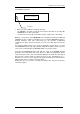
INSTALLATION The EPROM component. S t ic k e r w it h v e r s io n n u m b e r N o tc h • Before you reassemble the unit make sure that the EPROM is inserted correctly (if incorrectly inserted then it‘s goodbye Mr EPROM when you turn on the unit) - you haven‘t loosened or disconnected any of the components or the wiring. With the second version of the Drehbank series (availible from February 1999 and identifiable by the 3 switches and L.E.D.s) the non-volatile EEPROM memory is doubled.
INSTALLATION Software: The Drehbank Editor On the included DOS–formated disc you will find the Drehbank editor software. Warning Before you install the editor program (Please, Please, Please) read the README.TXT(help) file. Installing the Drehbank Editor System requirements The Drehbank Editor is a Windows application which requires the following system • IBM compatible PC . • CPU > 90 Mhz (recommended) • > 8 Megabyte RAM (recommended) • > 2 Megabytes of free space on the hard drive/disc. • Windows 3.
INSTALLATION Installation To install: initiate/execute INSTALL.EXE. Once you‘ve installed the application you’ll find a subfolder titled Drehbank in the directory you have chosen. You can also create a link on the desktop for quicker access to the editor application. To start the program simply doubleclick on the Drehbank.EXE file. De-installation The editing software has no effect on the operating system of your computer, therefore you can simply delete the Drehbank folder from your hard disc.
CHAPTER 3 BASIC OPERATIONS 3 Chapter The Basics What is the Drehbank? The Doepfer Drehbank is a user definable Midi control unit with 64 rotary control knobs. Any midi event can be assigned to any control knob. Each knob lets you control Midi events in the form of Midi-strings. You can control simple events like volume, reverb, panorama, etc., or you can create complex SysEx strings. The setting of each control knob is stored in a preset.
BASIC OPERATIONS The front panel 64 control knobs/potentiometers Drehbank incorporates 64 control knobs/potentiometers that have a control voltage range from 0..+5V. Internally the control voltage is translated into digitial information. A full turning of the control knob has a range of 256 values from 0..to.255.That means that the variables have a range of 256 steps. Note There may be slight fluctuations in the potentiometer tolerance levels for which we accept no liability.
BASIC OPERATIONS The recalling of the ROM presets has no effect on the nonvolatile memory (EEPROM). The preset that you loaded from the editor software into the nonvolatile memory still exists. To activate it again you must turn the unit off and on again. SW IT CHING BET WEEN T HE 2 B ANKS For each bank there is one switch and one L.E.D. indicator. Simply select a bank by pressing either of the bank switches on the Drehbank.
BASIC OPERATIONS B ANK INDICAT O RS The indicators show which bank is active: - L.E.D lit over Bank 1 (Bank 2 off) indicates BANK 1 is active. - L.E.D lit over Bank 2 (Bank 1 off) indicates BANK 2 is active. SNAPSHOT MODE Once the snapshot switch has been pressed the L.E.D. above it blinks rapidly. By pressing the switch once again within a second a „Snapshot“ will be sent and this is indicated by the L.E.D staying lit (again for about a second). After this the L.E.D.s returns to bank indicator mode.
BASIC OPERATIONS Note: The layout of ROM preset 1 is printed in the appendix. Information on ROM presets 2, 3, and 4 is found in the README.TXT file. - The Changeable non-volatile EEPROM Preset. This preset is located in the internal non-volatile memory (EEPROM) and will under normal operating conditions be loaded into the work buffer (RAM). Power input/ Power supply The Drehbank is powered by an external DC power supply. A 230V power supply with Euro plug is included in the package.
BASIC OPERATIONS The MIDI Connection The Drehbank merges the Midi data coming into the Midi In port with the generated data of the respective control knobs. The complete merged data is then sent to the Midi Out port. Note Drehbank normally works in Midi Merge mode. Important If there is a lot of data coming into the Midi In port it is possible that the Drehbank will have problems with merging, as the internal memory has a limited capacity.
BASIC OPERATIONS Editing with the Editor software The basic concepts of editing with the editor software are based upon the "Drag & Drop" principle. In "Control Copy" mode you can „drag“ a controller and „drop“ on the chosen control knob; you use the „drag and drop“ also when working with the library. In „Control Exchange“ mode you can exchange the controllers. To switch between the modes press the following symbols. --->+ for "Control Copy" mode. <---> for "Control Exchange" mode.
4 Chapter The Editing Software Opening and saving a Preset The Drehbank editor includes some presets that you can use as a basis for creating your own preset files. Click in the „preset“ menu on open to access the data browser. There you can select a preset and load it by clicking on O.K. The information in the preset is then loaded to the Drehbank editor and sent to the Drehbank unit. To save a preset click on save in the „preset“ menu, and then title the preset in the data browser.
USER INTERFACE Controller Properties Most of the control functions from the libraries have variables with which you can control Midi events e.g. Midi channel. To change the properties of a knob click once on the rightmouse and then on „properties“. Now you‘re going to get what you’ve been looking for! (the properties menu, yippee) ☺. Here you can alter the settings of the selected control knob with the pop up menus, e.g. Midi channel, controller numbers. To activate the changes click on „O.K.
USER INTERFACE Note 1. Don`t forget to save your preset. 2. When you switch the unit Off and On again the non-volatile memory still exists. Sysex files / Preset Text files SysEx Files .SYX are files with one or more MIDI system exclusive messages in binary code. The Drehbank needs to have one separate SysEx message per control knob, so that a complete Drehbank SysEx File is built from 128 single SysEx messages (2 banks with 64 control knobs per bank). Remember SysEx stands for "System Exclusive Message".
USER INTERFACE Generating Text files If you click on "Make Textfile" in the "Preset" menu you can generate a textfile to document your SysEx files. In this case make sure that the letters at the end of the file name are .TXT Editor Tools In the "Tools" menu the following functions are available. Be aware: there is no undo function! Copy Bank 1 ---> Bank 2 Copies all of the control functions of bank 1 to the control functions in bank 2.
USER INTERFACE Options Go into the main menu and click on „options“. Here you will find the following options The Midi Thru Mode in the Drehbank determines which type of MIDI messages "get-THRU-ed" from the Drehbank Midi Inputs to the Drehbank Midi Outputs. Event Thru When enabled all Midi channel messages e.g. note events, controller events from Midi In are forwarded to Midi Out. Realtime Thru When enabled all Midi realtime messages e.g. start, stop, timing clock from Midi In are forwarded to Midi Out.
USER INTERFACE Editing a control function Doubleclick the control knob you want to edit and you will get the Edit Control dialogue. If you are not familiar with MIDI details you should take a look at the MIDI 1.0 Specification and the Midi Table. Further take also a look how theTables works. After all (if you are a professional in MIDI) take the Technical Manual of the device you want to control with the Drehbank. Here you will find (mostly) its special MIDI implementation.
USER INTERFACE Edit Control: Midi - String Here you input the byte sequence of the desired MIDI event in hexadecimal notation. You can separate the bytes using space but this is not needed (e.g. B0 07 X0 for Volume Controller in Ch 1). Remark Hex is the abbreviation for hexadecimal. HEX is a numerical system (like decimal) using the following 16 characters: 0, 1, 2, 3, 4, 5, 6, 7, 8, 9, A (=10), B (=11), C (=12), D (=13), E (=14), F (=16) There are 16 different variables X0..
USER INTERFACE Edit Control: Label Input here a label for the control knob. Labels can have a max. length of 16 characters. You can also put values of variables in it using !XN, ?XN, $XN in the label, the same way as for the description. Note Use low case characters to match in the box without truncation. It is also recommended to use abbreviations (e.g. "ctr" instead of "controller"). Edit Control: Variable Assignment You can use 16 different variables X0..XF within the Midistring.
USER INTERFACE Edit Control: Type Here you can select the data format of the variable. As default each Xn is defined as "Normal byte" which is mostly used. The bit weight notation of a normal byte is <76543210>. You have also the choice of other formats that you should only use if you know what you are doing - if you do not, it is the best way to let it be "normal byte". Remark The poperties dialogue supports only the normal byte format.
USER INTERFACE Range to e.g. 120 Range from e.g.120 Range to e.g. 20 Range from e.g. 20 ccw # control range ! cw # control range ! ccw cw The left picture shows an example with Range from = 20 and Range to = 120. If the knob is turned from left (ccw) to right (cw) the data 20...120 are generated. The right picture shows an example with Range from = 120 and Range to = 20. If the knob is turned from left (ccw) to right (cw) the data 120...20 are generated.
USER INTERFACE Edit Control: Value For property variables this is the current or default value. If not on property, this parameter is transmitted to Drehbank but not yet used. For the future this may be used as default value, so set it as default e.g. as the center value for Panorama Controllers or 100 for volume controllers having a headroom of 27 digits.
USER INTERFACE Building a Library Since the Drehbank library files use the same file format as the preset files they are made as a Preset using the Editor. The difference between libraries and preset is that libraries may have all the control functions of a special device whereby the presets have a special arrangement of this control functions. How to build your own control function is described at "Editing a control function".
CHAPTER 5 APPENDIX 5 Chapter Appendix ROM Preset 1 Bank 1 In bank 1 there is a preset full of the most important Midi controllers, all to be found on Midi channel 1. Slot-Nr.
APPENDIX Key to Midi controller numbers 0= Bank select MSB 1= Modulation wheel 2= Breath control 4= Foot control 5= Portamento time 6= Data entry MSB 7= Channel (Main) Volume 8= Balance 10= Panorama 11= Expression Control 12= Effect Control 1 13= Effect Control 2 16= General Purpose 1 17= General Purpose 2 18= General Purpose 3 19= General Purpose 4 64= Damper Pedal (Sustain) 65= Portamento Switch 66= Sostenuto Switch 67= Softpedal 68= Legato foot switch 69= Hold 2 70= Soundcontrol 1 (Variation) 71= Soundc
APPENDIX External Inputs Option If you have bought a unit with the external inputs option you will find 8 ¼" sockets at the rear of the unit, which are labelled External Inputs. The 8 external sockets correspond with 8 of the control knobs on the right hand side of the unit (15, 16, 31, 32, 47, 48, 63 and 64). See below.
APPENDIX The jack, through which the control voltage is transmitted, must be configured as follows: Control voltage (CV) Unused (N.C.) Ground (GND) Jack configuration for cv mode You can also use a mono jack (pin hot). In the default settings, the external inputs 1, 2, 3, 4 correspond with the controller knobs 31, 15, 47, 63 and are set for control voltage mode. When the supplied control voltage does not cover the complete voltage range from 0...+5V the full Midi data range is not available.
APPENDIX In the default settings of the Drehbank the external inputs 5, 6, 7, 8 corresponding with the controller knobs 32, 48, 16, 64 are set for foot controller mode. When a foot controller does not supply a control voltage covering the complete control voltage range from 0...+5V the full MIDI data range is not available. In this case the range of the corresponding control knob must be adjusted (same as for CV mode). If desired the operation modes of the 8 external inputs can be redefined (e.g.
APPENDIX Bibliography This bibliography is subjective, and not guaranteed 100% accurate ! The most-up-to-date printed specs for General MIDI, MIDI, and the MIDI file format can be obtained for a few bucks from: International MIDI Association 23634 Emelita Street Woodland Hills, California 91367 USA Steve De Furia & Joe Scacciaferro, "MIDI Programmer's Handbook" M&T Books ISBN 1-55851-068-0 Michael Cxelperger: "Introducing Standard MIDI File". Electronic Musican, April 1989, S.
APPENDIX Title:"The MIDI drummer : by a drummer for a drummer" / by David Crigger. Publisher: Newbury Park, CA : Alexander Pub., c1987. Subjects: Electronic percussion instruments--Instruction and study. MIDI (Standard) Title: "MIDI for musicians" / by Craig Anderton. Publisher: New York : Amsco Publications, c1986. Subjects: MIDI (Standard) Computer sound processing. ISBN: 0-8256-1050-8 (pbk.) ISBN: 0-8256-2214-X (pbk. : cover) Title: "The MIDI manual" / David Miles Huber. Publisher: Carmel, Ind.
CHAPTER 5 APPENDIX 40