
User Guide


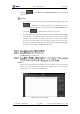

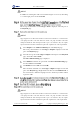


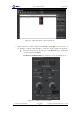
Table Of Contents
- 1. Security Precautions
- 2. Introduction
- 3. Hardware Installation
- 4. Electrical Specifications
- 5. Installation and Commissioning
- 5.1 Installing Software
- 5.2 Connecting Power Supply
- 5.3 Connecting Emergency Stop Switch
- 5.4 Connecting External Cables
- 5.5 System Commissioning
- 6. Operation
- 7. Maintenance

Dobot M1 User Guide 6 Operation
Issue V1.0.4 (2018-08-30) User Guide Copyright © Yuejiang Technology Co., Ltd
61
Select Output on the Add I/O Command pane of the Playback page.
The saved point information of which Type is Output is displayed on the left
pane of the Playback page.
Select the saved point of which Type is Output on the left pane of the Playback
page, and double-click Content.
The I/O Command Setting page is displayed.
Select OUT17 from the I/O drop-down list on the I/O Command Setting page,
and select 24V, then click Add.
Add OUT18, and select 0V, then click OK.
The relevant I/O information of which Type is Output is displayed on the left
pane of the Playback page. Right-click on the line and select RunSelected on
the context menu, and the object will be freed by Dobot M1.
NOTE
This topics only describes one trajectory as an example. You can implement multiple
trajectories. For details, see Step 1 to Step 10.
The Save Playback File page is displayed.
You can perform subsequent operations on the Playback page.
Select Enable Hand Hold Teach on the Playback page, the Add Motion Command
button will be unavailable. You can hold down the button under the Rear Arm to save
point after jogging Dobot M1 on the Operation Panel page or moving Dobot M1 by
hand.
Set the loop number of the saved point when implementing playback. The maximum value
is 9999. You can also select Infinite Loop to make Dobot M1 in the infinite loop state
when implementing playback according to the saved points list, as shown in Figure 6.8.
Figure 6.8 The loop number of the saved points list
Before saving a point, you can select the location of the added point on the right pane f
the Playback page, as shown in Figure 6.9