
User Guide
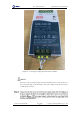
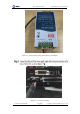
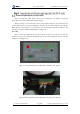

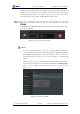
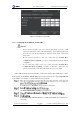
Table Of Contents
- 1. Security Precautions
- 2. Introduction
- 3. Hardware Installation
- 4. Electrical Specifications
- 5. Installation and Commissioning
- 5.1 Installing Software
- 5.2 Connecting Power Supply
- 5.3 Connecting Emergency Stop Switch
- 5.4 Connecting External Cables
- 5.5 System Commissioning
- 6. Operation
- 7. Maintenance

Dobot M1 User Guide 5 Installation and Commissioning
Issue V1.0.4 (2018-08-30) User Guide Copyright © Yuejiang Technology Co., Ltd
40
You have connected the PC to a router.
Procedure
NOTICE
This topic describes how to connect a PC to Dobot M1 using a router. It is applicable
to the scenario in which robotic arms are connected to the same PC. If only one
robotic arm is connected to the PC, you can connect robotic arm to the PC directly
using the network cable without router.
If you connect Dobot M1 to a PC over a network cable, the IP address of them must
be on the same network segment without conflict. You need to set IP address of
Dobot M1 or that of the PC after connecting Dobot M1 to the PC. For details, please
see 5.5.3 Setting IP Address.
5 seconds after startup, you can check the corresponding IP information from the
serial drop-down list on the upper left pane of the M1Studio page.
System Commissioning
The origin and other settings of Dobot M1 have been set by default, Dobot M1 can be directly
put in use. After Dobot M1 is installed and the cables connected are checked, the system
commissioning can be performed.
Debugging Dobot M1
Prerequisites
You have started M1Studio.
You have connected Dobot M1 to the PC over a serial cable.
(Optional) You have connected Dobot M1 to the PC over a network cable.
You have connected Dobot M1 and an emergency stop switch.
Procedure
When powering on, the yellow LED indicator in the base is steady on for about 15
seconds, and then blinks once. It is steady on again for about 5 seconds, which
indicates that Dobot M1 is being started.
After the yellow LED indicator in the base is off, the green one is steady on for about
5 seconds, and then is blinking, which indicates that Dobot M1 is in service.
NOTICE
When first powering on robotic arm, please check Z-axis or J3 value from M1Studio. If