
User's Manual


15
Setting Up the Printer
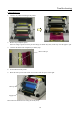
7. Set the take-up side core of the ribbon to the printer. Insert the protrusion of the core left side in the hole on
the printer, then set the right side to the holder of the same color (yellow).
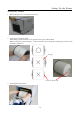
8. Set the supply side of the ribbon to the printer carefully to take out any slack. Insert the protrusion of the core
left side in the hole on the printer, then set the right side to the holder of the same color (white). Take up the
ribbon slack by rotating the ribbon on the supply side.
Ribbon winding direction
9. Close the front cover.
When the front cover is closed, the paper initialization process will be carried out (5 blank sheets will be fed
out).
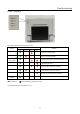
* In order to facilitate media color adjustment, media type recognition, and print quantity management,
an IC chip is built into the ink ribbon. Media without an IC chip, which has not been evaluated and
cleared, may not function properly. (If correct data cannot be read from the IC chip, an alarm will sound.
In this case, in order to protect the printer, it will lower the concentration for printing.)
* Please change the media as a set, because the IC chip for each ribbon has unique information.
Otherwise, errors could occur.
* If different width media (for example L-size and PC-size) are used on the same printer, problems with
the print quality could arise. Therefore, it is preferable not to mix the use of different width media on
one printer.
①
②
③
④