
User guide


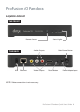

ProFusion iOPandoraQuickStartGuide 9
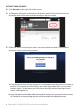
4 Oncetheactivationandsignupprocessiscomplete,clickContinue and you will
returntotheOnlineControlPanel.
5 Selectastationandplay.
9 Turnonyouramplierandincreasethevolumeinsmallincrementsuntilyou
reachyourdesiredlisteninglevel.
NOTE: Due to normal dierences between any previous music player and your new
ProFusion iO you may need to try dierent volume settings on your amplier.
ProFusion iO volume is set to 100% from the factory, so adjust your system
slowly and carefully.
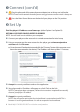
TEST CONNECTION
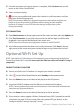
1 ClickAdministration inthetoprightcornerofthescreenandthenselecttheUpdatetab.
2 ClickTest Connection.ItmaytakeafewminutesforthefourdigitinstallPINtobe
displayed.Amessagewillbedisplayedifanyerrorsexist.
NOTE: If you receive an error message, please contact us at 800.929.5407.
3 YourEthernetconnectionhasbeensuccessfullyconnected.ClickZone in the top
rightcornerofthescreenandyouarereadytobeginusingPandoraforbusiness.
OptionalWi-FiSetUp
NOTE: Your ProFusion iO Pandora must be completely set up and connected to the Online
Control Panel before Wi-Fi setup. Do not remove the Ethernet cable until the Wi-Fi setup is
completed.
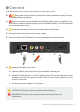
CONNECT USB WI-FI ADAPTOR
1 Ensure your ProFusion iOPandoraisinrangeofyourwirelessnetwork.
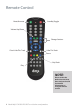
2 ClickontheOnlineControlPanelorpress Standbyontheremotecontrol.
3 Press the Powerbuttononthebackoftheplayertothe‘o’position.
4 InserttheUSBWi-FiadaptorintotheUSBportonthebackoftheplayer.
NOTE:For best performance, make sure the antenna is clear of obstacles and three feet
away from any large metal objects.
5 Press the Powerbuttononthebackoftheplayertothe‘on’position.
6 IfyourwirelessroutersupportsWirelessProtectedSetup(WPS),proceedtospecic
instructionsonpage10.IfyourrouterdoesnotsupportWPS,godirectlytothe
“congurewirelesssettingsmanually”section