Digital Audio Satellite Receiver DR500 User Guide
NOTICE This publication and its contents are proprietary to DMX and are intended solely for the contractual use of its customers for no other purpose than to operate the equipment described herein. This publication and its contents shall not be used or distributed for any other purpose and/or otherwise communicated, disclosed, or reproduced, in any way whatsoever, without the prior written consent of DMX.
CAUTION RISK OF ELECTRIC SHOCK DO NOT OPEN CAUTION: To Reduce The Risk Of Electric Shock, Do Not Remove Cover (Or Back). No User-Serviceable Parts Inside. Refer Servicing To Qualified Service Personnel. Précautions: Pour éviter toute décharge électrique, ne pas enlever le couvercle. Les pieces a l’interieur ne sont pas reparables. Faire appel uniquement á un personnel qualifié.
Table of Contents Introduction Important Information .............................................................................................................. ix Getting Started ......................................................................................................................... ix Section 1: System Overview and Component Descriptions System Features .......................................................................................................................
Section 3: Getting Started and Basic Operations Section Topics............................................................................................................................1 Starting up the DR500................................................................................................................3 Turning the DR500 ON and OFF...............................................................................................4 Basic Operational Information ..................................
Checking the DR500’s ID Number ..........................................................................11 Checking the DR500’s Status...................................................................................12 Section 5: Maintenance and Troubleshooting Maintenance ...............................................................................................................................1 Cleaning the DR500 Receiver...............................................................................
Welcome to the world of premier digital audio service provided by DMX. This guide is your handbook for using the DR500 Digital Audio Satellite Receiver and the DMR-22 and DMR-28 DMX/DJ remote control units. The sections in this guide provide step-by-step instructions for a variety of tasks and activities, including DR500 system connections, channel scanning and selection, setting forced tune times and dynamic ranges, and instantaneous viewing of programming information.
If you are an experienced user familiar with the DR500 and its remote control, you may wish to review the following sections before unpacking or operating this product: • Section 1 for an overview of the DMX/DBS system and equipment • Section 3 for DR500 start-up and to review basic operations • Section 4 for advanced operations • Appendix E to use the DR500 Reference Sheet • Other sections as needed DR500 (E-8) Rev.
DR500 Reference DR500 General Functions and Commands Channel Recall Press LAST. Scan Press SCAN. Select Enter the channel number using the NUMERIC keys. OR Use the TUNEÙ or TUNEÚ keys. Locally Managed Channels Add Tune to the desired channel. Press PRESET 940. Delete Tune to the desired channel. Press PRESET 950. Clock Check Press PRESET 100. Dynamic Range Check Tune to the desired channel. Press PRESET 110. Clear Press PRESET 510. Clears all dynamic range settings from memory.
DR500 Reference Volume Set Mute Adjust the volume using the controls on your stereo system. Press MUTE. To return to normal volume, press MUTE again. DMX/DJ View Functions and Commands Audio Info. Press Press DR500 Status Press Press Time Press Unit ID Press VIEW. MORE to see additional information. PRESET 150 and press VIEW. MORE to see additional information. PRESET 100 and press VIEW. PRESET 190 and press VIEW.
Thank you for subscribing to Digital Music Express! This section describes the Direct Broadcast Satellite (DBS) receiver and equipment that are used to deliver the best in CD-quality music. The equipment includes: • Satellite dish receiving antenna, low noise block (LNB) amplifier, and connecting cable • Digital Audio Satellite Receiver, Model DR500 • Remote control device, Model DMR-22 or Model DMR-28 DMX/DJ DR500 (E-11) Rev.
System Features The DR500 DBS Satellite Receiver is a digital audio stereo decoder which easily integrates with most stereo or monaural amplifier systems.
DBS System Overview Although the use of satellites, satellite dishes, and receivers may seem complex, the DMX/DBS service uses a highly sophisticated system that makes channel selection and local music programming easier and simpler than using a VCR. It also allows DMX to deliver music of unprecedented linearity, sonic precision, and exceptional fidelity.
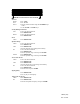
Once the DMX music programming is received at your location, your DR500 Receiver and associated audio components take over. • COMSTREAM DR200 Digital Audio Receiver DIGITAL AUDIO DR500 Digital Audio Satellite Receiver receives and decodes the digital audio programming information and sends it to your stereo amplifier system Additional DR500 receivers provide you with additional flexibility to create tailored music programs for multiple business environments that you can vary by the hour.
DR500 System Components The DR500 Digital Audio Satellite Receiver is a digital audio stereo decoder that easily integrates with most stereo or monaural amplifier systems. DR500 Digital Audio Satellite Receiver The DR500 is the master receiver that connects to the satellite dish and your stereo or monaural amplifier system. DR500 Front Panel The front panel of the DR500 is used to turn the DR500 on and off and manually select music channels.
DR500 Back Panel The back panel of the DR500 has a variety of connectors that are used to link the satellite dish to the DR500 and your audio system to the DR500. The back panel consists of: • Power Input attaches the DR500 to a 120 VAC wall mount supply • RF IN connector attaches the DR500 Receiver to your local satellite dish • Mono Out connector attaches the DR500 to a monaural receiver or amplifier • Stereo Out connectors attaches the DR500 to a stereo receiver or amplifier.
DMR Remote Control Units To select music channels remotely, you can use either the DMR-22 or DMR-28 DMX/DJ remote control units.
DMR-22 Remote Control The DMR-22 remote control unit is described below.
DMR-28 DMX/DJ Remote Control In addition to the basic features, the DMX/DJ provides instant viewing of the following information for each music selection: • Title • Album • Composer • Artist • Record label • Album ID number The DMX/DJ also displays DR500 operation information, help messages, and low battery indication. The DMX/DJ remote control is described below.
Additional DR500 Receivers Additional DR500 receivers can be added to your system at any time. Each receiver allows you to select and play one different DMX music channel on a separate audio system. This provides additional stereo music channels to cover other locations or zones. Two or more DR500 Receivers may be connected to one antenna to provide different music channels via separate audio systems.
This section helps you set up and connect your DR500 system.
DR500 Shipment Checklist The DR500 and its components are shipped in custom-designed, reinforced cardboard cartons. To ensure that the system is protected during opening, use a cutting tool that extends less than ½ inch into the carton. Keep the carton and original packaging to return a unit for repair, in the unlikely event of a failure.
Choosing a Good Location There are a few items to consider when selecting a location for your DR500 Receiver. Observe the following Safety Precautions: Safety Precautions Carefully read and follow all safety, use, and operating instructions before operating the DR500. Heed all warnings and cautions contained in this User Guide. Retain these safety, use, and operating instructions for future reference.
Connecting the DR500 to Your Audio System If your DR500 system has not been professionally installed, if you have disconnected your DR500 Receiver, or if you are adding a component, refer to the following steps and diagrams to help you connect your system. If you have questions or need assistance connecting any components to your DR500, please contact your DMX MUSIC Affiliate Sales Support team. To connect multiple DR500 Receivers to one antenna, refer to Appendix D.
Connecting the DR500 to Your Stereo System To connect the DR500 to a stereo system, refer to the figure below and the following instructions. 1. Make sure the stereo amplifier is OFF and the volume is turned completely down. 2. Connect the RCA stereo cables to the L(eft) and R(ight) STEREO jacks on the back of the DR500. 3. Connect the other end of the RCA cables to any high-level input on your stereo equipment EXCEPT the phonograph input. Remember to match left and right channels.
Connecting the DR500 to Your Monaural System To connect the DR500 to a monaural system, refer to the figure below and the following instructions. 1. Make sure the monaural amplifier is OFF and the volume is turned completely down. 2. Connect an RCA cable to the MONO jack on the back of the DR500. 3. Connect the other end of the RCA cable to any available input on the monaural equipment EXCEPT the phonograph input. Do not connect the RCA cables from the DR500 to the PHONO input of audio equipment.
Antenna Installation and Alignment It is recommended that the Satellite dish antenna be installed by your local DMX Affiliate. It is imperative that the dish be securely and safely mounted, and pointed accurately at the Satellite. Brief instructions are presented here for completeness. Satellite Dish Installer: Ground the RF input cable to the building grounding system as close as possible to the point of building entry. Refer to the National Electric Code (NEC) Article 820-40.
Connecting Multiple Receivers to One Antenna Multiple DR500 Receivers can be connected to one antenna. However, to avoid damage to either the antenna LNB and DR500 Receiver, the following items must be used: • Correct splitter(s) • Proper line amplifiers Line amplifiers may be required when using a signal splitter and/or when long coaxial cable runs are required from antenna to receiver.
The DR500 advanced features give you the power and flexibility to create tailored musical programs.
Forced Tune Events Forced Tune Events allow you to easily specify at what hour a particular channel will be played. Although forced tune events sound simple, they’re actually a powerful function that provides you with a wide range of musical programming flexibility and creativity, along with local manageability. Setting Forced Tune Events The DR500 allows you to program and store up to six forced tune events per day.
If the current channel has no programmed forced tune events, the front panel displays three flashing dashes. If the current channel has any programmed forced tune events, the time of the event (in 24-hour time) displays on the front panel as a flashing two-digit number. If more than one event is programmed for the channel, the front panel will scroll through all programmed events, displaying each for five seconds.
Local Channel Management The DR500 allows you to locally manage the channels authorized to you through DMX/DBS National Authorization Control Center. From your location, you can temporarily delete an authorized channel so that it cannot be played for a specific time in your location. Then, when you decide the timing is right, you can add the authorized channel into your format again. Deleting Authorized Channels The DR500 gives you local control to delete channels from your list of authorized channels.
Setting the Dynamic Range The DR500 Receiver is shipped with all 120 channels set at full CD-quality (90 dB dynamic range). To meet your individual music needs, you have the capability of setting a different dynamic range for up to 10 channels, or setting all channels to a global dynamic range default. Changing the dynamic range setting may provide a more uniform volume, or loudness, throughout your musical program. To set the dynamic range for a channel: 1. 2. Tune to the desired channel.
Checking Dynamic Range Settings To check the dynamic range for a specific channel: 1. Tune to the desired channel. 2. Press: PRESET 1 1 0 The front panel flashes the current dynamic range code (00-03) for this channel. If a specific dynamic range has not been set, the front panel displays a flashing three-digit number representing the global default for that channel. Clearing the Dynamic Range The DR500 allows you to program and store up to 10 channels with specific dynamic range settings.
Setting the Transponder Frequency The DR500 is shipped with the transponder frequency saved in memory. It is highly unlikely that this frequency will have to be changed and should only be done upon instructions from your DMX affiliate. In the event that a new transponder frequency must be entered, follow these procedures: 1. Press: PRESET 9 2 0 The transponder frequency in MHz displays as a flashing three-digit code on the front panel.
Checking the Transponder Frequency To check the current transponder frequency, press: PRESET 1 2 0 The front panel flashes the current Transponder Frequency MHz code. Checking Signal Quality The quality of the incoming signal can be checked using the following procedures: 1. Ensure that the DR500 has acquired the signal the sync indicator on the front panel will be lit. 2.
The following table shows the DR500 codes and their corresponding Eb/No levels. A code of -00, with a corresponding Eb/No level of 17 dB or greater, is the highest signal quality. A code of -68, with corresponding Eb/No levels of 5 dB or lower, is a very weak signal strength.
Front Panel Lockout Setting the Front Panel Lockout The DR500 allows you to inhibit, or lockout, any command entries. To do this press: PRESET 9 7 0 The front panel displays LOC indicating that the front panel has been locked. When the front panel has been locked, both the front panel and the remote control will be non-functional. The only command that will be accepted by the DR500 is the command to clear the front panel lockout.
Checking the DR500’s Status You can periodically check the status of the DR500 using the DMX/DJ. 1. To check the status, press: PRESET 1 5 0 VIEW The DMX/DJ displays a variety of status messages. 2. To move through the screens of information, press MORE on the DMX/DJ. MORE The DR500 status messages are presented in the following tables. DMX/DJ General Status Messages Status Message Description SIG STRENGTH: ## Displays the Eb/No signal strength.
Front Panel Status Code DMX/DJ Status Message DR500 Status Individual Error Messages 000 System OK DR500 is working properly 001 System PLL Phased locked loop error 002 System LNB Power to the low noise block (LNB) is shorted 004 System NV Nonvolatile memory errors Combined Error Messages 003 System PLL System LNB Phased locked loop error and power to the low noise block (LNB) is shorted 005 System PLL System NV Phased locked loop error and nonvolatile memory errors 006 System LNB Syst
Troubleshooting Tips The troubleshooting tips found on the following pages were designed to help you diagnose and correct minor problems in the unlikely event that you experience difficulties with your DBS DR500 system. Possible problems, arranged alphabetically, are followed by solutions that should help you to troubleshoot any DBS DR500 difficulties.
Problem No sound Possible Causes Solutions The stereo is turned off or the volume is turned Turn on the stereo and adjust the volume. down. The DR500 Receiver volume is turned down. Turn the volume up on the DR500 Receiver. The Mute function is selected. To return to normal volume, press MUTE on your remote control. You are not authorized to receive the current channel. Tune to an authorized channel (refer to Section 3). Contact your DMX affiliate if you wish to receive the music channel.
Problem Remote control operates erratically Possible Causes The remote control is exposed to direct, bright sunlight or florescent lighting. This exposure may interfere with the remote control signal and not allow the remote and DR500 to communicate. Protect the remote control from the direct light exposure. Remote control is broken. Check that the remote control is functioning properly by performing the procedure for viewing the time on the DMX/DJ.
Audio Specifications* Compression: Dolby Digital Sampling Rate: 44.1 kHz Frequency Response: 20.0 Hz to 20.0 kHz ±1.0 dB Dynamic Range: >90 dB Harmonic Distortion: < 0.015% typical, 0.05% maximum Output Level 0-2 V rms (maximum) Tuner Specifications* Input Frequency: 950 to 1450 MHz Input Dynamic Range: -20 dBm to -65 dBm LNB Power: 250 milliamps max 18 VDC ±10% LNB Frequency Drift: ±5 MHz Audio Threshold: 5.
Warranty Statement DMX warrants that its products are free from defects in material and workmanship at the time of shipment and that they conform to applicable specifications. In no event will DMX be liable for consequential misuse or damages. The DMX DR500 is warranted against any above-mentioned defects that appear within one year of shipping date.
Return Procedures DMX Affiliates Follow these return procedures if you are a DMX affiliate who has purchased the DR500 receiver in question and determined that the problem is specifically DR500-equipment related. If it is necessary to return a product for repair, the following procedures must be followed: 1. Contact Affiliate Sales Equipment Support team at (206) 329-1401 and ask to speak with Andrew McCullough or JJ Williams. 2.
Appendix C DR501 User Manual Addendum We’ve added a powerful, new message marketing tool in the DR501 receiver that helps you maximize the moment of contact with customers in your location. Message marketing educates customers on product and service offerings to influence increased purchases, to provide quality customer service, and to improve your business’ communications with customers. The DR501 receiver delivers a complete music and marketing system for your business success.