
Installation Instructions

Installing DMX AG™
DMX AG™ Foundation Guide: Version 4.3
Updated: September 2, 2014 (clarifications only denoted by ᵠ)
13
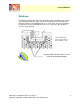
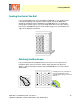
3.
Cut the membrane to fit as tightly as possible around the service.
4.
Caulk around the service again.
5.
(Now there will be caulking around the service both under the DMX AG™ and
on top of it.)
6.
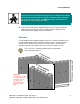
Start the next piece of membrane 6 inches (15 cm) BEFORE the service.
(The idea is to have a 12-inch (30 cm) overlap at the service.)
Center of Service
6” (15 cm)
Start the DMX AG™ 6 inches (15 cm)
before the pipe.
Caulk around
service and at cut
line*
12” (30 cm) overlap in the DMX AG™
Cut here to allow
fitting the DMX
AG™ around the
pipe.
Insert DMX
Washers™ every 6*
inches (15 cm)
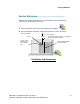
7.
Cut the top layer of membrane to fit as tightly as possible around the service.
8.
Caulk around the service again.
9.
(Now there will be caulking under and on top of each layer for good
protection.)
10. Insert DMX Washers™ along the overlapped membrane every 6 inches
(15cm)
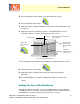
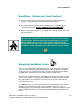
Sealing the Top of the Membrane
If the flat tab has been cut away, such as on a sloped grade or around windows,
use DMX FlexTrim™ to seal this area. Set the DMX FlexTrim™ against the top of
the membrane as shown below and nail every 6 inches* (15 cm).