
Installation Guide


1102 WIRELESS UNIVERSAL
TRANSMITTER
Installation Guide
DESCRIPTION
The 1102Universal Transmitter
provides an onboard terminal block
as a single input, typically used with
external door or window contacts.
The contact operates as a single
zone.
The 1102features the Disarm/
Disable operation to save battery
life. When this option is enabled,
Zone Tripped messages are
disabled when the system is
disarmed.
Using the onboard LED, the
transmitter provides built‑in survey
capability to allow for single‑person
installations, eliminating the
requirement for an external survey
kit. For added security, an internal
case tamper switch is provided.
Compatibility
All DMP XT Series and XR Series and
all 1100Series Wireless Receivers.
What is Included?
• One 1102Transmitter
• One 3V lithium CR123A battery
• Hardware pack
1
PROGRAM THE PANEL
Refer to the panel programming guide as needed. After completing
each of the following steps, press CMD to advance to the next
prompt.
1. At a keypad, enter 6653 (PROG) to access the Programmer
Menu.
2. At ZONE INFORMATION, enter the wireless ZONE NO.
3. At *UNUSED*, enter the zone name.
4. At ZONE TYPE, press any select key or area and select the
zone type.
5. At the NEXT ZONE prompt, select NO.
6. When WIRELESS? displays, select YES.
7. At SERIAL#, enter the eight‑digit device serial number.
8. At CONTACT, select EXTERNAL.
9. At SUPRVSN TIME, enter a supervision time. Default is 240.
10. At DISARM DISABLE, select NO or YES.
11. At the NEXT ZONE prompt, select YES if you are finished
programming the zone. Select NO if you would like to access
additional programming options.
12. To save panel programming, go to STOP and press CMD.
INSTALL THE BATTERY
2
Use a 3.0V lithium battery, a DMP Model CR123A battery, or an
equivalent model from Sony or Murata. For listed installations,
use either an Energizer® 123battery or a CR123A battery
manufactured by Panasonic or Tekcell.
1. Push the button on the end of the transmitterand separate
the two halves.
2. Observing polarity, place the battery in the holder and
press it into place. Refer to Figure 2during installation.
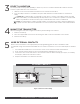
Figure 1: 1102 Universal Transmitter
Figure 2: 1102 Interior
Mounting
Hole
Red Survey
LED
External
Contact
Terminal Block
Battery
Holder