
Inc. Home Security System User Manual


Digital Monitoring Products SCS-1R Installation Guide
8
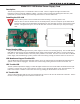
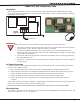
InstallatIon
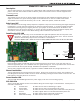
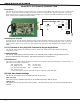
Before changing the the dip switch settings on the SCS-150 board, rst power down the SCS-1R receiver and
remove the processor board. After setting the dip switches, plug the SCS-150 board back into the receiver
and power up.
Reset Programming To Factory Defaults
Return the receiver programming in EEPROM to factory defaults using the procedure below.
Power down the SCS-1R and remove the SCS-150 board.•
Set the dip switches to 1010. •
Replace the SCS-150 board and power up. •
Wait until after the VERSION/DATE/CODE screen is displayed. •
Reset the dip switches to 0000 and replace the SCS-150 board. •
Clearing Receiver Events
The SCS-150 stores up to 5000 events in battery-backed RAM.
Clear the receiver events stored in RAM using the procedure below.
Set the dip switches to 1111. •
Replace the SCS-150 board and power up. •
Wait until after the VERSION/DATE/CODE screen is displayed. •
Reset the dip switches to 0000 and replace the SCS-150 board.•
Software Update Using the SD Card
The SD (Secure Digital) card slot may be used for software updates.
Before updating, make sure the SD Card is formatted for FAT32.
Insert the SD Card into the card reader attached to the computer.•
Go to My Computer and right-click on the drive that has the card reader attached.•
Select Properties to display the Removable Disk Properties.•
If the File System displays FAT32, then you are ready to load the software onto the SD Card.•
If the File System does not show FAT32 as the File System, the SD Card needs to be formatted.•
To format the SD card:
Go to My Computer and right-click on the drive that has the card reader attached.•
Select Format to open up the Format Removable Disk window.•
Select FAT32 in the File system drop-down menu and select • Start.
To format the disk, click • OK on the pop-up Warning box.
To load the software onto the SD Card:
Locate the software download on the Dealer Direct website. Click on title to download.•
Select Save in the popup window. Save the zip le to your computer.•
Extract the zip le onto the SD Card. There should be two les extracted on the SD card: SCS150a.bin and •
SCS150b.bin. Note: These two les need to be placed on the root directory of the SD card, not inside a folder.
To update the SCS-150:
Set the S2 dip switches on the SCS-150 to 1101 (ON ON OFF ON). •
Insert a FAT32 formatted SD card with the new software into the SD card slot on the SCS-150 processor board.•
Reconnect the keypad to the J15 header.•
Insert the SCS-150 processor board into the SCS-1R and power up. Observe the display for programming status.•
When nished with the update the SCS-1R display instructs you to remove the SD Card.•
Remove the SD card from the SCS-150 and remove the SCS-150 board.•
Reset the dip switches to 0000 (OFF OFF OFF OFF) and replace the SCS-150 board and cables. •