
Operating instructions


9
GRAIN SPREADER INSTALLATION
1. Adjust hanger extensions to fit
roof opening and install the
power spread unit.
2. Use the 9/32" hole at the end of
each hanger extension and bolt
hanger extensions to hatch
collar.
3. Then tighten all bolts holding
hanger extensions.
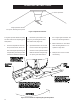
4. Once unit is installed, use a
carpenter's level across the top
of the spreader cone to make
sure it is level in all directions
(Figure 1).
5. If required, add spacer washers
between hanger brackets and
hanger extensions to level unit
(Figure 2).
Figure 1: Mount spreader and check with level.
Mount unit level inside the bin
Carpenter's level
Grain spreader
Use washers
to level unit
(if required)
Hanger extension
(SPD-2010)
Hanger extension
(SPD-2008)
Figure 2: Use washers to level unit.
The Scattergrain 1/2 HP motor is pro-
tected with an internal automatic re-
set overload. Before servicing, all
power to the unit must be discon-
nected and locked out to avoid a
possible reset/restart and serious
injury.
Before connecting and applying
power, rotate the spreader blade by
hand to be certain it rotates freely
without obstruction. The motor turns
the spreader blade counter-clockwise
as viewed from above the unit. The
power spread unit requires 115
volt power supply. The minimum wire
size is 14 gauge for runs up to 200
feet. It is advisable to provide addi-
tional protection such as 15 amp
slow blow fuses or 20 amp circuit
breaker. Consult a licensed electri-
cian for wire size on longer runs.
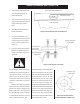
Regardless of grain type and bin size,
the grain flow must be directly down
(vertical) and centered (horizontal)
within the spreader cone (Figure 3).
This has to be done to prevent high
and low grain surface areas from one
side of the bin to the other.
Spreader cone
(SPD-2007)
Grain flow
Figure 3: Grain flow must be
centered within the spreader cone.