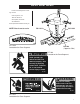
Scattergrain Grain Spreader Installation & Operating Instructions MODEL # FFD-120-WH Owner's Manual MANUAL # PNEG-258 PNEG-258 1
POWER SPREADER OPERATING INSTRUCTIONS TABLE OF CONTENTS Warranty ....................................................................................................................... 4 Roof Warning, Operation & Safety ............................................................................... 5 Safety Alert Decals ...................................................................................................... 6 Grain Spreader Assembly Instructions ...............................................
WARRANTY THE GSI GROUP, INC. ("GSI") WARRANTS ALL PRODUCTS MANUFACTURED BY GSI TO BE FREE OF DEFECTS IN MATERIAL AND WORKMANSHIP UNDER NORMAL USAGE AND CONDITIONS FOR A PERIOD OF 12 MONTHS AFTER RETAIL SALE TO THE ORIGINAL END USER OF SUCH PRODUCTS. GSI'S ONLY OBLIGATION IS, AND PURCHASER'S SOLE REMEDY SHALL BE FOR GSI, TO REPAIR OR REPLACE, AT GSI'S OPTION AND EXPENSE, PRODUCTS THAT, IN GSI'S SOLE JUDGMENT, CONTAIN A MATERIAL DEFECT DUE TO MATERIALS OR WORKMANSHIP.
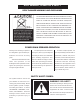
ROOF WARNING, OPERATION & SAFETY ROOF DAMAGE WARNING AND DISCLAIMER GSI DOES NOT WARRANT ANY ROOF DAMAGE CAUSED BY EXCESSIVE VACUUM OR INTERNAL PRESSURE FROM FANS OR OTHER AIR MOVING SYSTEMS. ADEQUATE VENTILATION AND/OR "MAKEUP AIR" DEVICES SHOULD BE PROVIDED FOR ALL POWERED AIR HANDLING SYSTEMS. GSI DOES NOT RECOMMEND THE USE OF DOWNWARD FLOW SYSTEMS (SUCTION). SEVERE ROOF DAMAGE CAN RESULT FROM ANY BLOCKAGE OF AIR PASSAGES.
SAFETY ALERT DECALS Grain Systems, Inc. recommends contacting your local power company, and having a representative survey your installation so the wiring is compatible with their system, and adequate power is supplied to your unit. Safety decals should be read and understood by all people in the grain handling area. The bottom right decal (DC-552) should be present on the inside bin door cover of the two ring door, 24" porthole door cover and the roof manway cover.
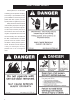
SAFETY ALERT DECALS If a decal is damaged or is missing contact: Grain Systems, Inc. 1004 E. Illinois St. Assumption, IL 62510 217-226-4421 A free replacement will be sent to you. NOTE: Decals not to scale. DC-1612 DC-1639 Located on the Cone Segment. DC-1639 DC-368 (Opposite Side) DC-368 Located on the Cone Segment. Grain spreader can unhook and fall if not attached properly. Bolt securely to peak ring center collar. Failure to do so can result in serious injury or death.
GRAIN SPREADER ASSEMBLY INSTRUCTIONS 1. Carefully unpack the unit and DIVERTER SEGMENTS CHART inspect for shipping damage. 2. Check tightness of all bolts in the cone and blade assemblies. 3. Select the proper number of diverter segments required (See Diverter Segments chart). Note: The various types of grain, moisture content, bin diameter, and capacity of fill auger are all conditions that change the evenness of spread. Some experimentation is needed to attain the proper spread pattern.
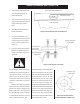
GRAIN SPREADER INSTALLATION Mount unit level inside the bin 1. Adjust hanger extensions to fit roof opening and install the power spread unit. Carpenter's level 2. Use the 9/32" hole at the end of each hanger extension and bolt Grain spreader hanger extensions to hatch collar. 3. Then tighten all bolts holding Figure 1: Mount spreader and check with level. hanger extensions. 4.
OPERATING INSTRUCTIONS Grain Spreader Tilt Single spreader diverter end up for desired grain spread. Figure 4: Adjustment of the tilt. The grain spreader blade assembly the blade up and down. This has four features for adjusting grain may vary according to bin diam- flow pattern. eter and fill rate (Figure 4). ther. Angled grain diverters will reduce the throwing distance. 3. Blade extension is used when 1. Tilt is the adjustment of the en- 2.
OPERATING INSTRUCTIONS ADJUSTMENT FOR BIN FILL LARGE BIN 36" DIA. AND GREATER SMALL BIN 24" DIA. AND LESS REF # PART TYPE OPERATION/PROCEDURE OPERATION/PROCEDURE 1 Spreader Blade Tilt Decrease (flatten)/loosen Ubolts and pivot the blade to horizontal. Always refer to single diverter side as gauge. Increase/loosen U-bolts and pivot the blade (single diverter side) upward. 2 Spreader Diverter Single Side Decrease (center filling)/ loosen bolts and rotate diverter clockwise.
OPERATING INSTRUCTIONS MAINTENANCE For normal operation, annually not be more than 1/4" below the vent of rotation. If power does not exist, relubricate both motor bearings with plug (Figure 6). It may be neces-sary check for blown fuse or flipped cir- approximately ten drops of 5W-30 to insert a wire through vent plug hole cuit breaker. oil. The gears of the gear box as- to find the grease level.
TROUBLESHOOTING GUIDE CORRECT SPREADING PATTERN Grain is slightly depressed in the center, grain flow is centered and the spreader is level. Trouble Probable Cause Large doughnut shaped ring caused by grain hitting high on bin wall. Tilt blade downward, decrease bite. Remove blade extension. Spreader blade too flat. Grain is high in center of bin, small doughnut. Flatten blade, increase bite, decrease grain flow to spreader. Add blade extension. Spreader blade too steep.
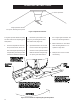
POWER SPREAD PARTS ASSEMBLY 002-1337-1, 1/2HP MOTOR S-7721, BOLT HHCS 5/18-18 X 1 1/4 S-1147, WASHER LOCK SPLIT 5/16 ZN S-277, BOLT HHBIN 5/16-18 X 1 1/4 S-2071, BOLT HHCS 3/8-16 X 1 1/4 S-248, 3/8 USS WASHER 321-1001-7, GEARBOX GASKET SPD-2186, GSI GEARBOX PINION 017-1535-8, TOLEDO GEARBOX PINION TIGHTEN SET SCREWS AGAINST FLAT ON MOTOR SHAFT SPD-2140, GSI GEARBOX 308-1007-1, TOLEDO GEARBOX SPD-2149, HANGER BRACKET S-1054, LOCK WASHER, 3/8 S-6606, BOLT FLNGS 5/16-18 X 3/4 ZN GR5 S-456, NUT 3/8-16 S-3
G R A I N 1004 E. Illinois St.