
User Manual


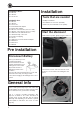


Place the new DLS Cruise driver in the hole for
the original speaker. Use the OEM screws to
safely mount the driver.
INFO: For those models that have different
mounting than described above, we have
included a rivet tool and 8 blind rivets.
Plug the speaker wire harness into the jack on the
new DLS speaker.
Mount the speaker grill by placing it over the
driver and softly giving it a push by the hand, so
that the grill snaps back in place.
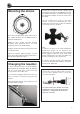
Changing the tweeters
In most cases the tweeter is located behind the
A-pillar. Remove the A-pillar simply by pulling it
out. You can use PRY tools. In some cases you
may loosen the door rubber seal.
If the vehicle is equipped with a front curtain, you
have to loosen the screws at the top by the front
window.
When the A-pillar and top of the curtain is loosen,
be gentle when moving it.
Mounting the drivers
Unscrew the old tweeter from the bracket and
un-plug the jack. Remove the OEM tweeter from
the bracket and replace it with the DLS tweeter.
The flat bottom adapter can also be used for the
assembly.
Use the four-leaf clover foam to secure the
tweeter on the back of the A-pillar. For some
models, the four-leaf clover needs to be adapted.
Use a sharp scissor to modify it.
Hint:
1) If there is no place for the tweeter behind the
A-pillar. The tweeter can be placed on the
dashboard, near the A-pillar (Use the included
bottom adapter). In this case, fix the tweeter with
double adhesive tape or hot glue. Just make sure
that the curtain has room to move freely
2) If there is a speaker location in the dashboard,
you can use the flat-bottom adapter to mount the
tweeter in the dashboard.
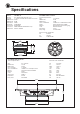
Connect the crossover with the PnP connector.
Use the other adhesive foam to secure the
crossover and cables.
The yellow cable loop is tweeter level select,
enabling fine tuning of the high frequencies
Closed loop = -4dB (Shown in the picture)
Open loop = Normal
4