
User manual

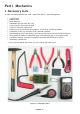


ASURO - 7
-
2. Mechanical Preparations
Completeness of the kit must be checked rst. A parts list in appendix A has been provided
as a checklist. Before doing any electronic artwork, we must however do some mechanical
preparations. So let’s start working.
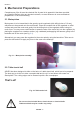
2.1. Motorpinion
Motor power is to be transmitted to the gear by small cogwheels (with drilling holes of 1.9 mm),
which have to be pressed onto the motor axles. Place the rounded side of the cogwheel on a at
surface and press the motor axle gently into the drilling hole of the cogwheel without using too
much force. You may use a small hammer to press the axle of the motor fully into the cogwheel, by
placing the cogwheel on a weaker surface ( eg. cardboard) and applying the hammer gently to the
backside axle of the motor (see g.
2.1).
Alternatively you may press the cogwheel to the motor axle by using the benchvice. Take care to
press the axle and not to apply any force to the case or the bearings.
Fig. 2.1.: Motorpinion assembly
2.2. Table-tennis ball
ASURO has been designed to slide on the halve of a table-tennis ball, which has to be prepared.
The best way to do this is to take a complete ball and to cut it in two halves with a saw or a
Stanleyknife. The cutting edges can be cleaned up with a le or sandpaper.
That’s all!
Fig. 2.2. Table-tennis ball
Do not use electrical aids like an electrical saw or electrical knife.
Table-tennis balls may be set a re very easily.
Mechanics