
User manual


ASURO - 22
-
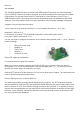
5.2. USB-Infrared-Tranceiver
This operation is only for the USDB IR-Transceiver.
WARNING! The USB IR-Transceiver does not have a housing and therefore it is very sensitive
for electrostatic discharge. Before you use it, discharge your body by touching a metal computer
housing or other earth point. An other option is to build the USB IR-Transceiver in a transparant
housing for further protection.
5.2.1 Windows
The following operational check is limited to the USB Infrared-Tranceiver.
First of all the IR-Transceiver must be checked, as it will be needed for the next step: the selftest
of the system. For this test connect the IR-Transceiver to a free USB port of your PC by a
USB extension cable.
Now a message will apear “NEW HARWARE WAS FOUND”;
AREXX ASURO USB-IR-TRANSCEIVER
Now you can install the USB driver from the ASURO CD. When the driver is not detected
automatically you can select it from the CD manualy from CD\windows\USB Driver, (Administrator
rigths are necesary for this operation). When the driver is installed you can approach the USB
transceiver like a normal serial port.
After starting the Hyperterminal program you will be asked to de ne a name for the connection.
You may choose ASURO USB or any other symbol. In the next window you choose “connect by”
and the COM-interface by which the transceiver has been connected in the previous step.
Then press “OK” and choose the following settings:
• Bits pro Second: 2400
• Databits: 8
• Parity: none
• Stopbits: 1
• Flowcontrol: none
Press “OK” again for con rmation
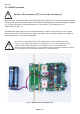
Hold the IR-Transceiver at the distance of 10 cm over a white sheet of paper. The component side
must be directed towards the paper sheet.
Press a few keys at your computer terminal.
The terminal programm normally should display the key-symbols. The IR-Transceiver transmits
the key-symbols by IR-Diode (D5), the transmitted signal re ects at the paper surface and is send
back to receiver-IC (IC2), from which it is being returned to the computer. If no symbols or wrong
symbols are being displayed you may carefully turn the trimmer between its extreme left and right
positions. Use a miniature screwdriver and strike a few keys at each position of the trimmer until
the correct symbols are displayed.
If you do not have any success in this procedure, we do have a problem with the circuit, which
should be solved (see paragraph 6.1).
Electronics