
User manual


ASURO - 12
-
Bad soldering contacts may be recognized by ball-shaped slugs of solder around a pad or a mat
surface (for lead-less solder the surface will even be extremely mat) and must be re-soldered.
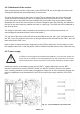
To insert sockets and other parts for horizontal mounting on the PCB you may use the following
trick: First of all you just solder one leg of the part. Then you press the part down slightly, while
heating the same soldering pad (Caution: the part may become very hot). The part will now
settle to the surface of the board and remain in a xed position. You now solder all other contacts.
Finally re-solder the rst contact again with some extra solder.
After soldering a part the outstanding wires of the legs are to be cut off with a pair of pincers. Cut
the legs off closely to the PCB, while taking care not to pull or push the legs.
Be careful for sharp-edged pieces of wire ying around while cutting the legs.
Vertically mounted parts of course are not allowed to make contact to neighbors and
must be bent apart if they have been placed too close.
3.4 De-soldering
When, ocassionally, a part has landed on a spot where it does not belong then you have to
remove such a part. The ASURO - as you could expect - has a double sided PCB with trough
metalized holes, this makes the removal of the parts not very easy.
The following may be some help for you;
Add some ex to the soldering of the part which must be removed (a simple way of doing this is to
add some extra solder). When all the solderings of the part are heated try to remove the part with
a plier from the PCB. At the end you can easily remove the solder with desoldering wick.
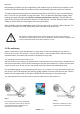
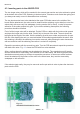
Put the soldering wick on the solder(pad) [see, step 1 & 2, below]. You may also do this when the
part is still in the PCB! Heat the wick and the solder together. At some point the wick will suck the
solder into the copper braid. At this point, REMOVE the soldering iron and wick quickly.
You may repeat this on the other side of the hole when there is still solder in it.
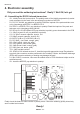
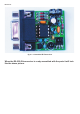
Electronics
Step 1
Put the copper braid over the solder(pad)
of the component which must be removed.
Heat the braid and the solder(pad), the
braid will now suck the solder.
Step 2
Remove the soldering iron and
copper braid at the same time.