User Manual v1.6 2023.
Searching for Keywords Search for keywords such as “battery” and “install” to find a topic. If you are using Adobe Acrobat Reader to read this document, press Ctrl+F on Windows or Command+F on Mac to begin a search. Navigating to a Topic View a complete list of topics in the table of contents. Click on a topic to navigate to that section. Printing this Document This document supports high resolution printing. Revision Log Version Date Revisions v1.2 2022.
Using this manual Legend Warning Important Hints and Tips Reference Read Before the First Flight Read the following documents before using the DJITM Mini 3 Pro: 1. Safety Guidelines 2. Quick Start Guide 3. User Manual It is recommended to watch all tutorial videos on the official DJI website and read safety guidelines before using for the first time. Prepare for your first flight by reviewing the quick start guide and refer to this user manual for more information.
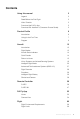
Contents Using this manual 2 Legend 2 Read Before the First Flight 2 Video Tutorials 2 Download the DJI Fly App 2 Download DJI Assistant 2 (Consumer Drones Series) 2 Product Profile 6 Introduction 6 Using for the First Time 7 Diagram 9 Aircraft 13 Introduction 13 Flight Modes 13 Aircraft Status Indicator 14 QuickTransfer 14 Return to Home 15 Vision Systems and Infrared Sensing Systems 18 Intelligent Flight Mode 20 Advanced Pilot Assistance Systems (APAS 4.
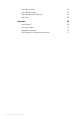
Pre-Flight Checklist 62 Auto Takeoff/Landing 62 Starting/Stopping the Motors 63 Flight Test 63 Appendix 4 66 Specifications 66 Firmware Update 72 Aftersales Information 73 FAR Remote ID Compliance Information 73 © 2023 DJI All Rights Reserved.
Product Profile This section introduces DJI Mini 3 Pro and lists the components of the aircraft and remote controller. © 2023 DJI All Rights Reserved.
Product Profile Introduction DJI Mini 3 Pro features both an Infrared Sensing System and Forward, Backward, and Downward Vision Systems. This allows for hovering and flying indoors as well as outdoors and for automatic Return to Home while avoiding obstacles from the front, back, and below. DJI Mini 3 Pro also boasts a foldable and compact design, weighing less than 249 g. The aircraft has a maximum flight speed of 36 mph (57.
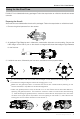
DJI Mini 3 Pro User Manual Using for the First Time DJI Mini 3 Pro is folded before being packaged. Follow the steps below to unfold the aircraft and remote controller. Preparing the Aircraft All aircraft arms are folded before the aircraft is packaged. Follow the steps below to unfold the aircraft. 1. Remove the gimbal protector from the camera. 2. All Intelligent Flight Batteries are in hibernation mode before shipment to ensure safety.
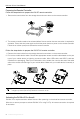
DJI Mini 3 Pro User Manual Preparing the Remote Controller Follow the steps below to prepare the DJI RC remote controller. 1. Remove the control sticks from the storage slots and mount them on the remote controller. 2. The remote controller needs to be activated before first use and an internet connection is required for activation. Press, and then press again and hold the power button to power on the remote controller. Follow the on-screen prompts to activate the remote controller.
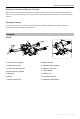
DJI Mini 3 Pro User Manual Binding the Aircraft and Remote Controller After activation, the aircraft is bound to the remote controller automatically. If automatic binding fails, follow the on-screen prompts on DJI Fly to bind the aircraft and remote controller for optimal warranty services. Updating Firmware A prompt will appear in DJI Fly when new firmware is available. Update the firmware whenever prompted to ensure optimal user experience. Diagram Aircraft 1 5 6 3 9 7 2 10 4 12 8 14 1.
DJI Mini 3 Pro User Manual DJI RC Remote Controller 2 1 7 10 9 4 5 Systems are available). Press and hold to initiate RTH. Press again to cancel RTH. 3 5. Flight Mode Switch 11 13 Switch between Cine, Normal, and Sport mode. 6 8 1. Control Sticks Use the control sticks to control the movement of the aircraft. The control sticks are removable and easy to store. Set the flight control mode in DJI Fly. 2. Status LED I n d i c a t e s t h e s t a t u s o f t h e re m o t e controller. 3.
DJI Mini 3 Pro User Manual pointing the gimbal downward. The function can be set in DJI Fly. and pointing the gimbal downward. The function can be set in DJI Fly. 18. Customizable C1 Button Switch between recentering the gimbal DJI RC-N1 Remote Controller 10 9 6 13 8 5 2 3 4 11 7 1 14 15 12 1. Power Button Press once to check the current battery level. Press, and then press and hold to power the remote controller on or off. 2. Flight Mode Switch Switch between Sport, Normal, and Cine mode. 3.
Aircraft DJI Mini 3 Pro contains a flight controller, video downlink system, vision systems, infrared sensing system, propulsion system, and an Intelligent Flight Battery. 12 © 2023 DJI All Rights Reserved.
Aircraft Introduction DJI Mini 3 Pro includes a flight controller, video downlink system, vision system, propulsion system, and an Intelligent Flight Battery. Flight Modes DJI Mini 3 Pro has three flight modes, plus a fourth flight mode that the aircraft switches to in certain scenarios. Flight modes can be switched via the Flight Mode switch on the remote controller.
DJI Mini 3 Pro User Manual Aircraft Status Indicator DJI Mini 3 Pro has two aircraft status indicators. Aircraft Status Indicator Aircraft Status Indicator When the aircraft is powered on but the motors are not running, the aircraft status indicators will display the current status of the flight control system. Refer to the table below for more information about the aircraft status indicators.
DJI Mini 3 Pro User Manual 2. Make sure Bluetooth and Wi-Fi are enabled on the mobile device. Launch DJI Fly and a prompt will appear to connect to the aircraft. 3. Tap Connect. Once successfully connected, the files on the aircraft can be accessed and downloaded at high speed. Method 2: mobile device is connected to the remote controller 1. Make sure that the aircraft is connected to the mobile device via the remote controller and the motors are off. 2. Enable Bluetooth and Wi-Fi on the mobile device. 3.
DJI Mini 3 Pro User Manual Smart RTH If the GNSS signal is sufficiently strong, Smart RTH can be used to bring the aircraft back to the Home Point. Smart RTH is initiated either by tapping in DJI Fly or by pressing and holding the RTH button on the remote controller until it beeps. Exit Smart RTH by tapping in DJI Fly or by pressing the RTH button on the remote controller. After exiting RTH, users will regain control of the aircraft.
DJI Mini 3 Pro User Manual Point has been recorded, the GNSS signal is good, and the compass is functioning normally, Failsafe RTH will automatically activate once the remote controller signal is lost for more than three seconds. If the aircraft is 50 m or less than 50 m from the Home Point when the remote controller signal is lost, it will fly to the Home Point at its current altitude.
DJI Mini 3 Pro User Manual Landing Protection Smart RTH or Auto Landing activates Landing Protection, which operates as follows: 1. Once Landing Protection determines that the ground is suitable for landing, the aircraft will land gently. 2. If the ground is determined unsuitable for landing, the aircraft will hover and wait for pilot confirmation. 3. If Landing Protection is not operational, DJI Fly will display a landing prompt when the aircraft descends to 0.5 m from the ground.
DJI Mini 3 Pro User Manual Calibrating Vision System Cameras Auto Calibration The Vision Systems installed on the aircraft are factory calibrated. If any abnormality is detected with a vision system camera, the aircraft will automatically perform calibration and a prompt will appear in DJI Fly. No further operation is required. Advanced Calibration If the abnormality persists after auto calibration, a prompt will appear in the app indicating that advanced calibration is required.
DJI Mini 3 Pro User Manual Pay attention to the flight environment. The Vision Systems and Infrared Sensing System only work in certain scenarios and cannot replace human control and judgment. During a flight, always pay attention to the surrounding environment and the warnings on DJI Fly, and be responsible for and maintain control of the aircraft. When no GNSS signals are available, the Downward Vision System works best at an altitude from 0.5 to 12 m.
DJI Mini 3 Pro User Manual capturing of both stationary and moving subjects such as vehicles and people. Move the roll stick to circle the subject, pitch stick to alter the distance from the subject, throttle stick to change the altitude, and yaw stick to adjust the frame. In Spotlight mode, when the vision systems are working normally, the aircraft will hover if an obstacle is detected, regardless of whether the obstacle avoidance behavior is set to Bypass or Brake in DJI Fly.
DJI Mini 3 Pro User Manual 2. Drag-select the subject in the camera view or enable Subject Scanning under Control settings in DJI Fly Control and tap the recognized subject to enable FocusTrack. The default mode is Spotlight. Tap the icon to switch between Spotlight, ActiveTrack, and POI. Tap GO to start FocusTrack. 3. Tap the shutter/record button to take photos or start recording. View the footage in Playback.
DJI Mini 3 Pro User Manual MasterShots MasterShots keeps the subject at the center of the frame while executing different maneuvers in sequence to generate a short cinematic video. Using MasterShots 1. Launch the aircraft and make it hover at least 2 m (6.6 ft) above ground. 2m 2. In DJI Fly, tap the shooting mode icon to select MasterShots and read the instructions. Make sure you understand how to use the shooting mode and there are no obstacles in the surrounding area. 3.
DJI Mini 3 Pro User Manual c) When the subject is in the air. d) When the subject is moving fast. e) The lighting is extremely dark (< 300 lux) or bright (> 10,000 lux). DO NOT use MasterShots in places close to buildings or where the GNSS signal is weak, otherwise the flight path may become unstable. Make sure to follow local privacy laws and regulations when using MasterShots. QuickShots QuickShots shooting modes include Dronie, Rocket, Circle, Helix, Boomerang, and Asteroid.
DJI Mini 3 Pro User Manual 2. In DJI Fly, tap the shooting mode icon to select QuickShots and follow the prompts. Make sure you understand how to use the shooting mode and there are no obstacles in the surrounding area. 3. Drag-select your target subject in the camera view. Choose a shooting mode and tap Start to begin recording. The aircraft will fly back to its original position once shooting is finished. 4. Tap to access, edit, or share the video to social media.
DJI Mini 3 Pro User Manual Hyperlapse Hyperlapse shooting modes include Free, Circle, Course Lock, and Waypoint. Free The aircraft automatically takes photos and generates a timelapse video. Free mode can be used while the aircraft is on the ground. After takeoff, control the aircraft’s movements and gimbal angle using the remote controller. Follow the steps below to use Free: 1. Set the interval time and video duration.
DJI Mini 3 Pro User Manual 4. Tap the shutter/record button to begin. Move the pitch stick and roll stick to control the horizontal flight speed and briefly alter the aircraft orientation. Move the throttle stick to control the vertical flight speed. Waypoints The aircraft automatically takes photos on a flight path of two to five waypoints and generates a timelapse video. The aircraft can fly in sequence from waypoints 1 to 5 or 5 to 1. Follow the steps below to use Waypoints: 1.
DJI Mini 3 Pro User Manual Nifty cannot work normally in the following situations: 1. When aircraft orientation changes rapidly flying near obstacles when using Bypass. 2. When flying through narrow obstacles such as canopies or bushes at high speed. 3. When flying near obstacles that are too small to detect. 4. When flying with the propeller guard.
DJI Mini 3 Pro User Manual Propellers Marked Unmarked Illustration Mounting Position Attach to the motors of the marked arm Attach to the motors of the unmarked arm Attaching the Propellers Attach the marked propellers to the motors of the marked arm, and the unmarked propellers to the motors of the unmarked arm. Use the screwdriver from the aircraft package to mount the propellers. Make sure the propellers are secure.
DJI Mini 3 Pro User Manual DO NOT squeeze or bend the propellers during transportation or storage. Make sure the motors are mounted securely and rotating smoothly. Land the aircraft immediately if a motor is stuck and unable to rotate freely. DO NOT attempt to modify the structure of the motors. DO NOT touch or let hands or body parts come in contact with the motors after flight as they may be hot. DO NOT block any of the ventilation holes on the motors or the body of the aircraft.
DJI Mini 3 Pro User Manual Using the Battery Checking the Battery Level Press the power button once to check the battery level. LED1 LED2 LED3 LED4 Battery Level LEDs Power Button The battery level LEDs display the power level of the battery during charging and discharging.
DJI Mini 3 Pro User Manual 3. To ensure optimal performance, keep the battery temperature above 20° C (68° F). 4. The reduced battery capacity in low-temperature environments reduces the wind speed resistance performance of the aircraft. Fly with caution. 5. Fly with extra caution at high sea levels. In cold environments, insert the battery into the battery compartment and turn on the aircraft to warm up before taking off. Charging the Battery Fully charge the battery before each use.
DJI Mini 3 Pro User Manual How to Charge 1. Insert the batteries into the charging hub until there is a click. 2. Connect the charging hub to a power outlet (100-240V, 50/60 Hz) using a USB-C cable and a DJI 30W USB-C charger or other USB Power Delivery chargers. 3. The battery with the highest power level will be charged first. The rest will be charged in sequence according to their power levels. The corresponding status LEDs will display the charging status (see table below).
DJI Mini 3 Pro User Manual 2. Connect the USB charger to an AC outlet (100-240V, 50/60 Hz). Use a power adapter if necessary. 3. Connect the USB charger to the charging port on the aircraft using a USB-C cable. 4. The battery level LEDs display the current battery level during charging. 5. The battery is fully charged when all the battery level LEDs emit a solid light. Remove the charger after charging is complete. The battery cannot be charged if the aircraft is powered on.
DJI Mini 3 Pro User Manual Battery Protection Mechanisms LED1 LED2 LED3 Status LED4 Blinking Pattern LED2 blinks twice per second Overcurrent detected LED2 blinks three times per second Short circuit detected LED3 blinks twice per second Overcharge detected LED3 blinks three times per second Over-voltage charger detected LED4 blinks twice per second Charging temperature is too low LED4 blinks three times per second Charging temperature is too high If any of the battery protection mechanisms are a
DJI Mini 3 Pro User Manual Gimbal and Camera Gimbal Profile The DJI Mini 3 Pro 3-axis gimbal stabilizes the camera, allowing you to capture clear and steady images and videos at high flight speed. The gimbal has a control tilt range of -90˚ to +60˚, and two control roll angles of -90˚ (portrait) and 0˚ (landscape). 60° 0° -90° Use the gimbal dial on the remote controller to control the tilt of the camera. Alternatively, do so through the camera view in DJI Fly.
DJI Mini 3 Pro User Manual Camera DJI Mini 3 Pro uses a 1/1.3-in CMOS sensor, which can shoot 4K videos and 48MP photos. The equivalent focal length is approximately 24 mm. The aperture of the camera is F1.7 and shoots from 1 m to infinity. The DJI Mini 3 Pro camera can take 48MP stills and supports shooting modes such as Single, Burst, AEB, Timed Shot and Panorama. It also supports H.264/H.265 video recording, digital zoom and slow motion recording.
Remote Controller This section describes the features of the remote controller and includes instructions for controlling the aircraft and the camera. 38 © 2023 DJI All Rights Reserved.
Remote Controller DJI RC When used with DJI Mini 3 Pro, DJI RC remote controller features OcuSync O3 video transmission, works at both 2.4 GHz and 5.8 GHz frequency bands. It is capable of selecting the best transmission channel automatically and can transmit 1080p 30fps HD live view from the aircraft to the remote controller at a distance of up to 12 km (7.5 mi) (compliant with FCC standards, and measured in a wide open area without interference). The DJI RC is also equipped with a 5.
DJI Mini 3 Pro User Manual Record Button: Press once to start or stop recording. Camera Control Dial Gimbal Dial Camera Control Dial: Adjust the zoom. Gimbal Dial: Control the tilt of the gimbal. Record Button Focus/Shutter Button Controlling the Aircraft The control sticks control the aircraft’s orientation (pan), forward/backward movement (pitch), altitude (throttle), and left/right movement (roll). The control stick mode determines the function of each control stick movement.
DJI Mini 3 Pro User Manual The default control mode of the remote controller is Mode 2. In this manual, Mode 2 is used as the example to illustrate how to use the control sticks. Stick Neutral/Center Point: Control sticks are in the center. Moving the control stick: The control stick is pushed away from the center position. Remote Controller (Mode 2) ( Aircraft Remarks Indicates Nose Direction) Throttle Stick: Moving the left stick up or down changes the aircraft’s altitude.
DJI Mini 3 Pro User Manual Flight Mode Switch Toggle the switch to select the desired flight mode. Position Flight Mode S Sport Mode N Normal Mode C Cine Mode CNS Flight Pause/RTH Button Press once to make the aircraft brake and hover in place. Press and hold the button until the remote controller beeps to start RTH, the aircraft will return to the last recorded Home Point. Press this button again to cancel RTH and to regain control of the aircraft.
DJI Mini 3 Pro User Manual Battery Level LEDs Blinking Pattern Battery Level 75%~100% 50%~75% 25%~50% 0%~25% Remote Controller Alert The remote controller beeps when there is an error or warning. Pay attention when prompts appear on the touch screen or in DJI Fly. Slide down from the top and select Mute to disable all alerts, or slide the volume bar to 0 to disable some alerts. The remote controller sounds an alert during RTH. The RTH alert cannot be cancelled.
DJI Mini 3 Pro User Manual Linking the Remote Controller The remote controller is already linked to the aircraft when purchased together as a combo. Otherwise, follow the steps below to link the remote controller and the aircraft after activation. 1. Power on the aircraft and the remote controller. 2. Launch DJI Fly. 3. In camera view, tap and select Control and then Pair to Aircraft (Link). 4. Press and hold the power button on the aircraft for more than four seconds.
DJI Mini 3 Pro User Manual Operations Slide from the left or right to the center of the screen to return to the previous screen. Slide up from the bottom of the screen to return to DJI Fly. ×2 Slide down from the top of the screen to open the status bar when in DJI Fly. The status bar displays the time, Wi-Fi signal, battery level of the remote controller, etc. Slide down twice from the top of the screen to open Quick Settings when in DJI Fly.
DJI Mini 3 Pro User Manual 1. Notifications Tap to check system notifications. 2. System Settings Tap to access system settings and configure the Bluetooth, volume, network, etc. You can also view the Guide to learn more about the controls and status LEDs. 3. Shortcuts : Tap to enable or disable Wi-Fi. Hold to enter settings and then connect to or add a Wi-Fi network. : Tap to enable or disable Bluetooth. Hold to enter settings and connect with nearby Bluetooth devices. : Tap to enable Airplane mode.
DJI Mini 3 Pro User Manual DJI RC-N1 When used with DJI Mini 3 Pro, DJI RC-N1 features OcuSync O3 video transmission, works at both 2.4 GHz and 5.8 GHz frequency bands, is capable of selecting the best transmission channel automatically, and offers 1080p 30fps HD live view transmission from the aircraft to DJI Fly on a mobile device (depending on mobile device performance) at a maximum transmission range of 12 km (7.
DJI Mini 3 Pro User Manual Gimbal Dial: For controlling the tilt of the gimbal. Press and hold the customizable button and then use the gimbal dial to zoom in or out. Controlling the Aircraft The control sticks control the aircraft’s orientation (pan), forward/backward movement (pitch), altitude (throttle), and left/right movement (roll). The control stick mode determines the function of each control stick movement.
DJI Mini 3 Pro User Manual The default control mode of the remote controller is Mode 2. In this manual, Mode 2 is used as the example to illustrate how to use the control sticks. Stick Neutral/Center Point: Control sticks are in the center. Moving the control stick: The control stick is pushed away from the center position. Remote Controller (Mode 2) ( Aircraft Remarks Indicates Nose Direction) Moving the left stick up or down changes the aircraft’s altitude.
DJI Mini 3 Pro User Manual Flight Mode Switch Toggle the switch to select the desired flight mode. Position Flight Mode SPORT Sport Mode NORMAL Normal Mode CINE Cine Mode Flight Pause/RTH Button Press once to make the aircraft brake and hover in place. Press and hold the button until the remote controller beeps to start RTH. The aircraft will return to the last recorded Home Point. Press this button again to cancel RTH and to regain control of the aircraft.
DJI Mini 3 Pro User Manual Optimal Transmission Zone The signal between the aircraft and the remote controller is most reliable when the remote controller is positioned towards the aircraft as depicted below. Optimal Transmission Zone Weak Signal Linking the Remote Controller The remote controller is already linked to the aircraft when purchased together as a combo. Otherwise, follow the steps below to link the remote controller and the aircraft after activation. 1.
DJI Fly App This section introduces the main functions of the DJI Fly app. 52 © 2023 DJI All Rights Reserved.
DJI Fly App Home Launch DJI Fly and enter the home screen. Fly Spots View or share suitable flight and shooting locations nearby, learn more about GEO Zones, and preview aerial photos of different locations taken by other users. Academy Tap the icon in the top right corner to enter Academy and view product tutorials, flight tips, flight safety notices, and manual documents. Album View photos and videos from DJI Fly and your mobile device.
DJI Mini 3 Pro User Manual Camera View 1 2 3 4 5 6 7 20 8 9 10 19 11 12 13 14 18 17 16 15 1. Flight Mode N: Displays the current flight mode. 2. System Status Bar In Flight: Indicates the aircraft flight status and displays various warning messages. Tap to view more information when a warning prompt appears. 3. Battery Information 80 24'17" : Displays the current battery level and remaining flight time. 4.
DJI Mini 3 Pro User Manual RTH: Tap to set the Return to Home Altitude and update the Home Point. Sensors: Tap to view the IMU and compass statuses and start calibration if necessary. Battery: Tap to view battery information such as battery cell status, serial number, and number of times charged. Unlock GEO Zone: Tap to view information about unlocking GEO Zones. The Find My Drone feature uses the map to find the location of the aircraft on the ground.
DJI Mini 3 Pro User Manual Reset Camera Settings: Tap to restore camera parameters to the default settings. USB Mode: When the aircraft is connected to a computer for copying footage, the aircraft will enter a low-power state if USB mode is enabled, which can extend the time for copying footage. Power on the aircraft, enable USB mode and connect to a computer to use USB mode. To disable USB mode, disable USB mode in DJI Fly. In USB mode, the aircraft will disconnect from the remote controller.
DJI Mini 3 Pro User Manual 15. Shooting Parameters RES&FPS EV 4K 30 +0.7 : Displays the current shootings parameters. Tap to access parameter settings. 16. microSD Card Information Storage 1:30:30 : Displays the remaining number of photos or video recording time on the current microSD card. Tap to view the available capacity of the microSD card. 17. Flight Telemetry H 150m : Vertical distance from the aircraft to the Home Point. D 80m : Horizontal distance from the aircraft to the Home Point.
DJI Mini 3 Pro User Manual b) Read and understand the warning messages and disclaimers before setting the altitude beyond the default limit. c) Read and understand the warning messages and disclaimers before switching flight modes. d) Read and understand the warning messages and disclaimer prompts near or in GEO zones. e) Read and understand the warning messages before using the Intelligent Flight modes.
DJI Mini 3 Pro User Manual Flight This section describes safe flight practices and flight restrictions. © 2023 DJI All Rights Reserved.
DJI Mini 3 Pro User Manual Flight After completing the pre-flight preparation, it is recommended to train your flying skills and practice flying safely. Make sure that all flights are carried out in an open area. The flying height is limited to 500 m. DO NOT exceed this height. Strictly abide by local laws and regulations when flying. Read the Safety Guidelines before flight to ensure the safe use of the product. Flight Environment Requirements 1.
DJI Mini 3 Pro User Manual Flight Altitude and Distance Limits Maximum flight altitude restricts an aircraft’s flight altitude, while maximum flight distance restricts an aircraft’s flight radius around the Home Point. These limits can be set using the DJI Fly app for improved flight safety.
DJI Mini 3 Pro User Manual GEO Zones DJI’s GEO System designates safe flight locations, provides risk levels and safety notices for individual flights, and offers information on restricted airspace. All restricted flight areas are referred to as GEO Zones, which are further divided into Restricted Zones, Authorization Zones, Warning Zones, Enhanced Warning Zones, and Altitude Zones. Users can view such information in real time in DJI Fly.
DJI Mini 3 Pro User Manual Starting/Stopping the Motors Starting the Motors Perform the Combination Stick Command (CSC) as shown below to start the motors. Once the motors have started spinning, release both sticks simultaneously. OR Stopping the Motors The motors can be stopped in two ways: Method 1: When the aircraft has landed, push the throttle stick down and hold. The motors will stop after three seconds.
DJI Mini 3 Pro User Manual 7. After landing, push the throttle down and hold. The motors will stop after three seconds. 8. Power off the Intelligent Flight Battery before the remote controller. Video Suggestions and Tips 1. The pre-flight checklist is designed to help you fly safely and shoot videos during flight. Go through the full pre-flight checklist before each flight. 2. Select the desired gimbal operation mode in DJI Fly. 3.
Appendix © 2023 DJI All Rights Reserved.
Appendix Specifications Aircraft Takeoff Weight < 249 g (including the Intelligent Flight Battery, propellers, and a microSD card) Dimensions (L×W×H) Folded: 145×90×62 mm Unfolded (without propellers): 171×245×62 mm Unfolded (with propellers): 251×362×70 mm Diagonal Distance 247 mm Max Ascent Speed S Mode: 5 m/s N Mode: 3 m/s C Mode: 2 m/s Max Descent Speed S Mode: 5 m/s N Mode: 3 m/s C Mode: 1.
DJI Mini 3 Pro User Manual Hovering Accuracy Range Vertical: Vision Positioning: ±0.1 m GNSS Positioning: ±0.5 m Horizontal: Vision Positioning: ±0.3 m High Accuracy System Positioning: ±0.5 m Transmission Video Transmission System O3 Operating Frequency 2.400-2.4835 GHz, 5.725-5.850 GHz Transmitter Power (EIRP) 2.4 GHz: <26 dBm (FCC), <20 dBm (CE/SRRC/MIC) 5.8 GHz: <26 dBm (FCC/SRRC), <14 dBm (CE) Wi-Fi Protocol 802.11 a/b/g/n/ac Operating Frequency 2.400-2.4835 GHz, 5.725-5.
DJI Mini 3 Pro User Manual Lens FOV: 82.1° Format Equivalent: 24 mm Aperture: f/1.7 Shooting Range: 1 m to ∞ ISO Video: 100-6400 Photo: 100-6400 Electronic Shutter Speed 1/8000-2 s Max Image Size 4:3: 8064×6048 (48 MP); 4032×3024 (12 MP) 16:9: 4032×2268 (12 MP) Still Photography Modes Single Interval: 2/3/5/7/10/15/20/30/60 s (JPEG) 2/3/5/7/10/15/20/30/60 s (JPEG+RAW) Automatic Exposure Bracketing (AEB): 3/5 bracketed frames at 0.
DJI Mini 3 Pro User Manual General Operating Temperature -10° to 40° C (14° to 104° F) Battery Capacity 5,200 mAh Battery Type Li-ion Chemical System LiNiMnCoO2 Operating Current/Voltage 1200 mA@3.6 V (with Android device) 700 mA@3.
DJI Mini 3 Pro User Manual Supported microSD Cards for DJI RC Remote Controller UHS-I Speed Grade 3 rating microSD card Recommended microSD Cards for DJI RC Remote Controller SanDisk Extreme 64GB V30 A1 microSDXC SanDisk Extreme 128GB V30 A2 microSDXC SanDisk Extreme 256GB V30 A2 microSDXC SanDisk Extreme 512GB V30 A2 microSDXC SanDisk Extreme Pro 64GB V30 A2 microSDXC SanDisk Extreme Pro 256GB V30 A2 microSDXC SanDisk Extreme Pro 400GB V30 A2 microSDXC SanDisk High Endurance 64GB V30 microSDXC SanDisk H
DJI Mini 3 Pro User Manual Supported Batteries App DJI Mini 3 Pro Intelligent Flight Battery (BWX162-2453-7.38) DJI Mini 3 Pro Intelligent Flight Battery Plus (BWX162-3850-7.38) Name DJI Fly Required Operating System iOS v11.0 or later; Android v6.
DJI Mini 3 Pro User Manual a) When in standby mode on the ground: about 22 minutes; b) When updating firmware: about 19 minutes (sufficient for 3 times of upgrades); c) When using QuickTransfer immediately after powering on: about 35 minutes; d) When using QuickTransfer after landing: about 35 minutes; Firmware Update Use DJI Fly or DJI Assistant 2 (Consumer Drones Series) to update the aircraft and the remote controller firmware.
DJI Mini 3 Pro User Manual Make sure to follow all the steps to update the firmware, otherwise the update may fail. The firmware update will take approximately 10 minutes. It is normal for the gimbal to go limp, aircraft status indicators to blink, and the aircraft to reboot. Wait patiently until the update is complete. Make sure the computer is connected to the internet during the update.
DJI Support http://www.dji.com/support This content is subject to change. Download the latest version from http://www.dji.com/mini-3-pro If you have any questions about this document, please contact DJI by sending a message to DocSupport@dji.com. DJI is a trademark of DJI. Copyright © 2023 DJI All Rights Reserved.