MAVIC 2 ENTERPRISE Advanced User Manual v1.0 2021.
Searching for Keywords Search for keywords such as “battery” and “install” to find a topic. If you are using Adobe Acrobat Reader to read this document, press Ctrl+F on Windows or Command+F on Mac to begin a search. Navigating to a Topic View a complete list of topics in the table of contents. Click on a topic to navigate to that section. Printing this Document This document supports high resolution printing.
Using This Manual Legend Warning Important Hints and Tips Reference Read Before the First Flight Read the following documents before using the MAVICTM 2 Enterprise Advanced: 1. 2. 3. 4. 5. In the Box User Manual Quick Start Guide Disclaimer and Safety Guidelines Intelligent Flight Battery Safety Guidelines It is recommended to read the disclaimer and safety guidelines before using for the first time.
Contents Using This Manual Legend 3 Read Before the First Flight 3 Download the DJI Pilot App 3 Download DJI Assistant 2 (Enterprise Series) 3 Product Profile 7 Introduction 7 Preparing the Aircraft 7 Preparing the Remote Controller 9 Diagram 10 Activation 13 Aircraft Flight Modes 15 15 Aircraft LEDs and Status Indicator 16 Return to Home 17 Vision Systems and Infrared Sensing Systems 20 Flight Recorder 23 Password Protection 23 Attaching and Detaching the Propellers 24 Int
DJI Pilot App 43 Manual Flight 43 Mission Flight 49 Album 53 Flight 55 Flight Environment Requirements 55 Flight Limits and GEO Zones 55 Pre-Flight Checklist 57 Starting/Stopping the Motors 57 Flight Test 58 Appendix Specifications 60 60 Calibrating the Compass 65 Updating Firmware 66 After-Sales Information 67 © 2021 DJI All Rights Reserved.
Product Profile This section introduces Mavic 2 Enterprise Advanced and lists the components of the aircraft and remote controller. 6 © 2021 DJI All Rights Reserved.
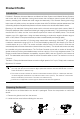
Product Profile Introduction DJI Mavic 2 Enterprise Advanced features omnidirectional Vision Systems and Infrared Sensing Systems, and comes with a fully stabilized 3-axis gimbal camera that includes a thermal camera and a visual camera, providing both infrared and visual images simultaneously.
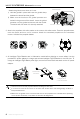
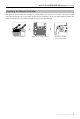
MAVIC 2 ENTERPRISE Advanced User Manual * Attach the gimbal cover when not in use. Gimbal clamp 1) Hold the gimbal in place and insert the gimbal clamp between the aircraft and the gimbal. 2) Make sure the hooks on the gimbal protector are locked in the grooves of the aircraft. Lower the gimbal protector2 over the gimbal and secure with the buckle. The buckle will click when it is securely attached. 1 3 Grooves Hooks 3. Attach the propellers with white marks to the motors with white marks.
MAVIC 2 ENTERPRISE Advanced User Manual Preparing the Remote Controller Two pairs of control sticks are included in the packaging for the Smart Controller. One pair is stored in the sticks storage slot on the back of the remote controller. Follow the steps below to attach the control sticks stored in the sticks storage slot to the remote controller. Lift the antennas Remove the control sticks Rotate to attach the control sticks © 2021 DJI All Rights Reserved.
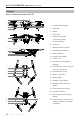
MAVIC 2 ENTERPRISE Advanced User Manual Diagram Mavic 2 Enterprise Advanced (L1TE) 1 2 3 4 5 A B 6 7 1. Forward Vision System 2. Propellers 3. Motors 4. Front LEDs 5. Gimbal and Camera A. Thermal Camera B. Visual Camera 8 6. Antennas 9 7. Backward Vision System 10 8. Aircraft Status Indicator 9. Battery Buckles 11 12 10. Lateral Vision System 11. USB-C Port 12. Link Button/Linking Status Indicator 13 14 13. Extended Port (can be used to connect accessories) 15 16 17 14.
MAVIC 2 ENTERPRISE Advanced User Manual DJI Smart Controller (RM500) 1 8 7 2 3 10 9 4 5 6 11 16 22 18 19 20 10 12 17 10 13 14 15 1. Antennas Relays aircraft control and video signal. 2. Back Button/Function Button Press once to return to the previous screen and press twice to go back to the home screen. 3. 4. Control Sticks Control the orientation and movement of the aircraft when the remote controller is linked to an aircraft.
MAVIC 2 ENTERPRISE Advanced User Manual 17. Record Button Press to start recording video. Press again to stop recording. 23 18. HDMI Port For video output. 19. microSD Card Slot Use to insert a microSD card. 24 25 20. USB-A Port Use to connect external devices. 26 27 28 21. Focus/Shutter Button Press once to take photos according to the mode selected in DJI Pilot. 22. Camera Settings Dial/Gimbal Dial Turn to adjust the zoom of the camera. 23. Air Vent Used for heat dissipation.
MAVIC 2 ENTERPRISE Advanced User Manual Activation Activating the Smart Controller Internet The Smart Controller needs to be activated before using it for the first time. Make sure the remote controller is connected to the internet during activation. Follow the steps below to activate. 1. Power on the remote controller. Select the language and tap Next. Carefully read the terms of use and privacy policy and tap Agree. Set the country/region. 2. Connect the remote controller to the internet via Wi-Fi.
Aircraft This section introduces the flight controller, Intelligent Flight Battery, and the Forward, Backward, and Downward Vision Systems. 14 © 2021 DJI All Rights Reserved.
Aircraft Mavic 2 Enterprise Advanced contains a flight controller, vision systems, video downlink system, propulsion system, and an Intelligent Flight Battery. Refer to the aircraft diagram in the Product Profile section. Flight Modes Mavic 2 Enterprise Advanced has three flight modes, plus a fourth flight mode that the aircraft switches to in certain circumstances: P-mode (Positioning): P-mode works best when the GPS signal is strong.
MAVIC 2 ENTERPRISE Advanced User Manual Aircraft LEDs and Status Indicator Mavic 2 Enterprise Advanced has Front LEDs and Aircraft Status Indicators as shown in the figure below. Front LEDs Aircraft Status Indicator Front LEDs Aircraft Status Indicator The Front LEDs show the orientation of the aircraft and glow solid red when the aircraft is powered on to indicate the front of the aircraft. Go to settings in DJI Pilot to turn the Front LEDs on or off.
MAVIC 2 ENTERPRISE Advanced User Manual Return to Home Return to Home (RTH) brings the aircraft back to the last recorded Home Point. There are three types of RTH: Smart RTH, Low Battery RTH, and Failsafe RTH. This section describes these three scenarios in detail. Description GPS If a strong GPS signal was acquired before takeoff, the Home Point is the location from which the aircraft launched. The GPS signal strength is ).
MAVIC 2 ENTERPRISE Advanced User Manual Warning Scenario Aircraft Status Indicator Critically Low Battery Level Actions Choose RTH or resume normal flight. Select an option. If no action is taken, the aircraft will enter RTH. Remaining battery level supports Emergency RTH (when in RTH, with a normal remote controller Blinks red slowly signal, and at an altitude higher than 50 m). Choose Emergency RTH or resume RTH. Select an option.
MAVIC 2 ENTERPRISE Advanced User Manual b. If the aircraft is between 5 and 20 m from the Home Point when RTH is initiated, the aircraft flies back at the current altitude. If the current altitude is less than 2 m, the aircraft will first ascend to 2 m and fly to the Home Point at a speed of 3 m/s. If RTH at Current Altitude is disabled, the aircraft lands immediately. c. If the aircraft is less than 5 m from the Home Point when RTH is initiated, it lands immediately. 3.
MAVIC 2 ENTERPRISE Advanced User Manual Landing Protection Landing Protection is activated during Smart RTH and the aircraft performs as follows: 1. When Landing Protection determines that the ground is suitable for landing, the aircraft lands gently. 2. If the ground is not suitable for landing, the aircraft hovers and waits for the pilot to confirm if it is suitable for landing or not. 3. If Landing Protection is not operational, DJI Pilot displays a landing prompt when the aircraft descends below 0.5 m.
MAVIC 2 ENTERPRISE Advanced User Manual signal is unavailable. In addition, the auxiliary bottom light located on the bottom of the aircraft improves visibility for the Downward Vision System in weak light conditions.
MAVIC 2 ENTERPRISE Advanced User Manual Using the Vision Systems The Downward Vision System and Infrared Sensing System activate automatically when the aircraft is powered on. No further action is required. When using the Downward Vision System, the aircraft can hover precisely even without GPS. The Downward Vision System is typically used in indoor environments where GPS is unavailable. The Downward Vision System works best when the aircraft is at an altitude of 1.6 to 33 ft (0.5 to 11 m).
MAVIC 2 ENTERPRISE Advanced User Manual Note that the Vision Systems may not function properly when the aircraft is flying too fast. Fly with caution when flying at over 10 m/s (32.8 ft/s) at 2 m (6.6 ft) or over 5 m/s (16.4 ft) at 1 m (3.3 ft). Operate the aircraft cautiously when in any of the following situations: a) b) c) d) e) f) g) h) i) j) Flying over monochrome surfaces (e.g., pure black, pure white, pure green). Flying over highly reflective surfaces. Flying over water or transparent surfaces.
MAVIC 2 ENTERPRISE Advanced User Manual The password is stored in the aircraft only and will not be uploaded to the DJI server. Therefore, the aircraft needs to be reformatted if the password is lost. The data stored in the aircraft will be deleted once the aircraft is formatted. If the aircraft requires maintenance, DJI will reformat the onboard data of the aircraft. Remove the security password and back up data before sending the aircraft back for repair. DJI takes no responsibility for any loss of data.
MAVIC 2 ENTERPRISE Advanced User Manual Make sure the motors are mounted securely and rotating smoothly. Land the aircraft immediately if a motor is stuck and unable to rotate freely. DO NOT attempt to modify the structure of the motors. DO NOT touch or let hands or body parts come in contact with the motors after flight as they may be hot. DO NOT block any of the ventilation holes on the motors or the body of the aircraft. Make sure the ESCs sound normal when powered on.
MAVIC 2 ENTERPRISE Advanced User Manual Refer to the Mavic 2 Intelligent Flight Battery Safety Guidelines before use. Users take full responsibility for all operations and usage. Using the Battery Low Battery Level LEDs Power Button High Checking Battery Level The battery level LEDs display how much charge is remaining. If the battery is powered off, press the power button to make the battery level LEDs light up to display the current battery level.
MAVIC 2 ENTERPRISE Advanced User Manual Charging the Battery Fully charge the Intelligent Flight Battery before using for the first time: 1. Connect the AC power adapter to a power source (100-240 V, 50/60 Hz). 2. Attach the Intelligent Flight Battery to the AC power adapter using the battery charging cable with the battery powered off. 3. The battery level LEDs display the current battery level during charging. 4.
MAVIC 2 ENTERPRISE Advanced User Manual Inserting the Intelligent Flight Battery Click Insert the Intelligent Flight Battery into the battery compartment of the aircraft. Make sure it is mounted securely and that the battery latches have clicked into place. Removing the Intelligent Flight Battery Slide the battery latches on the sides of the Intelligent Flight Battery to open the battery compartment. DO NOT insert or remove the battery while it is powered on. Make sure the battery is mounted securely.
MAVIC 2 ENTERPRISE Advanced User Manual Camera Mavic 2 Enterprise Advanced features a thermal camera and a visual camera, providing both infrared and visible light imaging simultaneously. The visual camera uses a 1/2’’ CMOS sensor and supports up to 32× digital zoom with focus range of 1 m to infinity. Mavic 2 Enterprise Advanced shoots up to 4K 30fps video and 48MP photos. Shooting modes include Single Shot, Interval, and Panorama.
MAVIC 2 ENTERPRISE Advanced User Manual DJI AirSense Manned aircraft with an ADS-B transceiver actively broadcast flight information, including their location, flight path, speed, and altitude. DJI AirSense receives this information from ADS-B transceivers via an on-board receiver or internet connection.
MAVIC 2 ENTERPRISE Advanced User Manual Modular Accessories Mavic 2 Enterprise Advanced features an extended port for mounting additional compatible DJI modular accessories that are listed below: M2E Beacon: helps to identify aircraft during flight at night or in low light areas. M2E Spotlight: used for long-range illumination to search in low-light conditions and assist when shooting with the camera at night. M2E Speaker: used for long-range, real-time broadcasting or audio playback.
MAVIC 2 ENTERPRISE Advanced User Manual Make sure that the accessories are correctly and securely mounted on the aircraft before use. Otherwise, they may fall from the aircraft during flight. DO NOT point the spotlight or the beacon directly at people’s eyes. DO NOT use the speaker near people or in an urban area where noise-sensitive structures are concentrated as the loudness could lead to accidents or injuries.
Smart Controller This section describes the features of the remote controller and includes instructions for controlling the aircraft and the camera. © 2021 DJI All Rights Reserved.
Smart Controller Smart Controller Profile The DJI Smart Controller uses DJI’s OcuSync 2.0 long-range transmission technology, offering a maximum transmission range of 6.2 mi (10 km) and displaying video from the aircraft to DJI Pilot on a mobile device at up to 720p resolution. The onboard buttons make controlling the aircraft easy and its detachable control sticks make it convenient to store. In wide-open areas with no electromagnetic interference, OcuSync 2.
MAVIC 2 ENTERPRISE Advanced User Manual Charging the Battery There are two pairs of built-in 18650 Li-ion batteries in the remote controller. Charge the remote controller using the USB-C port. Charging Time: approx. 2 hours and 15 minutes. (using a standard USB charger adapter ) Power Outlet 100~240 V USB Charger USB-C Cable Use a DJI official USB power adapter to charge the remote controller. If a DJI official adaptor is unavailable, using a certified FCC/CE rated 12V/2A USB adapter is recommended.
MAVIC 2 ENTERPRISE Advanced User Manual Mode 1 Left Stick Right Stick Forward UP Down Backward Left Turn Left Right Turn Right Mode 2 Left Stick Right Stick Forward UP Down Backward Turn Left Left Turn Right Right Mode 3 Left Stick Right Stick Forward UP Down Backward Left Right Turn Left The figure below explains how to use each control stick. Mode 2 is used as an example. Center position: control sticks are centered.
MAVIC 2 ENTERPRISE Advanced User Manual Remote Controller (Mode 2) ( Aircraft Remarks Indicates Nose Direction) Moving the left stick up or down changes the altitude of the aircraft. Push the stick up to ascend and down to descend. The more the stick is pushed away from the center, the faster the aircraft changes altitude. Push the stick gently to prevent sudden and unexpected changes in altitude. Moving the left stick to the left or right controls the orientation of the aircraft.
MAVIC 2 ENTERPRISE Advanced User Manual Flight Mode Switch Toggle the switch to select the flight mode. Choose between T-mode, P-mode, and S-mode. Position Flight Mode T T-mode (Tripod) 位置T T Position P P-mode (Positioning) 位置P P Position S S-mode (Sport) 位置S S Position Mavic 2 Enterprise Advanced begins in P-mode by default regardless of the position the switch is and in on the remote controller. To switch flight modes, first go to Camera View in DJI Pilot, tap enable Multiple Flight Modes.
MAVIC 2 ENTERPRISE Advanced User Manual Optimal Transmission Zone The optimal transmission range of the Smart Controller is shown below: 80° Make sure the antennas are facing towards the aircraft. The signal between the remote controller and the aircraft can reach its optimal performance when the angle between the antennas and the back of the Smart Controller is 80° or 180°. Note that the illustrations above do not reflect the actual distances between the user and aircraft and are for reference only.
MAVIC 2 ENTERPRISE Advanced User Manual Make sure the antennas of the remote controller are unfolded and adjusted to the proper position to achieve optimal transmission quality. Repair or replace the remote controller if damaged. A damaged remote controller antenna greatly decreases performance. Fully charge the battery at least once every three months to maintain battery health. Status LED and Battery Level LEDs Description The battery level LEDs displays the battery level of the controller.
MAVIC 2 ENTERPRISE Advanced User Manual Smart Controller Warning Sounds The Smart Controller will vibrate and/or beep when there is a warning prompt. If the error is related to the aircraft or flight status, the remote controller beeps and the status LED is solid green. If the error is related to the Smart Controller, a warning prompt will appear on the screen of the remote controller. To disable the beeping, power on the remote controller, tap Volume.
DJI Pilot App This section introduces the main functions of the DJI Pilot app. 42 © 2021 DJI All Rights Reserved.
DJI Pilot App DJI Pilot is specifically developed for enterprise users and offers two types of flight. Manual flight integrates a variety of professional features that make flying simple and intuitive. Mission flight supports flight planning, and allows users to control the drone automatically, making workflows much simpler and more efficient. Manual Flight Mission Flight S Manual Flight Camera View Enter the Camera View by tapping Manual Flight. 1 25 24 2 3 4 In-Flight(GPS) 5 GPS 6 9 10 2.
MAVIC 2 ENTERPRISE Advanced User Manual 1. System Status Bar : indicates aircraft flight status and displays various warning prompts. In flight (GPS) 2. Obstacle Detection Status : red bars are displayed when obstacles are close to the aircraft. Orange bars are displayed when obstacles are within the detection range. Grey bars are displayed when there are no obstacles within the detection range. 3.
MAVIC 2 ENTERPRISE Advanced User Manual 11. General Settings : tap to enter the General Settings to set units of measurement, enable or disable livestream, and more. 12. Display Mode Tap to switch between the Visible, IR, and Split display modes. Visible mode: only displays the footage that the visual camera captures. IR mode: only displays the footage that the infrared thermal camera captures. Split mode: displays the infrared and visual footage side by side.
MAVIC 2 ENTERPRISE Advanced User Manual 21. Map Tap to view the map. 22. Time and GPS Information Displays current date, time, and the longitude and latitude of the aircraft. Only available in Visible mode. 23. Accessory Shows if an accessory is connected such as the beacon set or use. , spotlight or speaker . Tap to 24. Gimbal Orientation Adjustment : tap to select the Gimbal Orientation Adjustment as Gimbal Recenter, Recenter Gimbal Yaw, Gimbal Yaw Downward or Gimbal Downward. 25.
MAVIC 2 ENTERPRISE Advanced User Manual IR View 1 In-Flight(GPS) 2.4G 12 GPS 2 61% 19:29 FFC IR 1x 2021-2-5 13:14 147.498992,-122.274800 MENU 8X 12 SPLIT 12 IR 1X VISIBLE 4X VISIBLE 4.0X 29ºC 2X D H.S 502 m D m H m/s H.S 16.0 V.S m/s 120 m 123456 m/s V.S 24.0 m/s 123456 H m + 147.498992, - 122.274800 4 1. 3 Palette : Mavic 2 Enterprise Advanced offers a variety of palette options.
MAVIC 2 ENTERPRISE Advanced User Manual b) Area Measurement: drag an area within the temperature measurement area on the screen. The average temperature, lowest temperature, highest temperature, and corresponding locations of this area will be displayed.
MAVIC 2 ENTERPRISE Advanced User Manual Mission Flight Introduction Tap to enter the mission library. View created flight routes or the most recent Waypoint flights, Mapping missions, or Oblique Photography missions. Mapping and Oblique Photography missions are generated using the app and Waypoint flights can be created by selecting Set Waypoints or Live Mission Recording.
MAVIC 2 ENTERPRISE Advanced User Manual Set Waypoints Tap Create a Route, Waypoint Flight, and then Set Waypoints to create a new flight route and edit waypoints. 5 In-Flight(GPS) 2.4G 12 GPS 61% 19:29 Flight Route Name S E 1 2 3 4 6 54.8m 4 5 7 Waypoint1 Select Aircraft 58.8m 10 Mavic 2 Enterprise Advanced 3 Display Altitude/Height 9 54.8m 2 8 Height 24.
MAVIC 2 ENTERPRISE Advanced User Manual waypoint. The settings are applied to the selected waypoint including aircraft speed, height, yaw, longitude, latitude, and waypoint type and actions. 8. Mission Information Displays the flight length, estimated flight time, waypoint quantity, photo quantity, longitude, and latitude. 9. Perform : tap and check the settings and status of the aircraft in the pop-up checklist. Tap Start to Fly to perform the mission. 10. Save : tap to save current settings.
MAVIC 2 ENTERPRISE Advanced User Manual 5. Clear Screen : tap to clear the flight path currently shown on the map. Live Mission Recording In-Flight(GPS) GPS 2.4G 12 61% 19:29 1 C1 ISO Shutter VISIBLE 1.0x ISO Shutter EV EV 100 1/1000 0 AE MENU 2 Waypoints 1 2X 12 12 SPLIT IR 00:05 VISIBLE 11 X X 3 489 m D H.S D m H m/s H.S 16.0 V.S m/s N 010° 120 m 123456 m/s V.S 24.0 m/s 123456 H m + 147.498992, - 122.274800 1. Tap C1 to add a new waypoint. 2.
MAVIC 2 ENTERPRISE Advanced User Manual Album Jan27,2021 4:21:23 PM Single Shot (3 photos) Tap to view photos or videos that can be saved to a mobile device. When saving a photo or video, the format will vary depending on the display mode. Refer to the Storing the Photos and Videos section for more information. Tap between the footage of the photo or video. Single Shot (3 photos) to switch © 2021 DJI All Rights Reserved.
Flight This section describes safe flight practices and flight restrictions. 54 © 2021 DJI All Rights Reserved.
Flight Once pre-flight preparation is complete, it is recommended to hone your flight skills and practice flying safely. Make sure that all flights are carried out in an open area. The flight height is limited to 500 m. DO NOT exceed this height. Strictly abide by local laws and regulations when flying. Make sure to read the Mavic 2 Enterprise Series Disclaimer and Safety Guidelines to understand the safety notices before flying. Flight Environment Requirements 1.
MAVIC 2 ENTERPRISE Advanced User Manual GPS Signal Strong Blinking Green Flight Limits DJI Pilot App Aircraft Status Indicator Max Altitude Altitude of the aircraft cannot exceed the specified value. Warning: Height limit reached. N/A Max Radius Flight distance must be within the max radius. Warning: Distance limit reached. Blinks red quickly when close to the max radius limit.
MAVIC 2 ENTERPRISE Advanced User Manual Pre-Flight Checklist 1. Make sure the remote controller, mobile device, and Intelligent Flight Battery are fully charged. 2. Make sure the Intelligent Flight Battery and the propellers are mounted securely. 3. Make sure the aircraft arms and propellers are unfolded. 4. Make sure the gimbal and camera are functioning normally. 5. Make sure that there is nothing obstructing the motors and that they are functioning normally. 6.
MAVIC 2 ENTERPRISE Advanced User Manual Flight Test Takeoff/Landing Procedures 1. Place the aircraft in an open, flat area with the Aircraft Status Indicators facing towards you. 2. Power on the aircraft and the remote controller. 3. Launch DJI Pilot and enter the live view. 4. Wait until the Aircraft Status Indicator blinks green indicating that the Home Point has been recorded and it is now safe to fly. 5. Push the throttle stick up slowly to take off. 6.
Appendix © 2021 DJI All Rights Reserved.
Appendix Specifications Aircraft Takeoff Weight (excl.
MAVIC 2 ENTERPRISE Advanced User Manual Thermal Camera Sensor Uncooled VOx Microbolometer Focal Length Approx. 9 mm 35mm Format Equivalent: Approx.
MAVIC 2 ENTERPRISE Advanced User Manual Stabilization 3-axis (tilt, roll, pan) Max Controllable Speed 120°/s Angular Vibration Range ±0.005° Sensing System Sensing System Omnidirectional Obstacle Sensing FOV (Forward) Horizontal: 40°, Vertical: 70° (Backward) Horizontal: 60°, Vertical: 77° (Downward) Front and Back: 100°, Left and Right: 83° (Lateral) Horizontal: 80°, Vertical: 65° Obstacle Sensing Range (Forward) Precision Measurement Range: 0.
MAVIC 2 ENTERPRISE Advanced User Manual Others Battery 18650 Li-ion (5000 mAh @ 7.
MAVIC 2 ENTERPRISE Advanced User Manual Charger Input 100-240 V, 50-60 Hz, Max. 0.8 A Output Main: 17.6 V 3.41 A or 17.0 V USB: 5 V 2 A Rated Power 60 W 3.53 A APP Name DJI Pilot (Android version) Video Transmission System OcuSync 2.0 Live View Quality 720p@30fps Latency (depending on environment and mobile device) 120 - 130 ms M2EA RTK Module Dimensions 69×69×59 mm Port Type USB Micro-B Power Approx.
MAVIC 2 ENTERPRISE Advanced User Manual Calibrating the Compass Aircraft It is recommended to calibrate the compass in any of the following situations when flying outdoors: 1. Flying in a location more than 31 miles (50 km) away from the location the drone was last flown. 2. The aircraft has not been flown for more than 30 days. 3. A compass interference warning prompt appears in DJI Pilot and/or the Aircraft Status Indicators blink red and yellow alternately.
MAVIC 2 ENTERPRISE Advanced User Manual Smart Controller After the remote controller is used in locations with electro-magnetic interference, the compass may need to be calibrated. A warning prompt will appear if the compass requires calibration. Tap the warning prompt to start calibrating. When a prompt does not appear, follow the steps below to calibrate the remote controller. 1. Enter the App Center, tap , then scroll down and tap Compass. 2.
MAVIC 2 ENTERPRISE Advanced User Manual Keep people and animals at a safe distance during any firmware update, system calibration, or parameter setting procedures. For safety, always update to the latest firmware version. If a firmware update is available, users will be prompted to update immediately or within three days. If the firmware update is ignored, users are required to agree to the disclaimer.
DJI Support http://www.dji.com/support This content is subject to change. Download the latest version from www.dji.com/mavic-2-enterprise-advanced If you have any questions about this document, please contact DJI by sending a message to DocSupport@dji.com. MAVIC is a trademark of DJI. Copyright © 2021 DJI All Rights Reserved.