MATRICE 200 SERIES V2 M200 V2 / M210 V2 / M210 RTK V2 User Manual 2020.07 v2.
Searching for Keywords Search for keywords such as “battery” and “install” to find a topic. If you are using Adobe Acrobat Reader to read this document, press Ctrl+F on Windows or Command+F on Mac to begin a search. Navigating to a Topic View a complete list of topics in the table of contents. Click on a topic to navigate to that section. Printing this Document This document supports high resolution printing.
Contents Using This Manual 2 Legends 2 Before Flight 2 Download the DJI Pilot app 2 Download the DJI Assistant 2 for Matrice 2 Product Profile 5 Introduction 6 Feature Highlights 6 Assemble the Aircraft 7 Preparing the Remote Controller 9 Aircraft Diagram 11 Remote Controller Diagram 12 Aircraft 14 Profile 15 Flight Mode 15 Flight Status Indicator 16 Vision System and Infrared Sensing System 17 Return-to-Home (RTH) 21 Flight Recorder 26 Attaching and Detaching the Propel
Gimbal and Camera 51 Gimbal 52 DJI Pilot App 54 Manual Flight 55 Mission Flight 59 Album 61 DJI FlightHub 61 Menu 61 Flight Environment Requirements 63 Flight 62 GEO (Geospatial Environment Online) System 63 Flight Restrictions 64 GEO Unlocking 67 Preflight Checklist 67 Calibrating the Compass 67 Starting/Stopping the Motors 69 Stop the Motor Mid-flight 69 Flight Test 70 Appendix 4 50 Camera 72 Specifications 73 Firmware Update 75 Using the Zenmuse XT Gimbal and
Product Profile This chapter describes the features of the Matrice 200 series V2, shows how to assemble the aircraft, and contains diagrams of the aircraft and remote controller with component explanations. © 2019 DJI All Rights Reserved.
Product Profile Introduction Matrice 200 V2 / Matrice 210 V2 / Matrice 210 RTK V2 (M200 V2 / M210 V2 / M210 RTK V2) is a powerful aerial imaging system with class-leading agility and speed, redundant components for maximum reliability, and smart features that make performing complex tasks easy. The aircraft’s visual sensors* enable enhanced hovering precision even when flying indoors or in environments where GNSS is unavailable. Gimbal cameras can be easily exchanged to suit your application's needs.
MATRICE 200 SERIES V2 User Manual Zenmuse XT S is only available in select countries and regions. ** When using an upward gimbal with the M210 V2, an external GPS Kit connected through the expansion port is required. *** When using the M210 RTK V2, more accurate positioning data can be achieved when using a DJI D-RTK 2 High Precision GNSS Mobile Station for Matrice Series.
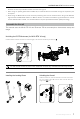
MATRICE 200 SERIES V2 User Manual Mounting the Propellers Propellers without silver rings go on motors without any marks. Press the propeller down onto the mounting plate and rotate in the lock direction until secure. Propellers with silver rings go on motors with the same color marks. Check that the propellers are secure before each flight. Mounting the Gimbal and Camera 1 Press the Gimbal Detachment button to remove the cover. 2 3 Rotate the gimbal lock to the locked position.
MATRICE 200 SERIES V2 User Manual Only use battery slot B when using one battery to supply power. In this case, the aircraft can only be powered on, but cannot take off. If for any reason only one battery is available during flight, land the aircraft immediately and replace the batteries as soon as possible. In this case, the gimbal connectors and the ports at rear of the aircraft cannot supply power to their connected devices. Make sure to use the included TB55 batteries.
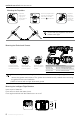
MATRICE 200 SERIES V2 User Manual For M200 V2 Mounting the Monitor to the Remote Controller A B Ensure that Part B is unlocked. Connect Part B to Part A. Lock the Mounting Bracket. Use a coin or the screwdriver included to adjust the tightness of the tilt axis. Connecting the Mobile Device Place your mobile device and adjust the clamp to secure. 2 Press the button to release the clamp. 1 3 10 © 2019 DJI All Rights Reserved. Connect your mobile device with a USB cable.
MATRICE 200 SERIES V2 User Manual Aircraft Diagram 17 8 15 14 13 16 7 12 6 19 9 2 5 20 21 18 22 1 4 23 10 3 24 25 26 11 27 13 The M200 V2 comes with a single downward gimbal connector. The M210 V2 and M210 RTK V2 each comes with a dual downward gimbal connector. The illustrations in this manual may vary from the actual product. 1. FPV Camera 2. Forward Vision System 3. DJI Gimbal Connector v2.0 (DGC2.0) I 4. DJI Gimbal Connector v2.0 (DGC2.0) II* 5. Gimbal Detachment Button 6. Frame Arms 7.
MATRICE 200 SERIES V2 User Manual Remote Controller Diagram 7 8 12 9 10 13 11 1 2 48 3 6 14 16 15 4 18 5 29 20 18 31 17 M200 V2 19 30 28 26 22 27 23 24 25 32 21 1. HDMI Port Output HDMI video signal. M210 V2 / M210 RTK V2 2. USB Port Supported extended device, e.g. U disk. 3. microSD Card Slot Provides extra storage space for the display device, maximum card size is 128 GB. 4.
MATRICE 200 SERIES V2 User Manual 36 47 33 47 37 38 39 40 42 41 34 43 44 46 35 24. Aperture Setting Button When using a Zenmuse X4S, X5S or X7, press and rotate the Camera Setting Dial to set the aperture. 25. ISO Setting Button When using a Zenmuse X4S, X5S or X7, press and rotate the Camera Setting Dial to set the ISO. 26. Pause Button Press once and the aircraft will brake and hover. 27. Power Button Used to turn the remote controller on and off. 28.
Aircraft This section describes the features of the Flight Controller, Vision System, and the Intelligent Flight Battery.
Aircraft Profile The aircraft includes a flight controller, a communication system, vision systems, a propulsion system and an Intelligent Flight Battery. This section describes the functions of these components. Flight Mode The following flight modes are available for the aircraft: P-mode (Positioning) : P-mode works best when the GPS signal is strong.
MATRICE 200 SERIES V2 User Manual In A-mode, the Vision System and some advanced features are disabled. Therefore, the aircraft cannot position or auto-brake in this mode and is easily affected by its surroundings, which may result in horizontal shifting. Use the remote controller to position the aircraft. Maneuvering the aircraft in A-mode can be difficult. Before switching the aircraft into A-mode, make sure you are comfortable flying in this mode.
MATRICE 200 SERIES V2 User Manual Warning Fast yellow flashing Remote Controller Signal Lost Slow red flashing Low Battery Warning Fast red flashing Critical Low Battery Warning Red flashing for 5 seconds IMU Error (when performing CSC) — Solid Red Critical Error Fast alternating red and yellow flashing Compass Calibration Required Alternating red and green flashing The RTK function of the M210 RTK V2 is enabled but RTK data is unavailable.
MATRICE 200 SERIES V2 User Manual Detection Range The detection range of the Vision System is depicted below. Note that the aircraft cannot sense and avoid obstacles that are not within the detection range. 10m The aircraft cannot detect objects in the grey area. Please fly with caution. Ultrasonic sensor detection range is depicted below. Infrared Sensing System detection range is depicted below. 18 © 2019 DJI All Rights Reserved.
MATRICE 200 SERIES V2 User Manual A note on the vision system and the ultrasonic sensor detection range is illustrated below. There may be a ±2° error in the angle of the downward vision system and ultrasonic sensor due to errors in the assembly process. To prevent accidents, please DO NOT attach any payload that might be in the sensors’ Do Not Obstruct Zone. If the payload comes into the Do Not Obstruct Zone, it is recommended to turn off the downward vision system in the Pilot app and fly with caution.
MATRICE 200 SERIES V2 User Manual If using a laptop for calibration, it is recommended to remove the landing gear before calibrating the downward vision system. Otherwise, the rectangle produced by the vision system may not be aligned with the boxes on the screen as the aircraft is farther from the screen. DO NOT power off or unplug the USB cable after calibration. Wait for data calculation. Using the Vision System The Vision System is activated automatically when the aircraft is turned on.
MATRICE 200 SERIES V2 User Manual The performance of your Vision System and Infrared Sensing System is affected by the surface being flown over. Ultrasonic sensors may not be able to accurately measure distances when operating above sound-absorbing materials and the cameras may not function correctly in suboptimal environments. The aircraft will switch from P-mode to A-mode automatically if neither GPS nor Vision System and Infrared Sensing System are available.
MATRICE 200 SERIES V2 User Manual The aircraft can sense and avoid obstacles when the Forward Vision System is enabled and lighting conditions are sufficient. The aircraft will automatically ascend to avoid obstacles and descend slowly as it returns to the home point. To ensure the aircraft returns home while facing forward, it cannot rotate or fly left and right during RTH while the Forward Vision System is enabled.
MATRICE 200 SERIES V2 User Manual Battery Level Warning Low battery level warning Remark Battery power is low. Land the aircraft. Critical Low battery level warning The aircraft must land immediately. Estimated remaining flight time Estimated remaining time is based on current battery level. Aircraft Status Indicator DJI Pilot App Flight Instructions Tap “Go-home” to have the aircraft return to the Home Point and land automatically, or “Cancel” to resume normal flight.
MATRICE 200 SERIES V2 User Manual 2. RTH procedure is triggered i.e., Smart RTH, Low-Battery RTH, and Failsafe RTH. 3. Home Point is confirmed and the aircraft adjusts its orientation. 4. a. The aircraft will ascend to the pre-set RTH attitude and then fly to the Home Point when the aircraft is further than 20 m from the Home Point. b. The aircraft will land automatically if RTH is triggered and the aircraft is less than 20 m from the home point. 5.
MATRICE 200 SERIES V2 User Manual Obstacle Avoidance During RTH The aircraft can sense and actively attempt to avoid obstacles during RTH, provided that lighting conditions are adequate for the Forward Vision System. Upon detecting an obstacle, the aircraft will act as follows: 1. The aircraft decelerates when an obstacle is sensed at approx. 49 feet (15 meters) ahead. 2. The aircraft stops and hovers then starts ascending vertically to avoid the obstacle.
MATRICE 200 SERIES V2 User Manual Center of Gravity Calibration The center of gravity will shift when the aircraft payloads changes. To ensure stable flight, it is required to recalibrate the aircraft’s center of gravity when a new payload is installed. Calibrate in a windless environment. Make sure that the aircraft is hovering and there is a strong GPS signal during calibration. Maintain visual line of sight of the aircraft and pay attention to flight safety.
MATRICE 200 SERIES V2 User Manual Detaching the Propellers Press the propeller down onto the mounting plate and rotate it in the unlock direction. Propeller blades are sharp; please handle with care. Only use DJI approved propellers. DO NOT mix propeller types. Stay clear of spinning motors. DO NOT touch the propellers when they are spinning. Ensure to check that the propellers and motors are installed firmly and correctly before each flight.
MATRICE 200 SERIES V2 User Manual 12. Heating: Batteries are able to work even in cold weather, ensuring a safe flight. Refer to "Using the Battery" section for details. 13. Waterproof and Dustproof: The vehicle’s new airframe design improves the Ingress Protection Rating to IP43 in accordance with the global IEC 60529 standards. Refer to the Disclaimer and Intelligent Flight Battery Safety Guidelines before use. Users take full responsibility for all operations and usage.
MATRICE 200 SERIES V2 User Manual Battery Level Button LED4 LED3 LED2 LED1 Always align the grooves on the Intelligent Flight Battery with the battery slot tracks. Make sure the Status LED of the Charging Hub has a blinking pattern of charging or ready to charge indicating that the battery is inserted correctly. Press the release button to detach batteries after charging is complete. DO NOT leave metal terminals exposed to open air when not in use.
MATRICE 200 SERIES V2 User Manual LED3 blinks twice per second Over charge detected LED3 blinks three times per second Over-voltage charger detected LED4 blinks twice per second Charging temperature is too low (<0°C) LED4 blinks three times per second Charging temperature is too high (>40°C) After any of the above mentioned protection issues are resolved, press the button to turn off the Battery Level Indicator.
MATRICE 200 SERIES V2 User Manual 3. Run the firmware update program. Press the update button and wait for the process to finish. 4. The Charging Hub will automatically restart when the update has been successfully completed. 5. Repeat this process if the firmware update fails for any reason.
MATRICE 200 SERIES V2 User Manual Checking Battery Levels Battery Level Indicators display how much power remains. When the battery is turned off, press the Power button once and the Battery Level Indicators LEDs will display the current battery level. See below for details. The Battery Level Indicators will also show the current battery level during discharging. The indicators are defined below. : LED is on. : LED is off. : LED is flashing.
MATRICE 200 SERIES V2 User Manual DJI AirSense Airplanes and helicopters with an ADS-B transceiver will actively broadcast flight information including location, flight path, speed, and altitude. DJI AirSense receives this by ADS-B transceivers via an on-board receiver or internet connection.
MATRICE 200 SERIES V2 User Manual Components at the Rear of the Aircraft M210 V2/M210 RTK V2 provides several I/O ports, which can be customized in the DJI Pilot app. The aircraft also has components such as Extended Power Port, USB Mode Switch, Linking Button, and USB Port. M200 V2* M210 V2 / M210 RTK V2 * Note that the M200 V2 only has USB Mode Switch, Linking Button, and USB Port.
MATRICE 200 SERIES V2 User Manual Pins Descriptions PWM power level is 3.3V and all pins can be configured in DJI Pilot app. Number Name 1 2 3 4 I/O port I/O port OSDK port Especially for an external GPS Kit* TIMESNYC GND GND / / Pins (from up PWM4/GPIO4/ PWM3/GPIO3 to down) HARDSYNC SDK_RX / / PWM1/GPIO1 PWM2/GPIO2 SDK_TX / / * An external GPS Kit is required when a single upward gimbal or other payload is used on the M210 V2.
MATRICE 200 SERIES V2 User Manual Mounting the Waterproof Rear Port Cover (For M210 V2 / M210 RTK V2) Users can customize a waterproof cover after connecting devices to the rear ports to ensure the level of ingress protection. First, remove the two screws in the rear of the aircraft and then remove the standard cover. Then mount your own waterproof cover. Top View 64.02 23.18 This curve is similar to an arc with a radius of 238.06 mm. 15.11 R238.06 Rear View 63.
Remote Controller This section describes the features of the remote controller that includes aircraft and remote controller operations.
Remote Controller Remote Controller Profile The CENDENCETM S remote controller features DJI’s OcuSync 2.0 technology for a maximum transmission distance of up to 5 mi (8 km).* Equipped with a DJI CrystalSky 7.85 inch ultra-bright monitor, it displays a HD live view directly via the built-in DJI Pilot app, providing a precise and responsive flying experience. Or equipped with a mobile device with a mobile device holder to download the DJI Pilot app.
MATRICE 200 SERIES V2 User Manual Charging the Battery The remote controller is powered by a WB37 intelligent battery, which can be charged via the charging port or by the WCH2 Intelligent Battery Charging Hub. Using the Charging Port Place the battery into the remote controller, and connect connector B of the battery power port, then connect the battery charger to a power outlet (100-240V, 50/60Hz). When charging is complete, the display on the remote controller will show 100%.
MATRICE 200 SERIES V2 User Manual Mounting the Monitor to the Remote Controller Mounting the DJI CrystalSky Monitor* A B Ensure that Part B is unlocked. Connect Part B to Part A. Lock the Mounting Bracket. Use a coin or the screwdriver included to adjust the tightness of the tilt axis. Mounting the Other Mobile Devices For other mobile devices (e.g. iPhones, iPads), the Cendence Mobile Device Holder and an appropriate USB cable are required.
MATRICE 200 SERIES V2 User Manual Optimal Transmission Range The transmission signal between the aircraft and the remote controller is most reliable when the antennas are positioned in relation to the aircraft as depicted below: 90° 5.8 GHz Strong 60° 2.4 GHz Weak Optimal Transmission Range Ensure the aircraft is flying within the optimal transmission zone. To maintain optimal transmission performance, adjust the remote controller and antennas according to the above diagram.
MATRICE 200 SERIES V2 User Manual Operating the Aircraft Controlling the Aircraft This section explains how to control the orientation of the aircraft through the remote controller. Control can be set to Mode 1, Mode 2 or Mode 3, or to a custom mode.
MATRICE 200 SERIES V2 User Manual Remote Controller (Mode 2) Aircraft Left Stick Remarks Moving the left stick up and down changes the aircraft’s elevation. Push the stick up to ascend and down to descend. When both sticks are centered, the aircraft will hover in place. The more the stick is pushed away from the center position, the faster the aircraft will change elevation. Always push the stick gently to prevent sudden and unexpected elevation changes.
MATRICE 200 SERIES V2 User Manual The Flight Mode Switch is locked to P-mode, regardless of the Flight Mode Switch's position. To change flight modes, go to the Camera View in DJI Pilot and enable Multiple Flight Modes in Main Controller Settings. After enabling multiple flight modes, toggle the switch to P for Position mode and S for Sport Mode. RTH Button Press and hold the RTH button to start the Return to Home (RTH) procedure. The aircraft will then return to the last recorded Home Point.
MATRICE 200 SERIES V2 User Manual Operating the Camera Shoot videos/photos with the Shutter Button and Video Recording Button on the remote controller. 1. Shutter Button Press to take a photo. Photos can be taken even while recording video. 2. Video Recoding Button Press once to start recording video, then press again to stop recording. 3. Autofocus button Press once to focus automatically. 4. Focus Adjustment Rotate Focus Adjustment Knob to set the focal length.
MATRICE 200 SERIES V2 User Manual Master remote controller 1. Connect the remote controller to your mobile device and launch the DJI Pilot App. to enter the remote controller settings window. 2. Go to the Camera View and tap 3. Select Master and set the remote controller as the Master Remote Controller. Follow the prompts to link the remote controller and aircraft. Once successfully linked, configuration is complete. Assistant remote controller 1.
MATRICE 200 SERIES V2 User Manual 4. App Functions On the Assistant Remote Controller, the Flight Route function and Playback function are unavailable in DJI Pilot. Remote Controller Screen Descriptions The remote controller of the M200 Series V2 has a screen that is primarily used to display aircraft and camera parameters. Dual Remote Controller Mode When using in dual remote controller mode, the contents of the Master and Assistant remote controller displays are different.
MATRICE 200 SERIES V2 User Manual Single Remote Controller Mode When using single remote controller, the screen display is the same as that of the Master display of the dual remote controller mode. Linking the Remote Controller The remote controller comes linked to your aircraft before delivery. Linking is only required when using for the remote controller for the first time. Follow these steps to link a remote controller: 1.
MATRICE 200 SERIES V2 User Manual Press the C1 and C2 buttons and the Start/Stop button for fast linking. Ensure the r emote controller is within 1.6 ft (0.5 m) of the air craft during linking. The remote controller will unlink itself from an aircraft if a new remote controller links to the same aircraft. In Dual Remote Controller Mode, the Assistant remote controller must also be relinked to the aircraft when the Primary remote controller is relinked to the aircraft. Mounting the Control Stick Covers 1.
Gimbal and Camera This section focuses on the technical specifications of the camera and explains how to use the gimbal.
Gimbal and Camera Camera Camera Profile Using the Zenmuse Z30 / X5S as an example, this section will demonstrate the technical specifications of the camera while explaining how to use the gimbal. Camera microSD Card Slot When using a Zenmuse X4S, X5S or X7, to store photos and videos, plug the microSD card into the slot shown below before powering on the aircraft. The aircraft comes with a 64 GB microSD card which was inserted into the slot before delivery and can support card sizes of up to 128 GB.
MATRICE 200 SERIES V2 User Manual Gimbal Gimbal Profile The 3-axis gimbal provides a steady platform for the attached camera, allowing you to capture stabilized images and video Users can control gimbal angles using the remote controller or the app. +20° +30° 0° -320° -120° -20° horizon +320° Using the DJI Pilot App to Control Gimbal Follow the steps below to use the DJI Pilot app to control gimbal orientation: 1. Launch DJI Pilot and enter the Camera View. 2.
MATRICE 200 SERIES V2 User Manual Gimbal Operation Modes Three gimbal operation modes are available. Switch between the different operation modes in DJI Pilot's Camera View. Note that your mobile device must be connected to the remote controller for changes to take effect. Refer to the table below for details: Pitch Pan Roll Follow Mode When the aircraft turns horizontally, the gimbal will pan with the aircraft so that the relative angle of the gimbal and the aircraft’s heading remains the same.
DJI Pilot App This section introduces the main functions of the DJI Pilot app.
DJI Pilot App The DJI Pilot app is specifically developed for enterprise users. Manual flight integrates a variety of professional features that make flying simple and intuitive. Mission flight supports flight planning, and allows you to control the drone automatically, making your workflow much simpler and more efficient. Mission Flight S M210 RTK V2 FlightHub Data Sync Bind Aircraft Manual Flight Enter the Camera View by tapping Manual Flight.
MATRICE 200 SERIES V2 User Manual 1. System Status Bar : This icon indicates aircraft flight status and displays various warning messages. READY TO GO (GPS) 2. Obstacle Detection Status : Red bars are displayed when obstacles are close to the aircraft. Orange or yellow bars are displayed when obstacles are within the detection range. 3. Battery Level Indicator Bar : The battery level indicator provides a dynamic display of the battery level.
MATRICE 200 SERIES V2 User Manual 14. Auto Exposure Lock AE : Tap to lock the exposure value. AE 15. More Settings to enter the extended menu to view and adjust the parameters of all other settings. Tap : Flight Controller Settings — Includes Home Point settings, Return to Home altitude, maximum altitude, distance limit, sensors state, remote controller signal lost action, remote controller signal lost action, center of gravity auto calibration, extended IO options, etc.
MATRICE 200 SERIES V2 User Manual 25. Zoom Menu Tap and hold T to zoom in. The magnification will be displayed under the button. Tap and hold W to zoom out. Tap R to reset the magnification to 1x. 26. Flight Telemetry D 30 m : Horizontal distance between the aircraft and the Home Point. H 10.0 m : Height from the Home Point. HS 10.0 m/s : Aircraft horizontal speed. VS 2.0 m/s : Aircraft vertical speed. 113.95434, 22.54764: The longitude and latitude of the aircraft.
MATRICE 200 SERIES V2 User Manual Mission Flight Tap to enter the mission library. Set a waypoint flight path including up to 240 waypoints, define waypoint actions then start flying with a tap. 1 2In Flight 3 (GPS)4 5 6 7 8 4.07V 9 4.
MATRICE 200 SERIES V2 User Manual Route The settings are applied to the entire route, including aircraft speed, height, yaw, gimbal control, and completion action. Drone Yaw: a. Along the route: The aircraft’s nose is always aligned to the direction of the next two waypoints. b. Manual: Users manually control the aircraft heading using the control sticks. c. Set Each Waypoint: Set aircraft heading at each waypoint in “Waypoints” settings. d. Center to POI: This option will be displayed when a POI is added.
MATRICE 200 SERIES V2 User Manual Album View your masterpieces all in one place. You can save the photos or videos to the CrystalSky monitor or your mobile device. DJI FlightHub Content related to DJI FLIGHTHUBTM will be shown here if the DJI account used has a FlightHub license. DJI FlightHub is a web-based drone management platform that provides users with real-time monitoring, flight logs and data, team management and more. For more information, please visit www.dji.
Flight This section describes safe flight practices and flight restrictions.
Flight Once pre-flight preparation is complete, it is recommended to use the flight simulator in DJI Assistant 2 for Matrice to hone your flight skills and practice flying safely. Ensure that all flights are carried out in an open area. It is important to understand basic flight guidelines for the safety of both you and those around you. Refer to the Disclaimer and Safety Guidelines for more information. Flight Environment Requirements 1. Do not use the aircraft in severe weather conditions.
MATRICE 200 SERIES V2 User Manual The GEO System is for advisory purposes only. Individual users are responsible for checking official sources and determining which laws or regulations may apply to their flight. In some instances, DJI has selected widely-recommended general parameters (such as a 1.5-mile radius at airports) without making any determination as to whether these guidelines match regulations that apply to specific users.
MATRICE 200 SERIES V2 User Manual Maximum Flight Altitude Max Radius Home Point Height of aircraft when turned on Strong GPS Signal Restriction Description DJI Pilot App Message Max Altitude Aircraft's altitude cannot exceed the specified value. Maximum Flight Altitude reached. Adjust your altitude using FC Settings if required. Max Radius Flight distance cannot exceed the specified value. Maximum Flight Distance reached. Adjust your distance using FC Settings if required.
MATRICE 200 SERIES V2 User Manual GEO Zone Flight Restrictions GEO Zone Description Takeoff: The aircraft’s motors cannot be started. Restricted Zone In-flight: When GPS signal changes from weak to strong, DJI Pilot starts a 20-second countdown. Once the countdown is over, the aircraft immediately lands in semi-automatic descent mode and turns off its motors after landing. In-flight: When the aircraft approaches the boundary of the Restricted Zone, it automatically decelerates and hovers.
MATRICE 200 SERIES V2 User Manual GEO Unlocking Due to differing laws and regulations between countries and regions, and differing flight restrictions between GEO Zones, DJI provides users with two methods for unlocking GEO Zones: Self-Unlocking and Custom Unlocking. Self-Unlocking is used for Authorization Zones, where the user is required to submit an unlock request by authenticating their phone number for a registered DJI account. This feature is only available in certain countries.
MATRICE 200 SERIES V2 User Manual 3. Hold the aircraft vertically, with the nose pointing downward, and rotate it 360 degrees around the center axis. Re-calibrate the aircraft if the aircraft status indicators blink red. If the Aircraft Status Indicator blinks red and yellow after the calibration procedure, move your aircraft to a different location and try again. DO NOT calibrate the compass near metal objects such as a metal bridge, cars, scaffolding.
MATRICE 200 SERIES V2 User Manual Starting/Stopping the Motors Starting Motors The Combination Stick Command (CSC) is used to start the motors. Push both sticks to the bottom inner or outer corners to start the motors. Once the motors start spinning, release both sticks simultaneously. OR Stopping the Motors There are two ways to stop the motors: 1. When aircraft has landed, push the left stick down , then conduct the same CSC that was used to start the motors, as shown above .
MATRICE 200 SERIES V2 User Manual Flight Test Takeoff/Landing Procedures 1. 2. 3. 4. 5. 6. 7. 8. 9. Place the aircraft in an open, flat area with the battery level indicators facing towards you. Turn on the remote controller, then turn on the Intelligent Flight Battery. Launch DJI Pilot and enter the Camera View. Wait until the Aircraft Status Indicators blink green (GPS) or blink green and blue alternately (RTK, for the M210 RTK V2 only).
MATRICE 200 SERIES V2 User Manual Make sure the battery ports, battery compartment ports, battery surfaces, and battery compartment surfaces are dry before inserting the batteries. Make sure the battery ports and battery surfaces are free from any liquid before charging the batteries. Before packing the aircraft into the carrying case, ensure that it is free from any liquid by wiping it carefully. Product warranty does not cover water damage.
Appendix
Appendix Specifications Aircraft Dimensions M200 V2: Unfolded, propellers and landing gears included, 883×886×398 mm Folded, propellers and landing gears excluded, 722×247×242mm M210 V2: Unfolded, propellers and landing gears included, 883×886×398 mm Folded, propellers and landing gears excluded, 722×282×242 mm M210 RTK V2: Unfolded, propellers and landing gears included, 883×886×427 mm Folded, propellers and landing gears excluded, 722×282×242 mm Diagonal Wheelbase 643 mm Weight M200 V2: Approx. 4.
MATRICE 200 SERIES V2 User Manual Supported DJI Gimbals Zenmuse X4S/X5S/X7/XT/XT2/Z30/XT S Supported Gimbal Configurations M200 V2: Single Downward Gimbal M210 V2 / M210 RTK V2: Single Downward Gimbal (connected to Gimbal Connector I), Dual Downward Gimbals, Single Upward Gimbal Ingress Protection Rating IP43 GNSS M200 V2 / M210 V2: GPS+GLONASS; M210 RTK V2: GPS+GLONASS+BeiDou+Galileo Operating Temperature -4° to 122° F (-20° to 50° C) Beacons Power Avg. 0.6 W Luminous Intensity Min.
MATRICE 200 SERIES V2 User Manual Upward Infrared Sensing System Obstacle Sensing Range 0-16.4 feet (0-5 m) FOV ±5° Operating Environment Large, diffuse, and reflective obstacles (reflectivity >10%) Intelligent Flight Battery (TB55-7660mAh-22.8V) Capacity 7660 mAh Voltage 22.8 V Battery Type LiPo 6S Energy 174.6 Wh Net Weight (Single One) Approx.
MATRICE 200 SERIES V2 User Manual 2. Click the corresponding device name and then the firmware update tag. 3. Select the firmware version required. Make sure to connect to the Internet when downloading the firmware. 4. Restart the device after the firmware update is complete. The battery firmware is included in the aircraft firmware. Be sure to update all the batteries' firmware. The firmware update will take around 15 minutes.
MATRICE 200 SERIES V2 User Manual Dual Downward Gimbals The M210 V2/M210 RTK V2 supports dual downward gimbals. Using the Dual Downward Gimbals All Zenmuse X5S, X4S, XT, X7, XT2, and Z30 gimbals are supported.
MATRICE 200 SERIES V2 User Manual GPS Kit Indicator Descriptions Blinking Blue Self-checking, or positioning finished but not used. Blinking Green Slowly Positioning finished and data from GPS kit used. Red Error Carrying Box Descriptions 2 1. Landing Gear × 2 2. Propeller Pair × 4 1 2 3. Aircraft 4. Remote Controller 5. CrystalSky Monitor/iPad 6. Intelligent Flight Battery 7. Wb37 Intelligent Battery 8. In2ch Charging Hub 9. WCH2 Charging Hub 10. Battery Charger 11.
DJI Support https://www.dji.com/support This content is subject to change. Download the latest version from http://www.dji.com/matrice-200-series-v2 If you have any questions about this document, please contact DJI by sending a message to DocSupport@dji.com. Copyright © 2019 DJI All Rights Reserved.