RONIN 2 V1.2 2017.
Searching for Keywords Search for keywords such as “battery” and “install” to find a topic. If you are using Adobe Acrobat Reader to read this document, press Ctrl+F on Windows or Command+F on Mac to begin a search. Navigating to a Topic View a complete list of topics in the table of contents. Click on a topic to navigate to that section. Printing this Document This document supports high resolution printing.
Using this Manual Legend Warning Important Hints and Tips Reference Before You Begin The following documents have been produced to help you safely operate and make full use of your RONINTM 2: Ronin 2 in the Box Ronin 2 Quick Start Guide Ronin 2 User Manual Ronin 2 Intelligent Battery Safety Guidelines Ronin 2 Disclaimer and Safety Guidelines Check all of the included parts listed in the In the Box manual.
Contents Using this Manual 1 Before You Begin 1 Download the Ronin 2 App 1 Download DJI Assistant 2 1 Introduction Ronin 2 Diagram Getting Started 3 4 5 Assembling the Grip 5 Installing the Grip onto the Gimbal 6 Mounting the Camera 7 Extending the Roll Axis Arm 10 Cable and Accessory Guides 10 Balancing 12 Before Balancing 12 Step 1: Balancing the Vertical Tilt 12 Step 2: Balancing Depth for the Tilt Axis 13 Step 3: Balancing the Roll Axis 13 Step 4: Balancing the Pan Axis 14
Introduction DJI Ronin 2 is a professional 3-axis handheld gimbal that is highly compatible with cable cams, drones, cranes, Steadicams, and more. Its customizable mounting modes such as Handheld, Car Mount, Aerial, and Tripod mode help the Ronin 2 work accurately in different shooting scenarios. Also, its new Pan Lock mode has been specially designed for work with Steadicams. Features Highlights • Its carbon fiber structure makes the Ronin 2 lightweight, strong, and functional.
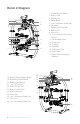
Ronin 2 Diagram 1 2 3 4 5 6 17 16 15 7 8 9 14 10 13 11 12 18. Battery Mount Release Button 19. Secondary Power Button 20. Battery Eject Buttons 21. 14.4 V P-Tap Port 22. 22.8 V DC-out Port 23. Built-in Touch Panel 24. Built-in Antennas 25. D-Bus Port 26. 14.4 V Accessory Power Port 27. DC-in Port 28. 14.4 V Accessory Power Port 18 19 20 21 22 1. Gimbal Dovetail Mount 2. Ronin 2 Grip 3. SDI-Out Port 4. Power Button 5. 14.4 V Accessory Power Port 6. Pan Motor 7. Camera Top Cross Bar 8.
Getting Started Assembling the Grip Use the Grip to hold the Ronin 2 during setup or operation. Follow the steps below to assemble the Ronin 2 Grip. on the Grip Feet and extend them outwards. 1. Press the button and then tighten them . 2. Attach the upper and lower parts of the Grip 1 2 3 3. The hand stops on both sides are used to help users hold the Grip firmly. Adjust their positions according to your needs. When setting on a table, make sure the table is flat and level.
Ronin 2 User Manual Installing the Grip onto the Gimbal 1. The pan, tilt and roll axes are locked by default. Unlock the tilt and roll axes to adjust their positions as shown, then lock the tilt and roll axes again. 2. Toggle the lever to the unlocked position. Next, attach the gimbal to the Grip the safety lock engages. Then lock the lever. 2 11 To remove the gimbal, toggle the lever to the unlocked position and press down the safety lock. Then slide the gimbal off the dovetail mount.
Ronin 2 User Manual Mounting the Camera Supported Cameras ARRI ALEXA Mini Canon C300 MKII RED Raven ARRI ALEXA XT Canon C500 RED Dragon Black Magic Ursa Mini Panasonic Varicam LT Sony FS5 Black Magic Ursa Mini Pro RED Epic Sony FS7 Canon C100 RED Epic-W Sony F55 Canon C100 MKII RED Scarlet Sony F5 Canon C300 RED Weapon Supported Lens Canon Fujinon Cooke Zeiss CN-E Primes ZK2.5x 14 T2.9 Mini S4/i Primes Ultra Primes CN-E 18-80 ZK4.7x 19 T2.
Ronin 2 User Manual Camera Size Requirements The maximum depth from the center of gravity on the camera base plate is 250 mm. The maximum height, measured from the top of the camera base plate, is 170 mm. The maximum width is 190 mm. m 170mm 250m 190mm Make sure the camera is powered off during installation. It is recommended to use soft connection cables to avoid obstructing camera movement. Mounting a Camera 1.
Ronin 2 User Manual 2. Attach the Camera Top Cross Bar to the camera. Refer to the locations below to mount the Top Cross Bar to the ARRI ALEXA MINI (using M4-10 screws), RED EPIC (using 1/4" screws) and RED WEAPON 8K (using M4-10 screws) cameras. ARRI ALEXA MINI RED EPIC, RED WEAPON 8K The Top Cross Bar can be installed in two directions. If the camera lens’ center of gravity is forward, then mount the Top Cross Bar with the long part forward as shown. 3.
Ronin 2 User Manual Extending the Roll Axis Arm The roll axis arm can be extended up to 5.5 cm if there isn’t sufficient mounting space for a long camera. Loosen the screws on both sides of the roll axis, and toggle the levers to their unlocked position. Next, pull out the arms on both sides simultaneously as needed. Make sure the measurement marks match up on both of the arms. Tighten the screws and toggle the levers.
Ronin 2 User Manual The Top Mounting Block replaces the center handle on the Ronin 2 Grip. It has 1/4"-20 holes allowing third party handles and accessories to be attached. The Universal Mount offers an attachment point for the gimbal allowing it to be mounted to various platforms such as a jib, vehicle mount, or cable cam. Do not use unauthorized accessories/cables as they may harm your Ronin 2 and void your warranty.
Balancing To obtain the best performance from the Ronin 2, proper balancing is essential. Accurate balance is critical for shots where the Ronin 2 will be subjected to fast motion or acceleration (running, biking, moving in cars, attached to aircraft, etc.). Proper balance will also offer longer battery runtimes. There are three axes that need to be accurately balanced prior to turning on the Ronin 2 and setting up the software. Before Balancing 1.
Ronin 2 User Manual Step 2: Balancing Depth for the Tilt Axis 1. Rotate the tilt axis so that the camera lens is pointing forward. to the unlocked position and then loosen the top securing knob . 2. Toggle the lever Adjust the camera's balance by turning the adjustment knob until the camera remains still when rotating the tilt axis 45 degrees upwards or downwards. and toggle the lever to the locked position. 3. Tighten the securing knob 4. Lock the tilt axis.
Ronin 2 User Manual Step 4: Balancing the Pan Axis Please note: It is recommended to mount the provided MotionBlock before balancing the pan axis when shooting in a high-speed situation for improved gimbal performance. Attach the MotionBlock to the pan axis and tighten the screws as shown. It is necessary to use the optional Counterweights if mounting a longer camera system and the MotionBlock cannot be mounted due to the pan axis balancing position. Visit the official DJI Online Store to learn more. 1.
Intelligent Battery The Ronin 2 comes with a hot-swappable dual battery system, allowing the gimbal work continuously without suspending shooting. The TB50 Intelligent Battery has a capacity of 4280 mAh, a voltage of 22.8 V, and a variety of power management functions. When the Intelligent Battery is fully charged, it can power the whole system, including the gimbal, camera, Focus system, and monitor for approximately 2.5 hours. When only powering the gimbal, the TB50 has a max runtime of eight hours.
Ronin 2 User Manual Assistant 2 app. 3. Balancing Function: Automatically balances the voltage of each battery cell when charging. 4. Overcharge Protection: Charging stops automatically when the battery is fully charged. 5. Temperature Protection: The battery will only charge when the temperature is between 5-45° C (41-113° F). 6. Overcurrent Protection: Battery stops charging when high amperage (> 10 A) is detected. 7.
Ronin 2 User Manual 6 1 5 4 2 8 7 3 1. 2. 3. 4. Power Port Charging Port Charging Port Cover Battery Charging Level Indicators 5. 6. 7. 8. Cover/Battery Release Button Status LEDs Firmware Update Port (Micro USB) Speaker Switch 1. Connect the Battery Charger to a power outlet (100-240 V, 50/60 Hz), then uncover the rubber cover on the power port to connect the Charging Hub to the Battery Charger. Charging Hub Charger Power Outlet 2.
Ronin 2 User Manual Status LED Descriptions Status LED (Charging Hub) Description Blinking Green Charging — Solid Green Fully charged Blinking Red Battery Charger Error. Retry with an official battery charger. — Solid Red Intelligent Battery error Blinking Yellow Battery temperature too high/low.
Ronin 2 User Manual After any of the above-mentioned protection issues are resolved, press the Battery Level button to turn off the Battery Level Indicator. Unplug the Intelligent Battery from the charger and plug it back in to resume charging. Note that you do not need to unplug and plug the charger in the event of a room temperature error. The charger will resume charging when the temperature falls within the normal range. DJI is not responsible for damage caused by third-party chargers.
Ronin 2 User Manual Using the Intelligent Battery Check the Battery Level Press the Battery Level button once to check the battery level. Powering ON/OFF Press and hold the Power button on the gimbal or Battery Mount to turn on the Ronin 2. Make sure you unlock the pan, tilt, and roll axes before powering on the Ronin 2. Heating the Battery Manual Heating: When the battery is powered off, press and hold the Power button for 3 seconds to initiate battery warm-up manually.
Gimbal Settings Built-in Touch Panel Settings After balancing and powering on the Ronin 2, you can adjust gimbal settings directly on the Built-in Touch Panel. Buttons Description Mounting Mode Button Back Button USB Type-C Port Jog Wheel Lock Button Follow Mode Button Toggle Button D-Bus Port OK Button Motor Pause Button 1. Mounting Mode Button Press the Mounting Mode button to select a mounting mode. Handheld: Select Handheld mode when using the Ronin 2 handheld.
Ronin 2 User Manual enabled. It is not related to Free, Recenter, or FPV mode. FPV Mode:The gimbal will synchronize with the movement of the Grip including roll to provide a first-person perspective experience. Recenter Mode: The gimbal will reorient and reset the pan angle to the forward-facing direction. 3. Back Button Press once to go back to the previous menu. 4. Toggle Button Press once to toggle between the submenus. 5. Jog Wheel Rotate to select options. 6.
Ronin 2 User Manual 5. Motor Pause : Indicates the motor is powered off. 6. Pan Lock Mode : Indicates the gimbal is in Pan Lock Mode, and the pan motor is powered off. 7. Follow Mode : Free mode. : Follow mode. : FPV mode. : Recenter mode. 8. Working Battery number : Shows the number of batteries currently working. The Ronin 2 can operate with one or two batteries. 9. Battery Level :Displays the current battery level.
Ronin 2 User Manual Stiffness: Select the mounting mode prior to adjusting the Stiffness value. The motor stiffness adjustment allows you to fine-tune the amount of power that is applied by the motors as they react and balance the weight on each axis. Please make sure you leave an extra margin for this setting to ensure stability at all times. For example, if the Pan axis starts to shake at a stiffness of 40, then lower the value to 32.
Ronin 2 User Manual 2. More Settings 12 2 60% 0º Motor Basic More Set power-on position Gimbal Trim Pan Tilt +0 +0.0 Balance test Set the Power-on Position: It is not necessary to set the power-on position if there is no special requirement. To set the power-on position, adjust the pan position as needed, and then press the OK button to confirm. The Ronin 2 will record this new position and the pan axis will stay at the recorded position when restarted.
Ronin 2 User Manual Monitor 12 1. Motor 2 60% Displays the power, angle, and temperature of motors. If a particular motor axis indicates a power reading greater than 10, this often means the mechanical balance of the camera hasn’t been properly adjusted. A properly balanced camera rig will display readings close to 0 power on each axis, but these values may vary. Monitor Motor Device Log Angle Pan 1.4º Tilt 1.4º Roll 4.5º 2.
Ronin 2 User Manual Endpoint: Limits the gimbal’s rotation range by setting the endpoint during controller input. Test Endpoint: Allows testing of the pan and tilt endpoints. Ensure the camera is unobstructed before tapping the test buttons. The default endpoint settings for pan axis are set to 180°, which means there is no endpoint for the pan axis, allowing it to rotate 360° continuously. 2. Channel The channel indicator provides feedback during remote operator configuration.
Ronin 2 User Manual 3. More Access Log File: Internal storage is built into the Ronin 2 for recording data. If the gimbal is acting abnormally, contact DJI Support. If the provided solutions are not successful, DJI Support will request log files for further analysis. Access log files only when instructed by a DJI Support specialist. Password: Displays the default Bluetooth password of your Ronin 2. The password can be changed.
Ronin 2 User Manual Ronin 2 App The Ronin 2 app allows you to adjust gimbal settings remotely. Also, new intelligent features have been added to the Create menu such as Track, CamAnchor, and more. Use the Ronin 2 app to activate the Ronin 2 for the very first time. An internet connection is required for product activation. Configuration You can use the Default Settings or setup and save several custom settings profiles.
Ronin 2 User Manual Create The Create menu includes the Video, Track, and CamAnchor features. Ensure the Ronin 2 is in Follow or Free mode when using Create features. It is recommended to mount the Ronin 2 onto a tripod when using Create features. Video You can use the mobile device to control the camera for recording video. Speed Control Knobs: Turn the Speed Control Knobs to adjust the max speed of each axis. Roll Slider: Slide to control roll axis movement.
Ronin 2 User Manual Track Tap the screen to select several positions, and the camera will use the selected positions as a track to record video. 1 2 Position Settings: Up to 10 individual positions can be selected. Tap to add position and tap to delete. 1.0s 0.0s Time Settings: Duration is how long the camera will take to move between two positions, and Stay Time is how long it will stay at the current position. Stay Time Duration Preview Button: Tap Preview button to see if the position is proper.
Ronin 2 User Manual About Displays your account information, firmware version, and more. 32 © 2017 DJI OSMO All Rights Reserved.
Remote Controller Remote Controller Diagram 1 2 3 4 5 6 7 8 16 15 14 18 19 13 12 11 17 9 10 1. Built-in Antenna Do not obstruct the antenna. 2. Pan Axis Speed Control Knob Turn this Speed Control Knob to adjust the maximum speed of the pan axis. 3. Tilt Axis Speed Control Knob Turn this Speed Control Knob to adjust the maximum speed of the tilt axis. 4. Roll Axis Speed Control Knob Turn this Speed Control Knob to adjust the maximum speed of the roll axis. 5.
Ronin 2 User Manual 10. Neck Strap Bracket 11. Profile Switch Switch between various profiles. 12. C2 Button 13. Record Button Press once to start/stop recording. 14. USB Type-C Port For charging and updating firmware. 15. Battery Level Indicators Displays the current battery level. 16. Handle 17. Accessory Mounting Hole 1/4”-20 thread. 18. CAN Port 19. C1 Button Binding the Remote Controller The remote controller is bound to the gimbal by default.
Ronin 2 User Manual Charging Charge the Remote Controller using a USB charger via the USB Type-C port. The remote controller has a maximum run time of 6 hours when fully charged. Low High Charging Time: 2 hours (when charging at 2 A) Battery Level Indicators The battery level indicators display the current battery level. The following is a description of the indicators.
Operation Modes There are two operation modes for the Ronin 2: 3-Axis mode and Pan Lock mode. 3-Axis Mode 3-Axis mode is the standard, default mode. The Ronin 2 can be used in this mode without any adjustments. Pan Lock Mode Pan Lock mode is specially designed for using the Ronin 2 with Steadicams. To use Pan Lock mode: 1. Select the Handheld Mounting mode. 2. Enter the Settings page via the built-in touch panel and select “Pan Lock,” and then the pan motor will shut off. 3. Lock the pan axis.
Specifications General Built-In Functions Operation Modes Underslung Mode Upright Mode Briefcase Mode Handheld, Car Mount, Aerial, Tripod, & Steadicam Mode Built-in, independent IMU modules DJI Advanced 32-Bit ARM Processor DJI Specialized Gimbal Drive Motors with Encoders Dual Battery System Bluetooth Module D-Bus Receiver Supported 2.4 GHz/5.
Ronin 2 User Manual Mechanical & Electrical Characteristics Working Current Static current: ≈300 mA (@22.8 V) Dynamic current: ≈500 mA (@22.8 V) Locked motor current: Max 15 A (@22.8 V) Operating Temperature -4° F ~ 122° F (-20° C ~ 50° C) Operating Frequency 2.4-2.4835 GHz; 5.725-5.850 GHz Transmitter Power (EIRP) 2.4 GHz FCC: ≤25 dBm; CE: ≤20 dBm; SRRC: ≤20 dBm 5.8 GHz FCC: ≤25 dBm; CE: ≤14 dBm; SRRC: ≤14 dBm Weight Including handle bar: 14 lb (6.3 kg) Excluding handle bar: 11 lb (4.
Contents are subject to change. Download the latest version from http://www.dji.com/product/ronin-2 If you have any questions about this document, please contact DJI by sending a message to DocSupport@dji.com. RONIN is a trademark of DJI OSMO. Copyright © 2017 DJI OSMO All Rights Reserved.