
User Manual


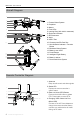
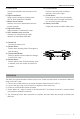
Table Of Contents
- Using This Manual
- Legend
- Read Before the First Flight
- Video Tutorials
- Download the DJI GO 4 App
- Download DJI Assistant 2
- Product Profile
- Introduction
- Feature Highlights
- Preparing the Mavic Air
- Aircraft Diagram
- Remote Controller Diagram
- Activation
- Aircraft
- Flight Modes
- Aircraft LEDs and Status Indicator
- Return to Home
- Vision Systems
- Intelligent Flight Modes
- Advanced Pilot Assistance Systems
- Flight Recorder
- Attaching and Detaching the Propellers
- Intelligent Flight Battery
- Gimbal and Camera
- Remote Controller
- Using the Remote Controller
- Optimal Transmission Zone
- Linking the Remote Controller
- DJI GO 4 App
- Equipment
- Editor
- SkyPixel
- Me
- Controlling the Aircraft with a Mobile Device
- Flight
- Flight Environment Requirements
- Flight Limits and GEO Zones
- Preflight Checklist
- Auto Takeoff and Auto Landing
- Starting/Stopping the Motors
- Test Flight
- Appendix
- Specifications
- Calibrating the Compass
- Firmware Updates
- After-Sales Information

8
©
2018 DJI All Rights Reserved.
Mavic Air
User Manual
Aircraft Diagram
Remote Controller Diagram
1. Forward Vision System
2. Propellers
3. Motors
4. Front LEDs
5. Landing Gear (with built-in antennas)
6. Gimbal and Camera
7. GPS Antennas
8. Vents
9. USB-C Port
10. Camera microSD Card Slot
11. Aircraft Status Indicator / Function
Button
12. Backward Vision System
13. Battery Level LEDs
14. Power Button
15. Intelligent Flight Battery
16. Battery Latches
17. Downward Vision System
1
11
12
5
4
2
3
7
8 9
6
1. Antennas
Relay aircraft control and video signals.
2. Status LED
Displays the remote controller's
system status.
3. Return to Home (RTH) Button
Press and hold the button to initiate
RTH. Press again to cancel RTH.
4. Charging / Main Video Link Port
(Micro USB)
Connect to the AC Power Adapter to
charge the remote controller battery;
connect to a mobile device for video
linking via RC cable.
1
2
3
5
14
8
9
15
16
17
13
7
11
12
10
4
6
10