
User Manual

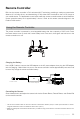
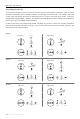

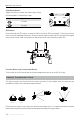

Table Of Contents
- Using This Manual
- Legend
- Read Before the First Flight
- Video Tutorials
- Download the DJI GO 4 App
- Download DJI Assistant 2
- Product Profile
- Introduction
- Feature Highlights
- Preparing the Mavic Air
- Aircraft Diagram
- Remote Controller Diagram
- Activation
- Aircraft
- Flight Modes
- Aircraft LEDs and Status Indicator
- Return to Home
- Vision Systems
- Intelligent Flight Modes
- Advanced Pilot Assistance Systems
- Flight Recorder
- Attaching and Detaching the Propellers
- Intelligent Flight Battery
- Gimbal and Camera
- Remote Controller
- Using the Remote Controller
- Optimal Transmission Zone
- Linking the Remote Controller
- DJI GO 4 App
- Equipment
- Editor
- SkyPixel
- Me
- Controlling the Aircraft with a Mobile Device
- Flight
- Flight Environment Requirements
- Flight Limits and GEO Zones
- Preflight Checklist
- Auto Takeoff and Auto Landing
- Starting/Stopping the Motors
- Test Flight
- Appendix
- Specifications
- Calibrating the Compass
- Firmware Updates
- After-Sales Information

32
©
2018 DJI All Rights Reserved.
Mavic Air
User Manual
Gimbal and Camera
Gimbal
The Mavic Air’s 3-axis gimbal provides stabilization for the camera, allowing you to capture clear, stable
images and video. The gimbal has a tilt range of -90˚ to +17˚. The tilt range is set to -90˚ to 0˚ by default
and can be adjusted in DJI GO 4 (tap and select “Advanced Settings” > “Extend Gimbal Tilt Limit”).
Other gimbal settings such as Gimbal Mode and Gimbal Auto Calibration can also be selecting by
tapping .
Use the gimbal dial on the remote controller to control camera tilt. Alternatively, in DJI GO 4, go to
Camera View, press and hold on the screen until a blue circle appears, and drag the circle up and down
to control camera tilt. Dragging the circle left and right will control the aircraft’s orientation.
-90°
0°
17°
Gimbal Operation Modes
Two gimbal operation modes are available. Switch between the different operation modes on the
camera settings page of the DJI GO 4 app.
Follow Mode: The angle between the gimbal’s orientation and aircraft’s nose remains constant at all
times.
FPV Mode: The gimbal will synchronize with the movement of the aircraft to provide a first-person
perspective ying experience.
Do not tap or knock the gimbal when the aircraft is powered on. To protect the gimbal during
takeo, always take o from at, open ground.
A gimbal motor error may occur in these situations:
a. The aircraft is placed on uneven ground or the gimbal’s motion is obstructed.
b. The gimbal has been subjected to excessive external force, such as during a collision.
Flying in heavy fog or clouds may make the gimbal wet, leading to temporary failure. The
gimbal will recover full functionality once it dries.
Removing the Intelligent Flight Battery
Slide the battery latches on the sides of the Intelligent Flight Battery and it will pop out of the battery
compartment.
Never insert or remove the battery when it is turned on.
Ensure the battery is mounted rmly. The aircraft will not take o if the battery is mounted
incorrectly.