
User Manual
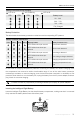
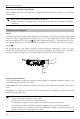

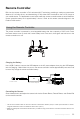
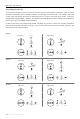

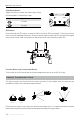

Table Of Contents
- Using This Manual
- Legend
- Read Before the First Flight
- Video Tutorials
- Download the DJI GO 4 App
- Download DJI Assistant 2
- Product Profile
- Introduction
- Feature Highlights
- Preparing the Mavic Air
- Aircraft Diagram
- Remote Controller Diagram
- Activation
- Aircraft
- Flight Modes
- Aircraft LEDs and Status Indicator
- Return to Home
- Vision Systems
- Intelligent Flight Modes
- Advanced Pilot Assistance Systems
- Flight Recorder
- Attaching and Detaching the Propellers
- Intelligent Flight Battery
- Gimbal and Camera
- Remote Controller
- Using the Remote Controller
- Optimal Transmission Zone
- Linking the Remote Controller
- DJI GO 4 App
- Equipment
- Editor
- SkyPixel
- Me
- Controlling the Aircraft with a Mobile Device
- Flight
- Flight Environment Requirements
- Flight Limits and GEO Zones
- Preflight Checklist
- Auto Takeoff and Auto Landing
- Starting/Stopping the Motors
- Test Flight
- Appendix
- Specifications
- Calibrating the Compass
- Firmware Updates
- After-Sales Information

©
2018 DJI All Rights Reserved.
31
Mavic Air
User Manual
Battery Protection
The table below shows battery protection mechanisms and corresponding LED patterns.
In the event of charging temperature protection occurring the battery will resume charging once
the temperature has returned to within the allowable range. If one of the other battery protection
mechanisms activates, to resume charging once the issue has been resolved it is necessary to rst
press the Power button to turn the battery o, unplug the battery from the AC power adapter, and then
plug it back in to resume charging.
DJI does not take any responsibility for damage caused by third-party AC power adapters.
Inserting the Intelligent Flight Battery
Insert the Intelligent Flight Battery into the aircraft’s battery compartment, making sure that it is mounted
rmly and that the battery latches have clicked into place.
Battery Protection Mechanisms
LED1 LED2 LED3 LED4 Blinking Pattern Battery Protection Item
LED2 blinks twice per second Overcurrent detected
LED2 blinks three times per
second
Short circuit detected
LED3 blinks twice per second Overcharge detected
LED3 blinks three times per
second
Over-voltage charger detected
LED4 blinks twice per second Charging temperature is too low
LED4 blinks three times per
second
Charging temperature is too
high
Battery Level LEDs During Charging
: LED is on.
: LED is ashing. : LED is o.
LED1 LED2 LED3 LED4
Battery Level
0% - 50%
50% - 75%
75% - 100%
Fully Charged
click