
User Manual
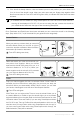
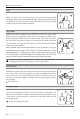

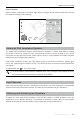
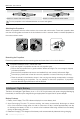
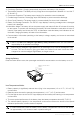
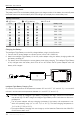
Table Of Contents
- Using This Manual
- Legend
- Read Before the First Flight
- Video Tutorials
- Download the DJI GO 4 App
- Download DJI Assistant 2
- Product Profile
- Introduction
- Feature Highlights
- Preparing the Mavic Air
- Aircraft Diagram
- Remote Controller Diagram
- Activation
- Aircraft
- Flight Modes
- Aircraft LEDs and Status Indicator
- Return to Home
- Vision Systems
- Intelligent Flight Modes
- Advanced Pilot Assistance Systems
- Flight Recorder
- Attaching and Detaching the Propellers
- Intelligent Flight Battery
- Gimbal and Camera
- Remote Controller
- Using the Remote Controller
- Optimal Transmission Zone
- Linking the Remote Controller
- DJI GO 4 App
- Equipment
- Editor
- SkyPixel
- Me
- Controlling the Aircraft with a Mobile Device
- Flight
- Flight Environment Requirements
- Flight Limits and GEO Zones
- Preflight Checklist
- Auto Takeoff and Auto Landing
- Starting/Stopping the Motors
- Test Flight
- Appendix
- Specifications
- Calibrating the Compass
- Firmware Updates
- After-Sales Information

28
©
2018 DJI All Rights Reserved.
Mavic Air
User Manual
Intelligent Flight Battery
The Mavic Air Intelligent Flight Battery is an 11.55 V, 2375 mAh battery with smart charging/discharging
functionality. It should only be charged using an appropriate DJI approved AC power adapter.
Battery Features
1. Battery Level Display: The LED indicators display the current battery level.
2. Auto-Discharging Function: To prevent swelling, the battery automatically discharges to below
65% of the maximum charge when it is idle for more than 10 days. It takes approximately one day
to discharge the battery to 65%. It is normal to feel moderate heat being emitted from the battery
during the discharging process.
3. Balanced Charging: The voltages of the battery cells are automatically balanced during charging.
Detaching the Propellers
Press the propellers down into the mounting plate and rotate them in the unlock direction.
Propeller blades are sharp – handle with care.
Only use original DJI propellers and do not mix propeller types.
Ensure that all propellers are in good condition before each ight. Do not use aged, chipped,
or broken propellers.
Ensure that the propellers and motors are installed rmly and correctly before each ight.
To avoid injury, stand clear of and do not touch propellers or motors when they are spinning.
Place the aircraft in the direction shown in the carrying case during transportation or storage
to avoid damaging the propellers. Do not squeeze or bend the propellers. If propellers
become distorted ight performance will be aected.
Marked Unmarked
Attach on motors with white marks Attach on motors without white marks
Turn the propellers in the indicated direction to mount and tighten.
Attaching the Propellers
Attach the propellers with the white marks to the motors with white marks. Press each propeller down
onto the mounting plate and rotate in the lock direction until it is secured. Attach unmarked propellers to
the motors without marks.
White Marks Unmarked