User Manual v1.0 2021.
Searching for Keywords Search for keywords such as “battery” and “install” to find a topic. If you are using Adobe Acrobat Reader to read this document, press Ctrl+F on Windows or Command+F on Mac to begin a search. Navigating to a Topic View a complete list of topics in the table of contents. Click on a topic to navigate to that section. Printing this Document This document supports high resolution printing.
Contents Using this Manual 2 Legend 2 Before Use 2 Downloading the DJI Mimo App 2 Introduction Overview Getting Started 4 4 5 Charging 5 Attaching the Phone 5 Using DJI OM 5 Button and Port Functions Operating Mode DJI Mimo App 8 8 11 12 Connecting to the DJI Mimo App 12 Camera View 13 Firmware Update 17 How to Update 17 Storage 17 Specifications 18 © 2021 DJI OSMO All Rights Reserved.
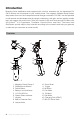
Introduction Boasting 3-axis stabilization and equipped with a built-in extension rod, the lightweight DJI OM 5 unlocks the full potential of your mobile phone. The magnetic foldable design makes setup easier than ever and transportation and storage convenient. DJI OM 5 can be operated in both portrait and landscape and the upright, underslung, side grip, and low position modes help you capture the perfect shot. Take your content to the next level through DJI Mimo with ActiveTrack TM 4.
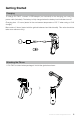
Getting Started Charging To charge DJI OM 5, connect a USB adapter (not included) to the charging port using the power cable (included). The battery is fully charged when the battery level indicators turn off. Charging time: 1.5 hours (tested in the environment temperature of 25° C when using a 10 W charger) Max runtime: 6 hours (tested with the gimbal balanced and held steadily. This value should be taken as a reference only) Attaching the Phone 1. DJI OM 5 is folded when packaged.
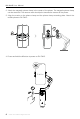
DJI OM 5 User Manual 2. Attach the magnetic phone clamp in the center of the phone. The magnetic phone clamp can be stretched. The camera mark should point towards the camera of the phone. 3. Align the marks on the phone clamp and the phone clamp mounting plate. Attach the mobile phone to DJI OM 5. 4. Press and hold the M button to power on DJI OM 5. 6 © 2021 DJI OSMO All Rights Reserved.
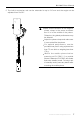
DJI OM 5 User Manual 5. The built-in extension rod can be extended to up to 215 mm and the angle can be adjusted from 0 to 90 °. Make sure the direction of the magnetic phone clamp is the same as shown and it is in the middle of the phone. Otherwise, the gimbal performance may be affected. Adjust the phone clamp and make sure it is as vertical like the phone. For optimal performance, use the provided riser pad if using a phone less than 7.5 mm thick or weighing less than 170 g.
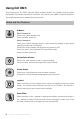
Using DJI OM 5 After powering on, DJI OM 5 will enter follow mode by default. The gimbal converts joystick movements into smooth pan and tilt transitions, and reduces the impact of natural vibrations. The mobile phone can by adjusted by hand as well. Button and Port Functions M Button When Powered off Press once: check battery level. Press and hold: power on. When Powered on Press once: switch between photo or video mode (by default) or enter quick settings (function set in DJI Mimo).
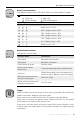
DJI OM 5 User Manual Battery Level Indicators Indicates the battery level of DJI OM 5. Refer to the table below for details. The indicators are defined below. LED is on. LED is flashing. Blinking Patterns LED is off. LED is flashing fast. Battery Level Battery Level > 65% 45% < Battery Level ≤ 65% 30% < Battery Level ≤ 45% 20% < Battery Level ≤ 30% 10% < Battery Level ≤ 20% 2% < Battery Level ≤ 10% Battery Level ≤ 2% System Status Indicator Indicates the current status.
DJI OM 5 User Manual Charging Port (USB-C) Charge DJI OM 5 by connecting a USB adapter to this port. 1/4”-20 UNC Port The 1/4"-20 UNC port can be used to attach a tripod. M3×0.5 Screw Hole Used to mount counterweights. Counterweights should be used if a camera lens or microphone is mounted on the mobile phone. Make sure the total weight of these accessories is less than 290 g. Lanyard Hole The lanyard hole can be used to attach a wrist strap.
DJI OM 5 User Manual Operating Mode The figures below depict the operation modes when using OM 5 in portrait mode. The same operation modes apply when used in landscape mode. Upright Mode Underslung Mode Side Grip Mode Low Position Mode Upright mode can be used without any further user input. In this mode, press the trigger twice quickly to center the mobile phone. Rotate DJI OM 5 to the right or left by 90° to go from Upright to Side Grip mode. Press the trigger twice to center the mobile phone.
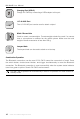
DJI Mimo App Watch a live HD video feed on your mobile phone screen through the DJI Mimo app. The app also allows you to use ShotGuides, Story mode, Hyperlapse, Timelapse, ActiveTrack 4.0, DynamicZoom, and Pano, or configure camera and gimbal settings in just a few taps. Device: tap to connect to DJI OM 5. Once connected, DJI Mimo enters camera view. Academy: tap to watch tutorials and view manuals. AI Editor: provides several templates to edit photos or videos. Home: tap to return to the home screen.
DJI OM 5 User Manual time. The exact information will be listed in the prompt. An internet connection is required. 4. DJI OM 5 will be activated after authorization and the app will enter the camera view. When connected via Bluetooth, DJI OM 5 is able to control the camera of the mobile phone without DJI Mimo. Refer to the Mobile Phone Compatibility List for details. Camera View 3 4 5 6 7 8 PHOTO PANO 2 AUTO 16 4K 60 OFF 1.0x 15 1/100 1/100 80 14 1.
DJI OM 5 User Manual The differences between the head and shoulder tracking and face tracking are that head and shoulder tracking supports 360° tracking while face tracking does not. Also, the detection range of the cameras are different. The detection range between the back camera and the gesture is 0.5 to 4 m, and the distance between the front camera and the gesture is 0.5 to 2 m. Note that ActiveTrack 4.0 may consume more power and cause the temperature of the mobile phone to increase. c.
DJI OM 5 User Manual box to select a subject, and tap the shutter button to start shooting. Slow Motion: tap to shoot video at 4x and 8x slow motion. Video: tap to shoot a normal video. Photos: tap to take a single shot photo. Press and hold for burst shooting. Pano: tap to take a 3×3, 240°, or CloneMe panorama photo. Story: provides several templates for recording video. 10. Shutter Button Tap to take a photo or to start or stop recording video. 11.
DJI OM 5 User Manual gimbal to be controlled in a horizontal or vertical direction. Invert Pan Control: after enabling this feature, the pan axis movement direction is the reverse of the previous direction. Invert Tilt Control: after enabling this feature, the tilt axis movement direction is the reverse of the previous direction. Press M Button: switch between photo and video mode or enter/exit the quick menu. The function can be set by the user.
Firmware Update Use DJI Mimo to update the DJI OM 5 firmware. It takes approximately three minutes to complete an update. How to Update Before starting an update, make sure that the battery level is at least 15% (at least two battery level indicators illuminated). Connect DJI OM 5 to your mobile device and launch DJI Mimo. You will be prompted if a new firmware update is available. To start updating, connect the mobile device to the internet and follow the on-screen instructions.
Specifications Name DJI OM 5 Model OE100 Dimensions Unfolded: 264.5 × 111.1 × 92.3 mm Folded: 174.7 × 74.6 × 37 mm Built-in extension rod length: 215 mm Weight 292 g (gimbal) 34 g (magnetic phone clamp) Power Consumption 1.2 W (steady and balanced status) Mechanical Range Pan: -161.12° to 172.08° Roll: -127.05° to 208.95° Tilt: -101.46° to 229.54° Max Controllable Speed 120°/s Compatible Phones Weight: 230±60 g Diagonal: ≤ 196 mm (or ≤ 7.72 in) Thickness: 6.
This content is subject to change. Download the latest version from www.dji.com/om-5/downloads OSMO is a trademark of DJI OSMO. Copyright © 2021 DJI OSMO All Rights Reserved.