
Mavic 3 - User Manual v1.0
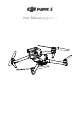

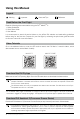

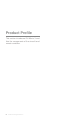
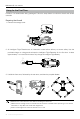
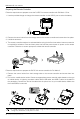
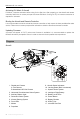
Table Of Contents
- Using this Manual
- Product Profile
- Using for the First Time
- Introduction
- Diagram
- Aircraft
- Gimbal and Camera
- Intelligent Flight Battery
- Flight Recorder
- Advanced Pilot Assistance Systems (APAS 5.0)
- Vision Systems and Infrared Sensing System
- Return to Home
- Aircraft Status Indicators
- Flight Modes
- Propellers
- Remote Controller
- Linking the Remote Controller
- RC-N1
- DJI RC Pro
- DJI Fly App
- Camera View
- Home
- Flight
- Flight Test
- Starting/Stopping the Motors
- Auto Takeoff/Landing
- Pre-Flight Checklist
- Flight Limits and GEO Zones
- Flight Environment Requirements
- Appendix
- After-Sales Information
- Firmware Update
- Specifications

DJI Mavic 3 User Manual
9
©
2021 DJI All Rights Reserved.
Diagram
Aircraft
1. Gimbal and Camera
A. Tele Camera
B. Hasselblad L2D-20c Camera
2. Horizontal Omnidirectional Vision System
3. Auxiliary Bottom Light
4. Downward Vision System
5. Infrared Sensing System
6. Front LEDs
7. Motors
8. Propellers
9. Aircraft Status Indicators
10. Landing Gears (Built-in antennas)
11. Upward Vision System
12. Intelligent Flight Battery
13. Battery Level LEDs
14. Power Button
15. Battery Buckles
16. USB-C Port
17. microSD Card Slot
Activating DJI Mavic 3 Aircraft
DJI Mavic 3 requires activation before using for the rst time. After powering on the aircraft and remote
controller, follow the on-screen prompts to activate DJI Mavic 3 using DJI Fly. An internet connection is
required for activation.
Binding the Aircraft and Remote Controller
It is recommended to bind the aircraft and remote controller to help ensure the best possible after-sales
service. Follow the on-screen prompts after activation to bind the aircraft and remote controller.
Updating Firmware
A prompt will appear in DJI Fly when new firmware is available. It is recommended to update the
rmware whenever prompted to do so in order to ensure the best possible user experience.
11
16
17
13
15
14
12
1
2
10
7
8
5
3
4
9
6
2
A
B