
User Manual

Mavic Air 2
User Manual
©
2020 DJI All Rights Reserved.
23
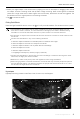
Keep moving the pitch stick forward or backward. The aircraft will avoid the obstacles by flying above,
below, or to the left or right of the obstacle. The aircraft will also respond to other control sticks movements
simultaneously.
When APAS is enabled, the aircraft can be brought to a stop by pressing the Flight Pause button on the remote
controller or tapping Stop on the screen in DJI Fly. The aircraft hovers for three seconds and awaits further pilot
commands.
To enable APAS, open DJI Fly, enter System Settings>Safety, and enable APAS.
APAS is disabled when using Intelligent Flight modes and recording at high resolution such as
2.7K 48/50/60 fps, 1080p 48/50/60/120/240 fps, and 4K 48/50/60 fps.
APAS is only available when flying forward and backward. If the aircraft flies left or right, APAS is
disabled.
Make sure you use APAS when the Forward and Backward Vision Systems are available. Be
sure there are no people, animals, objects with small surface areas (e.g., tree branches), or
transparent objects (e.g., glass or water) along the desired flight path.
Make sure you use APAS when the Downward Vision System is available or the GPS signal is
strong. APAS may not function properly when the aircraft is flying over water or snow-covered
area.
Be extra cautious when flying in extremely dark (<300 lux) or bright (>10,000 lux) environments.
Pay attention to DJI Fly and ensure the aircraft is working in APAS mode normally.
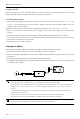
Flight Recorder
Flight data including ight telemetry, aircraft status information, and other parameters are automatically saved to
the internal data recorder of the aircraft. The data can be accessed using DJI Assistant 2 for Mavic.
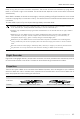
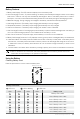
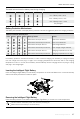
Propellers
There are two types of Mavic Air 2 Low-Noise Quick Release Propellers, which are designed to spin in dierent
directions. Marks are used to indicate which propellers should be attached to which motors. Make sure to
match the propeller and motor following the instructions.
Propellers Marked Unmarked
Illustration
Position Attach on motors with white marks Attach on motors without white marks