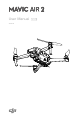
User Manual 2020.05 v1.
Searching for Keywords Search for keywords such as “battery” and “install” to find a topic. If you are using Adobe Acrobat Reader to read this document, press Ctrl+F on Windows or Command+F on Mac to begin a search. Navigating to a Topic View a complete list of topics in the table of contents. Click on a topic to navigate to that section. Printing this Document This document supports high resolution printing.
Using this Manual Legend Warning Important Hints and Tips Reference Read Before the First Flight Read the following documents before using the DJITM MAVICTM Air 2: 1. In the Box & Disclaimer and Safety Guidelines 2. Quick Start Guide 3. User Manual It is recommend to watch all tutorial videos on the official DJI website and read the disclaimer and safety guidelines before using for the first time.
Contents Using this Manual 2 Legend 2 Read Before the First Flight 2 Video Tutorials 2 Download the DJI Fly App 2 Download DJI Assistant 2 for Mavic 2 Product Profile 6 Introduction 6 Preparing the Aircraft 6 Preparing the Remote Controller 7 Aircraft Diagram 8 Remote Controller Diagram 8 Activating Mavic Air 2 9 Aircraft 11 Flight Modes 11 Aircraft Status Indicators 11 Return to Home 12 Vision Systems and Infrared Sensing System 16 Intelligent Flight Mode 18 Flight Rec
Flight Flight Environment Requirements 42 Flight Limits and GEO Zones 42 Pre-Flight Checklist 43 Auto Takeoff/Landing 44 Starting/Stopping the Motors 44 Flight Test 45 Appendix 4 42 47 Specifications 47 Calibrating the Compass 50 Firmware Update 51 After-sales Information 52 © 2020 DJI All Rights Reserved.
Product Profile This section introduces Mavic Air 2 and lists the components of the aircraft and remote controller. © 2020 DJI All Rights Reserved.
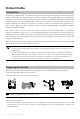
Product Profile Introduction DJI Mavic Air 2 features both an Infrared Sensing System and Forward, Backward, and Downward Vision Systems, allowing for hovering, flying indoors as well as outdoors, and automatic Return to Home. Capturing complex shots is made effortless with DJI signature technologies such as Obstacle Sensing and Advanced Pilot Assistance System 3.0. Enjoy Intelligent Flight modes such as QuickShots, Panorama, and FocusTrack, which include ActiveTrack 3.0, Spotlight 2.
Mavic Air 2 User Manual B A 1 2 A B 4. All Intelligent Flight Batteries are in hibernation mode before shipment to ensure safety. Use the provided charger to charge and activate the Intelligent Flight Batteries for the first time. It takes approximately 1 hour and 35 minutes to fully charge an Intelligent Flight Battery. Unfold the front arms before unfolding the rear arms. Make sure the gimbal protector is removed and all arms are unfolded before powering on the aircraft.
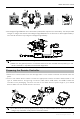
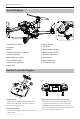
Mavic Air 2 User Manual Aircraft Diagram 11 16 1 2 14 5 3 15 10 13 6 4 17 9 7 8 12 1. Forward Vision System 10. Battery Buckles 2. Propellers 11. Front LEDs 3. Motors 12. Aircraft Status Indicators 4. Landing Gears (Built-in antennas) 13. Backward Vision System 5. Gimbal and Camera 14. Intelligent Flight Battery 6. Downward Vision System 15. Power Button 7. Auxiliary Bottom Light 16. Battery Level LEDs 8. Infrared Sensing System 17. microSD Card Slot 9.
Mavic Air 2 User Manual 4. Battery Level LEDs Displays the current battery level of the remote controller. 9. Mobile Device Holder Used to securely mount the mobile device to the remote controller. 5. Control Sticks Use the control sticks to control the aircraft movements. Set the flight control mode in DJI Fly. The control sticks are removable and easy to store. 10. Antennas Relay aircraft control and video wireless signals. 6.
Aircraft This section introduces the flight controller, Forward, Backward and Downward Vision Systems, and the Intelligent Flight Battery. 10 © 2020 DJI All Rights Reserved.
Aircraft Mavic Air 2 contains a flight controller, video downlink system, vision systems, infrared sensing system, propulsion system, and an Intelligent Flight Battery. Flight Modes Mavic Air 2 has three flight modes, plus a fourth flight mode that the aircraft switches to in certain scenarios. Flight modes can be switched via the Flight Mode switch on the remote controller.
Mavic Air 2 User Manual The front LEDs show the orientation of the aircraft and glow solid red when the aircraft is turned on to indicate the front of the aircraft. The aircraft status indicators communicate the status of the aircraft’s flight control system. Refer to the table below for more information about the aircraft status indicators.
Mavic Air 2 User Manual Smart RTH If the GPS signal is sufficient, Smart RTH can be used to bring the aircraft back to the Home Point. Smart RTH is initiated either by tapping in DJI Fly or by pressing and holding the RTH button on the remote controller until it beeps. Exit Smart RTH by tapping in DJI Fly or by pressing the RTH button on the remote controller. Smart RTH includes Straight Line RTH and Power Saving RTH. Straight Line RTH Procedure: 1. The Home Point is recorded. 2. Smart RTH is triggered. 3.
Mavic Air 2 User Manual Low Battery RTH Low Battery RTH is triggered when the Intelligent Flight Battery is depleted to the point that the safe return of the aircraft may be affected. Return home or land the aircraft immediately when prompted. DJI Fly displays a warning when the battery level is low. The aircraft will automatically return to the Home Point if no action is taken after a 10 second countdown. The user can cancel RTH by pressing the RTH button or Flight Pause button on the remote controller.
Mavic Air 2 User Manual It is important to set a suitable RTH altitude before each flight. Launch DJI Fly, and set the RTH altitude. The aircraft cannot avoid obstacles during Failsafe RTH if the Forward and Backward Vision Systems are unavailable. During RTH, the speed and altitude of the aircraft can be controlled using the remote controller or DJI Fly if the remote controller signal is normal. The orientation of the aircraft and the direction of flight, however, cannot be controlled.
Mavic Air 2 User Manual Vision Systems and Infrared Sensing System Mavic Air 2 is equipped with both an Infrared Sensing System and Forward, Backward, and Downward Vision Systems. The Forward, Backward, and Downward Vision Systems consist of two cameras each and the Infrared Sensing System consists of two 3D infrared modules.
Mavic Air 2 User Manual Advanced Calibration If the abnormality persists after auto calibration, a prompt appears in the app that advanced calibration is required. The advanced calibration must be used with DJI Assistant 2 for Mavic. Follow the steps below to calibrate the Forward Vision System cameras, then repeat the steps to calibrate other Vision System cameras. 1 Point the aircraft toward the screen. 2 Align the boxes. 3 Pan and tilt the aircraft.
Mavic Air 2 User Manual i. Flying over surfaces with repeating identical patterns or textures (e.g., tiles with the same design). J. Flying over obstacles with small surface areas (e.g., tree branches). Keep the sensors clean at all times. DO NOT tamper with the sensors. DO NOT use the aircraft in dusty or humid environments. If the aircraft experiences a collision, camera calibration is required. Calibrate the cameras if DJI Fly prompts you to do so.
Mavic Air 2 User Manual 2. Drag a box around the subject in the camera view to enable FocusTrack. In Flight P 1m/s H 6m 1.6m/s D 12m 10 80 EV 0 AV 3. FocusTrack begins. The default mode is Spotlight. Tap the icon to switch between Spotlight, ActiveTrack , and POI . When a wave gesture is detected (wave with a single hand and the elbow higher than the shoulder), ActiveTrack will be triggered. 4. Tap the shutter/record button to take photos or start recording. View the footage in Playback.
Mavic Air 2 User Manual QuickShots QuickShots shooting modes include Dronie, Rocket, Circle, Helix, Boomerang, and Asteroid. Mavic Air 2 records according to the selected shooting mode and automatically generates a short video. The video can be viewed, edited, or shared to social media from playback. Dronie: The aircraft flies backward and ascends, with the camera locked on the subject. Rocket: The aircraft ascends with the camera pointing downward. Circle: The aircraft circles around the subject.
Mavic Air 2 User Manual 3. Select your target subject in the camera view by tapping the circle on the subject or dragging a box around the subject. Choose a shooting mode and tap Start to begin recording. When a wave gesture is detected (wave with a single hand and the elbow higher than the shoulder), QuickShots will also be triggered. The aircraft flies back to its original position once shooting is finished. 4. Tap to access the video.
Mavic Air 2 User Manual Free The aircraft automatically takes photos and generates a timelapse video. Free mode can be used while the aircraft is on the ground. After takeoff, control the aircraft’s movements and gimbal angle using the remote controller. Follow the steps below to use Free: 1. Set the interval time, video duration, and max speed. The screen displays the number of photos that will be taken and how long the shooting time will be. 2. Tap the shutter button to begin.
Mavic Air 2 User Manual Keep moving the pitch stick forward or backward. The aircraft will avoid the obstacles by flying above, below, or to the left or right of the obstacle. The aircraft will also respond to other control sticks movements simultaneously. When APAS is enabled, the aircraft can be brought to a stop by pressing the Flight Pause button on the remote controller or tapping Stop on the screen in DJI Fly. The aircraft hovers for three seconds and awaits further pilot commands.
Mavic Air 2 User Manual Attaching the Propellers Attach the propellers with marks to the motors with marks and the unmarked propellers to the motors without marks. Press each propeller down onto the motor and turn until it is secure. B A 1 2 A B Detaching the Propellers Press the propellers down onto the motors and rotate them in the unlock direction. Propeller blades are sharp. Handle with care. Only use official DJI propellers. DO NOT mix propeller types.
Mavic Air 2 User Manual Battery Features 1. Battery Level Display: The LED indicators display the current battery level. 2. Auto-Discharging Function: To prevent swelling, the battery automatically discharges to 96% of the battery level when it is idle for one day, and automatically discharges to 60% of the battery level when it is idle for five days. It is normal to feel moderate heat being emitted from the battery during the discharging process. 3.
Mavic Air 2 User Manual Powering On/Off Press the power button once, then press again, and hold for two seconds to power the battery on or off. The battery level LEDs display the battery level when the aircraft is powered on. Low Temperature Notice 1. Battery capacity is significantly reduced when flying in low-temperature environments of 14° to 41° F (-10° to 5° C). It is recommended to hover the aircraft in place for a while to heat the battery. Make sure to fully charge the battery before takeoff. 2.
Mavic Air 2 User Manual The table below shows the battery level during charging. LED1 LED2 LED3 LED4 Battery Level 0% < Battery Level ≤ 50% 50% < Battery Level ≤ 75% 75% < Battery Level < 100% Fully Charged Battery Protection Mechanisms The battery LED indicator can display battery protection indications triggered by abnormal charging conditions.
Mavic Air 2 User Manual Gimbal and Camera Gimbal Profile The 3-axis gimbal of Mavic Air 2 provides stabilization for the camera, allowing you to capture clear and stable images and video. The control pan range is -80° to +80° and the control tilt range is -90° to +24°. The default control tilt range is -90˚ to 0˚, and the tilt range can be extended to -90˚ to +24˚ by enabling “Allow Upward Gimbal Rotation” in DJI Fly.
Mavic Air 2 User Manual Make sure the temperature and humidity is suitable for the camera during usage and storage. Use a lens cleanser to clean the lens to avoid damage. DO NOT block any ventilation holes on the camera as the heat generated may damage the device and hurt the user. Storing Photos and Videos Mavic Air 2 supports the use of a microSD card to store your photos and videos.
Remote Controller This section describes the features of the remote controller and includes instructions for controlling the aircraft and the camera. 30 © 2020 DJI All Rights Reserved.
Remote Controller Remote Controller Profile Built into the remote controller is DJI’s long-range transmission technology OcuSync 2.0, offering a maximum transmission range of 6 mi (10 km) and displaying video from the aircraft to DJI Fly on your mobile device at up to 1080p. Control the aircraft and camera smoothly using the onboard buttons while the detachable control sticks make the remote controller easy to store. In a wide-open area with no electromagnetic interference, OcuSync 2.
Mavic Air 2 User Manual Controlling the Aircraft The control sticks control the aircraft’s orientation (pan), forward/ backward movement (pitch), altitude (throttle), and left/right movement (roll). The control stick mode determines the function of each control stick movement. Three preprogrammed modes (Mode 1, Mode 2, and Mode 3) are available and custom modes can be configured in DJI Fly. The default mode is Mode 2.
Mavic Air 2 User Manual Remote Controller (Mode 2) ( Aircraft Indicates Nose Direction) Remarks Moving the left stick up or down changes the aircraft’s altitude. Push the stick up to ascend and down to descend. The more the stick is pushed away from the center position, the faster the aircraft will change altitude. Always push the stick gently to prevent sudden and unexpected changes in altitude. Moving the left stick to the left or right controls the orientation of the aircraft.
Mavic Air 2 User Manual Flight Pause/RTH Button Press once to make the aircraft brake and over in place. If the aircraft is performing QuickShots, RTH, or auto landing, press once to exit the procedure and then brake. Press and hold the RTH button until the remote controller beeps to start RTH. Press this button again to cancel RTH and regain control of the aircraft. Refer to the Return to Home section for more information about RTH.
Mavic Air 2 User Manual Linking the Remote Controller The remote controller is linked to the aircraft before delivery. Linking is only required when using a new remote controller for the first time. Follow these steps to link a new remote controller: 1. Power on the remote controller and the aircraft. 2. Launch DJI Fly. 3. In camera view, tap and select Control and Connect to Aircraft. 4. Press and hold the power button of the aircraft for more than four seconds.
DJI Fly App This section introduces the main functions of the DJI Fly app. 36 © 2020 DJI All Rights Reserved.
DJI Fly App Home Launch DJI Fly and enter the home screen. Album Skypixel Me GO FLY Academy Tap the icon in the top right corner to enter Academy. Product tutorials, flight tips, flight safety, and manual documents can be viewed here. Album Allows you to view the DJI Fly and your phone’s album. Create contains Templates and Pro. Templates provides auto edit feature for imported footage. Pro allows you to edit the footage manually. SkyPixel Enter SkyPixel to view videos and photos shared by users.
Mavic Air 2 User Manual Camera View 1 17 2 3 In Flight N 4 10 5 6 80 7 8 25 13 9 10 16 11 1m/s H 6m 15 1.6m/s EV D 12m 14 0 AV 12 13 1. Flight Mode N : Displays the current flight mode. 2. System Status Bar In Flight : Indicates aircraft flight status and displays various warning messages. 3.
Mavic Air 2 User Manual can only be stopped mid-flight in an emergency situation such as if there is a collision, a motor has stalled, the aircraft is rolling in the air, or the aircraft is out of control and is ascending or descending very quickly. “Anytime” indicates that the motors can be stopped mid-flight anytime once user performs a combination stick command (CSC). Stopping the motors in mid-flight will cause the aircraft to crash.
Mavic Air 2 User Manual : Tap to enter playback and preview photos and videos as soon as they are captured. 12. Camera Modes Switch : Choose between Auto and Manual mode when in photo mode. In Manual mode, shutter and ISO can be set. In Auto mode, AE lock and EV can be set. 13. Aircraft Orientation : Displays the real-time orientation of the aircraft. 14. Flight Telemetry D 12m H 6m 1.
Flight This section describes safe flight practices and flight restrictions. © 2020 DJI All Rights Reserved.
Flight Once pre-flight preparation is complete, it is recommended to hone your flight skills and practice flying safely. Make sure that all flights are carried out in an open area. Refer to the Remote Controller and DJI Fly sections for information about using the remote controller and the app to control the aircraft. Flight Environment Requirements 1. Do not use the aircraft in severe weather conditions including wind speeds exceeding 10 m/s, snow, rain, and fog. 2. Only fly in open areas.
Mavic Air 2 User Manual When GPS is available Flight Limits DJI Fly App Aircraft Status Indicator Max Altitude Aircraft's altitude cannot exceed the specified value Warning: Height limit reached Max Radius Flight distance must be within Warning: Distance limit reached the max radius Blinks green and red alternately Only Downward Vision System is available Flight Limits DJI Fly App Aircraft Status Indicators Max Altitude Height is restricted to 16 ft (5 m) when the GPS signal is weak and Downwa
Mavic Air 2 User Manual Auto Takeoff/Landing Auto Takeoff Use auto takeoff when the aircraft status indicator blinks green. 1. Launch DJI Fly and enter the camera view. 2. Complete all steps in the pre-flight checklist. 3. Tap . If conditions are safe for takeoff, press and hold the button to confirm. 4. The aircraft will take off and hover 3.9 ft (1.2 m) above the ground. The aircraft status indicator indicates whether the aircraft is using GPS and/or the Downward Vision System for flight control.
Mavic Air 2 User Manual OR Method 1 Method 2 Stopping the Motors Mid-flight Stopping motors mid-flight will cause the aircraft to crash. The motors should only be stopped mid-flight in an emergency situation such as if a collision has occurred or if the aircraft is out of control and is ascending or descending very quickly, rolling in the air, or if a motor has stalled. To stop the motors mid-flight use the same CSC that was used to start the motors. The default setting can be changed in DJI Fly.
Appendix 46 © 2020 DJI All Rights Reserved.
Appendix Specifications Aircraft Takeoff Weight 570 g Dimensions (L×W×H) Folded: 180×97×84 mm Unfolded: 183×253×77 mm Diagonal Distance 302 mm Max Ascent Speed 4 m/s (S Mode) 4 m/s (N Mode) Max Descent Speed 3 m/s (S Mode) 3 m/s (N Mode) Max Speed (near sea level, no wind) 19 m/s (S Mode) 12 m/s (N Mode) 5 m/s (T Mode) Max Service Ceiling Above Sea Level 5000 m Max Flight Time 34 mins (measured while flying at 18 kph in windless conditions) Max Hover Time (without wind) 33 minutes Max Flig
Mavic Air 2 User Manual Sensing System Forward Precision Measurement Range: 0.35-22.0 m Detection Range: 0.35-44 m Effective Sensing Speed: ≤12 m/s FOV: 71° (horizontal), 56° (vertical) Backward Precision Measurement Range: 0.37-23.6 m Detection Range: 0.37-47.2 m Effective Sensing Speed: ≤12 m/s FOV: 44° (horizontal), 57° (vertical) Downward Infrared Sensor Measurement Range: 0.1-8 m Hovering Range: 0.5-30 m Vision Sensor Hovering Range: 0.
Mavic Air 2 User Manual Remote Controller Operating Frequency 2.400-2.4835 GHz, 5.725-5.850 GHz Max Transmission Distance (unobstructed, free of interference) 10 km (FCC) 6 km (CE) 6 km (SRRC) 6 km (MIC) Operating Temperature 41° to 104° F (5° to 40° C) Transmitter Power (EIRP) 2.400 - 2.4835 GHz: ≤26 dBm (FCC), ≤20 dBm (CE), ≤20 dBm (SRRC) , ≤20 dBm (MIC) 5.725 - 5.850 GHz: ≤26 dBm (FCC), ≤14 dBm (CE), ≤26 dBm (SRRC) Battery Capacity 5200 mAh Operating Current/Voltage 1200 mA@3.
Mavic Air 2 User Manual Recommended microSD Cards SanDisk Extreme PRO 64GB U3 V30 A2 microSDXC SanDisk High Endurance 64GB U3 V30 microSDXC SanDisk Extreme 64GB U3 64GB V30 A2 microSDXC SanDisk Extreme 128GB U3 V30 A2 microSDXC SanDisk Extreme 256GB U3 A2 microSDXC Lexar 667x 64GB U3 V30 A2 microSDXC Lexar High-Endurance 64GB U3 V30 microSDXC Samsung EVO Plus (Yellow) 64GB U3 V30 microSDXC Samsung EVO Plus (Red) 64GB U3 microSDXC Samsung EVO Plus 128GB U3 microSDXC Samsung EVO Plus 256GB U3 microSDXC Kings
Mavic Air 2 User Manual If the aircraft status indicator blinks red and yellow alternately after calibration is completed, this indicates that the current location is not suitable for flying the aircraft, due to the level of magnetic interference. Change your location. A prompt will appear in DJI Fly if compass calibration is required before takeoff. The aircraft can take off immediately once calibration is complete.
Mavic Air 2 User Manual Make sure follow all the steps to update firmware. Otherwise, the update may fail. The firmware update will take approximately 10 minutes. It is normal that the gimbal goes limp, aircraft status indicators blink, and the aircraft reboots. Wait patiently until the update is complete. Make sure the computer has access to the internet. Before performing an update, make sure the Intelligent Flight Battery is at least 40% charged and the remote controller is at least 30% charged.
DJI Support http://www.dji.com/support This content is subject to change. Download the latest version from http://www.dji.com/mavic-air-2 If you have any questions about this document, please contact DJI by sending a message to DocSupport@dji.com. MAVIC is a trademark of DJI. Copyright © 2020 DJI All Rights Reserved.