
User's Manual

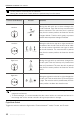


Table Of Contents
- Using this Manual
- Contents
- Product Profile
- Preparing the Smart Controller
- Smart Controller Operations
- Display Interface
- Appendix
- Changing Storage Locations for Images and Videos
- Control Stick Navigation
- DJI GO Share (only available when using DJI GO 4)
- Status LED and Battery Level Indicators Description
- Smart Controller Warning Sounds
- System Update
- Button Combinations
- Calibrating the Compass
- Blocking Third-party Notifications
- HDMI
- After-sales Information
- Specifications

14
©
2020 DJI All Rights Reserved.
Display Interface
Homepage
The screen displays the homepage when the Smart Controller is powered on.
Example: Mavic 2 Pro
1 Time
Displays local time.
2 DJI GO 4 / DJI Pilot
Tap to enter DJI GO 4 / DJI Pilot. The
button is blue if the remote controller is
linked to the aircraft. Users can tap to
enter camera view after logging in using a
DJI account. If the remote controller is not
linked to the aircraft, tap, and log in using
a DJI account. Select “Enter Device” and
follow the prompts to enter camera view.
3 Gallery
Tap to check stored images and videos.
4 App Center
Tap to check all applications including DJI
GO 4 / DJI Pilot, Settings, File Manager,
and any third-party apps that users have
downloaded and installed. Refer to the
App Center section for more information.
5 Battery Level
Displays the battery level of the remote
controller.
Navigate on the remote controller by using the 5D button, the control sticks, or touching
the screen. Conrm a selection by pressing the 5D button or touching the screen. Refer to
the Control Stick Navigation section for more information.
QuickFly can be enabled in settings. Once enabled, the remote controller automatically
enters the camera view of DJI GO 4 after powering on if the remote controller is already
paired with the aircraft. This feature is only availabe when using DJI GO 4.
11:30
100%
GO
1
2
3 4
5