
User Manual


12
©
2019 DJI All Rights Reserved.
DJI Smart Controller User Manual
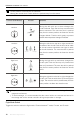
CustomizableButtons
Therearethreecustomizablebuttonsonthecontroller:C1,C2,andtheConrmbutton.Whenthe
remotecontrollerisnotlinkedtoanaircraft,presstheConrmbuttontoconrmaselection.When
the remote controller is linked to an aircraft, the button cannot be used to confirm a selection.
However, the function of the button when linked to an aircraft can be customized in DJI GO 4 / DJI
Pilot.
ThefunctionsoftheC1andC2buttonsaresetinDJIGO4/DJIPilot.Thedefaultcongurationfor
theC1buttoniscenterfocusandthedefaultcongurationfortheC2buttonisplayback.
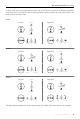
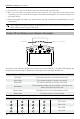
Optimal Transmission Range
The optimal transmission range of the Smart Controller is shown below:
80°
Make sure the antennas are facing towards the aircraft. When the angle between the antennas and
the back of the Smart Controller is 80° or 180°, the connection between the remote controller and
the aircraft can reach its optimal performance.
Notethattheillustrationsabovedonot reect theactualdistancesbetweentheuserandaircraft
and are for reference only.
DJI GO 4 / DJI Pilot will warn the user when the transmission signal is weak. Adjust the
antennas to make sure that the aircraft is within the optimal transmission range.
Operating the Camera
Shoot videos and photos with the Focus/Shutter button and Record button on the remote controller.
1. Focus/Shutter Button
Press to take a photo. If Burst mode is selected, multiple photos will be taken if the button is
continuously pressed.
2. Record Button
Press once to start recording video and press again to stop.
3. Camera Settings Dial
Mavic 2 Pro: Turn the dial to adjust the exposure compensation (when in Program mode),
aperture (when in Aperture Priority and Manual mode), or shutter (when in Shutter Priority mode).
Mavic 2 Zoom/ Mavic 2 Enterprise: Turn to adjust the zoom of the Mavic 2 Zoom camera.
Mavic 2 Enterprise Dual: Turn the dial to adjust the exposure compensation.