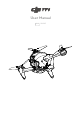
User Manual v1.0 2021.
Searching for Keywords Search for keywords such as “battery” and “install” to find a topic. If you are using Adobe Acrobat Reader to read this document, press Ctrl+F on Windows or Command+F on Mac to begin a search. Navigating to a Topic View a complete list of topics in the table of contents. Click on a topic to navigate to that section. Printing this Document This document supports high resolution printing.
Using this Manual Legend Warning Important Hints and Tips Reference Read Before the First Flight Read the following documents before using DJITM FPV. 1. User Manual 2. Quick Start Guide 3. Disclaimer and Safety Guidelines It is recommended to watch all tutorial videos on the official DJI website and read the disclaimer and safety guidelines before using for the first time. Prepare for your first flight by reviewing the quick start guide and refer to this user manual for more information.
Contents Using this Manual 3 Read Before the First Flight 3 Video Tutorials 3 Download the DJI Fly App 3 Download the DJI Virtual Flight App 3 Download DJI Assistant 2 (DJI FPV series) 3 Product Profile 6 Introduction 6 Preparing the Aircraft 7 Preparing the Goggles Preparing the Remote Controller 8 10 Diagram 10 Linking 14 Activation 15 Aircraft 16 Flight Modes 16 Aircraft Status Indicator 17 Return to Home 18 Vision Systems and Infrared Sensing System 20 Flight Recorder
DJI FPV User Manual Flight 47 Flight Environment Requirements 47 Flight Limits and GEO Zones 47 Pre-Flight Checklist 48 Starting/Stopping the Motors 49 Flight Test 50 Maintenance 51 Aircraft 52 Appendix 5 51 Goggles 61 Specifications 61 Calibrating the Compass 65 Updating Firmware 66 After-Sales Information 66 © 2021 DJI All Rights Reserved.
Product Profile Introduction DJI FPV consists of an aircraft, goggles, and remote controller, which all feature DJI’s O3 technology that provides video transmission with a maximum transmission range of 6 mi (10 km), bit rate of up to 50 Mbps, and minimum end-to-end latency within 28 ms. DJI FPV works at both 2.4 and 5.8 GHz and is capable of selecting the best transmission channel automatically.
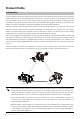
DJI FPV User Manual 5.8 GHz is not supported in some regions. This frequency band will automatically be disabled when the aircraft is activated or connected to DJI Fly in these regions. Observe local laws and regulations. Using the goggles does not satisfy the requirement of visual line of sight (VLOS). Some countries or regions require a visual observer to assist by observing the flight. Make sure to comply with local regulations when using the goggles. Preparing the Aircraft 1.
DJI FPV User Manual 3. All Intelligent Flight Batteries are in hibernation mode before shipping to ensure safety. Remove the Intelligent Flight Battery and use the provided charger to charge and activate the Intelligent Flight Batteries for the first time. It takes approximately 50 minutes to fully charge an Intelligent Flight Battery. 1 3 2 It is recommended to attach a gimbal protector to protect the gimbal when the aircraft is not in use.
DJI FPV User Manual 2. Attach the strap to the headband attachment on the top and sides of the goggles. 3. Use the included power cable to connect the power port of the goggles to the goggles battery. 4. Align the lenses over your eyes and pull the headband down. Adjust the headband size until the goggles fit securely and comfortably on your face and head. 5. Turn the Interpupillary Distance (IPD) slider to adjust the distance between the lenses until the images are properly aligned.
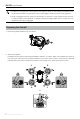
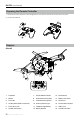
DJI FPV User Manual Preparing the Remote Controller 1. Remove the control sticks from the storage slots on the remote controller and screw them into place. 2. Unfold the antennas. 2 1 Diagram Aircraft 7 15 11 6 13 1 12 2 14 10 5 8 3 9 4 16 17 18 1. Propellers 7. Aircraft Status Indicator 13. Power Button 2. Motors 8. Downward Vision System 14. Battery Level LEDs 3. Front LED 9. Infrared Sensing System 15. Power Port 4. Landing Gears (Built-in antennas) 10.
DJI FPV User Manual Goggles 1 3 2 4 1. Antennas 2. Front Cover 3. Channel Adjustment Buttons 4. Channel Display 5. USB-C Port 6. microSD Card Slot 7. Air Intake 8. IPD Slider 5 6 8 7 12 10 9 13 11 14 15 16 18 9. 17 Headband Attachment 10. Foam Padding 11. Lens 12. Air Vent 13. Shutter/Record Button Press once to take photos or start or stop recording. Press and hold to switch between photo and video mode. 14.
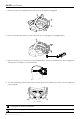
DJI FPV User Manual Remote Controller 5 3 4 9 1 12 2 7 6 8 10 11 13 14 1. Power Button Press once to check the current battery level. Press once, then again, and hold to power the remote controller on or off. 2. Battery Level LEDs Displays the current battery level of the remote controller. 3. Lanyard Attachment 4. C1 Button (Customizable) The function of this button can be adjusted in the goggles. By default, press once to adjust or disable Coordinated Turn (S Mode).
DJI FPV User Manual 12. Start/Stop Button When using Sport mode, press once to enable or disable cruise control. When using Manual mode, press twice to start or stop the motor. When using Normal or Sport mode, press once to cancel Low Battery RTH when the countdown appears in the goggles. 13. Shutter/Record Button Press once to take photos or start or stop recording. Press and hold to switch between photo and video mode. 14. Antennas Relays aircraft control wireless signals. 15 16 17 18 15.
DJI FPV User Manual Linking The devices are all linked before shipping. Linking is only required when using a new device for the first time. Follow the steps below to link the aircraft, goggles, and remote controller: 1. Power on the aircraft, goggles, and remote controller. 2. Press the link button on the goggles. The goggles will start to beep continually. 3. Press and hold the power button of the aircraft until the battery level LEDs start to blink in sequence. 4.
DJI FPV User Manual 7. Once linking is successful, the remote controller stops beeping and both the battery level LEDs turn solid and display the battery level. Make sure the goggles and the remote controller are within 0.5 m of the aircraft during linking. The aircraft must be linked with the goggles before the remote controller. Activation DJI FPV must be activated before using for the first time. Make sure all devices are linked after powering on the aircraft, goggles, and remote controller.
Aircraft DJI FPV contains a flight controller, a gimbal and camera, video downlink system, vision system, propulsion system, and an Intelligent Flight Battery. Flight Modes DJI FPV has three flight modes, plus a fourth flight mode that the aircraft switches to in certain scenarios. Flight modes can be switched via the flight mode switch on the remote controller. Normal Mode: The aircraft utilizes GPS, the Forward and Downward Vision Systems, and the Infrared Sensing System to locate itself and stabilize.
DJI FPV User Manual Aircraft Status Indicator DJI FPV has a front LED, frame arm LED, and aircraft status indicator. Aircraft Status Indicator Frame Arm LED Front LED The front LED shows the orientation of the aircraft and the frame arm LED is for decoration. The LEDs turns solid blue when the aircraft is powered on. The colors and lighting methods of the front LED and frame arm LED can be customized in the goggles.
DJI FPV User Manual Return to Home The Return to Home (RTH) function brings the aircraft back to the last recorded Home Point and lands when the GPS is signal is strong. There are three types of RTH: Smart RTH, Low Battery RTH, and Failsafe RTH. If the aircraft successfully recorded the Home Point and the GPS signal is strong, the RTH will be triggered when either Smart RTH is initiated, the aircraft battery level is low, or the signal between the remote controller and the aircraft is lost.
DJI FPV User Manual RTH (Straight Line) 1. The Home Point is recorded. 2. RTH is triggered. 3. If the aircraft is less than 5 m from the Home Point when RTH begins, it lands immediately. If the aircraft is more than 5 m and less than 50 m from the Home Point when RTH begins, it will return home at the current altitude with a maximum horizontal speed of 3 m/s. If the aircraft is further than 50 m from the Home Point when RTH begins, it will ascend to the RTH altitude and return home at a speed of 13.5 m/s.
DJI FPV User Manual Precision Landing The aircraft automatically scans and attempts to match the terrain features below during RTH. The aircraft will land when the terrain matches the terrain of the Home Point. A prompt will appear in the goggles if the terrain fails to match. Landing Protection is activated during Precision Landing. The performance of Precision Landing is subject to the following: a) The Home Point must be recorded upon takeoff and must not be changed during flight.
DJI FPV User Manual Detection Range Forward Vision System The Forward Vision System has a detection range of 0.5 to 18 m, horizontal FOV of 56°, and vertical FOV of 71°. Downward Vision System The Downward Vision System works best when the aircraft is at an altitude of 0.5 to 15 m and its operating range is 0.5 to 30 m. The FOV to the front and rear is 106° and 90° to the right and left. 0.5-18 m 56° 56° 71° 106° 0.
DJI FPV User Manual Using the Vision Systems The Downward Vision System is available if the surface has a clear texture and there is sufficient light. The Downward Vision System works best when the aircraft is at an altitude of 0.5 to 15 m. If the altitude of the aircraft is above 15 m, the Vision System may be affected. Extra caution is required. Follow the steps below to use the Downward Vision System. 1. Make sure the aircraft is in Normal mode. Power on the aircraft. 2.
DJI FPV User Manual e) f) g) h) i) j) Flying in an area where the lighting changes frequently or drastically. Flying over extremely dark (< 10 lux) or bright (> 40,000 lux) surfaces. Flying over surfaces that strongly reflect or absorb infrared waves (e.g., mirrors). Flying over surfaces without clear patterns or texture. (e.g., power poles). Flying over surfaces with repetitive identical patterns or textures (e.g., tiles with the same design). Flying over obstacles with small surface areas (e.g.
DJI FPV User Manual A B B A 1 2 Detaching the Propellers Hold the motor, press the propeller down, and rotate in the opposite direction to the one marked on the propeller until it pops out. Propeller blades are sharp. Handle with care. Only use official DJI propellers. DO NOT mix propeller types. Purchase the propellers separately if necessary. Make sure that the propellers are properly attached before each flight. Make sure all propellers are in good condition before each flight.
DJI FPV User Manual Intelligent Flight Battery The FPV Intelligent Flight Battery is a 22.2 V, 2000 mAh battery with smart charging and discharging functionality. Battery Features 1. Battery Level Display: the battery level LEDs display the current battery level. 2.
DJI FPV User Manual The battery level LEDs display the power level of the flight battery during charging and discharging. The statuses of the LEDs are defined below: LED is on. LED1 LED is flashing. LED2 LED3 LED4 LED is off.
DJI FPV User Manual 3. The battery level LEDs display the current battery level during charging. 4. The Intelligent Flight Battery is fully charged when all the battery level LEDs are off. Detach the charger when the battery is fully charged. The charging time is approximately 50 minutes. It is recommended to discharge the Intelligent Flight Batteries to 30% or lower. This can be done by flying the aircraft outdoors until there is less than 30% charge left.
DJI FPV User Manual If any of the battery protection mechanisms are activated, unplug the charger, and plug it in again to resume charging. If the charging temperature is abnormal, wait for the charging temperature to return to normal and the battery will automatically resume charging without the need to unplug and plug the charger again. Installing/Removing the Battery Install the Intelligent Flight Battery in the aircraft before use.
DJI FPV User Manual Gimbal and Camera Gimbal Profile The gimbal of DJI FPV aircraft stabilizes the camera and users can capture clear and stable images and videos even when the aircraft is flying at high speeds thanks to DJI’s RockSteady electronic stabilization. The control tilt range is -50° to +58°. Use the gimbal dial on the remote controller to control the tilt of the camera. 58° 0° -50° Gimbal Mode The gimbal mode will automatically switch according to the flight mode.
DJI FPV User Manual 4K video can only be recorded when the transmission quality is set to high quality. Make sure the temperature and humidity are suitable for the camera during usage and storage. Use a lens cleanser to clean the lens to avoid damage. DO NOT block any ventilation holes on the camera as the heat generated may damage the device and injure the user. Storing Photos and Videos DJI FPV supports the use of a microSD card to store photos and videos.
Goggles The DJI FPV Goggles V2 give users a first-person view of the aerial camera with real-time video and audio transmission. They can also be used to play videos recorded by the goggles and set transmission, control, and camera parameters. The DJI FPV Goggles V2 can also be used with the DJI FPV Air Unit. For more information, refer to the DJI Digital FPV System User Manual at https://www.dji.com/fpv/info#downloads.
DJI FPV User Manual Operation 5D Button Toggle the button to scroll through the menu. Press the button to confirm. On the home screen, press the button to enter the menu. Toggle left or right to adjust the screen brightness. Toggle up or down to adjust the volume. Shutter/Record Button Press once to take photos or start or stop recording. Press and hold to switch between photo and video mode. Back Button Press to return to the previous menu or exit the current mode.
DJI FPV User Manual 2. microSD Card Information Displays whether or not a microSD card is inserted in the aircraft or goggles as well as the remaining capacity. A flashing icon will appear when recording. 3. Gimbal Slider Displays the gimbal tilt angle when the gimbal dial is toggled. 4. Prompts Displays information such as when switching modes, when the battery level is low, and other warnings. 5. Goggles Battery Level Displays the battery level of the goggles.
DJI FPV User Manual Menu Bar Press the 5D button on the goggles to enter the menu bar. Status Displays detailed information for current status warning prompts. Calibration is required if there are any IMU or compass abnormalities. Album Shows the photos or videos stored on the microSD of the goggles. Select the file and confirm to preview. Photos and videos recorded by the aircraft can be previewed. Insert the microSD card of the aircraft into the microSD card slot of the goggles.
DJI FPV User Manual Transmission The video transmission of the current device can be set under Pilot settings. Nearby video transmission devices and their signal strength can be viewed in Audience mode. Select a channel to see the camera view. 1 2 3 4 5 6 1. Broadcast Mode Enable or disable Broadcast mode. The device number will be displayed when Broadcast mode is enabled so that other devices can find the device and enter the channel to watch the camera view. 2.
DJI FPV User Manual Setting Safety Set the safety configurations such as max flight altitude, max flight distance, and RTH altitude. Users can also update the Home Point, enable or disable Obstacle Slowing, and view the status of as well as calibrate the IMU and compass. Find My Drone helps to find the location of the aircraft on the ground by using the cached video in the goggles.
DJI FPV User Manual The functions of some of the buttons of the remote controller can be customized in Remote Controller. These include the C1 button, C2 switch, and the custom mode on the flight mode switch. The stick mode can be set and the exponential can be adjusted when using Manual mode. Users can also calibrate the remote controller. Camera Camera parameters such as ISO, shutter, EV, saturation, and WB can be adjusted. Also, the camera mode can be set to auto or manual.
DJI FPV User Manual Display Adjust screen brightness, zoom, and display or hide the Home Point. About View device information such as the serial number and the firmware of the goggles and the linked devices. Switch to DJI FPV Digital System in the menu to use the DJI FPV Air Unit. Power on the goggles again after switching. Select Reset All to reset the goggles and the linked devices to their default settings. 38 © 2021 DJI All Rights Reserved.
Remote Controller Built into the DJI FPV Remote Controller 2 is DJI's O3 transmission technology, offering a maximum transmission range of 6 mi (10 km). The buttons make control of the aircraft and camera effortless while the detachable control sticks allow for the remote controller to be easily stored. The built-in battery has a capacity of 5200 mAh and a maximum run time of 9 hours. Operation Powering On/Off Press the power button once to check the current battery level.
DJI FPV User Manual Controlling the Aircraft The control sticks control the orientation (pan), forward and backward movement (pitch), altitude (throttle), and left and right movement (roll) of the aircraft. The control stick mode determines the function of each control stick movement.
DJI FPV User Manual Remote Controller (Mode 2) ( Aircraft Indicates nose direction) Remarks Throttle Stick: moving the left stick up or down changes the altitude of the aircraft. Push the stick up to ascend and down to descend. Push the stick gently to prevent sudden and unexpected changes in altitude. Normal/Sport mode: The aircraft hovers in place if the stick is in the center. Use the left stick to take off when the motors are spinning at an idle speed.
DJI FPV User Manual Manual mode is disabled by default. Make sure that the switch is set to Manual mode in the goggles before switching to Manual mode. The aircraft will remain in Normal or Sport mode if the switch is not set to Manual mode in the goggles. Go to Settings, Control, Remote Controller, Button Customization, and set the Custom Mode to Manual mode.
DJI FPV User Manual Customizable Button The functions of the customizable buttons can be set on the remote controller settings in the goggles, including the C1 button, C2 switch, and the custom mode. The C1 button and C2 switch can be used as shortcuts for functions such as raising, lowering, or recentering the gimbal or enabling or disabling ESC beeping or the auxiliary bottom light. The custom mode can be set to Manual or Sport mode.
DJI FPV User Manual Stick Adjustment When using Manual mode, adjust the throttle stick based on your stick mode for a better user experience. 1. Turn the remote controller over and lift the rear rubber grip from the inside groove. Groove 2. The screws under the grip can adjust the corresponding stick on the front of the remote controller. Use an H1.5 hex key to adjust the resistance of the stick and recenter the stick vertically.
DJI FPV User Manual Fully charge your mobile device before launching DJI Fly. Mobile cellular data is required when using DJI Fly. Contact your wireless carrier for data charges. DO NOT accept phone calls or use texting features during flight if you are using a mobile phone as your display device. Read all safety tips, warning messages, and disclaimers carefully. Familiarize yourself with the related regulations in your area.
Flight Once pre-flight preparation is complete, it is recommended to hone your flight skills and practice flying safely. Make sure that all flights are carried out in an open area. The flight height is limited to 500 m. DO NOT exceed this height. Strictly abide by local laws and regulations when flying. Make sure to read the DJI FPV Disclaimer and Safety Guidelines to understand the safety notices before flying. Flight Environment Requirements 1.
DJI FPV User Manual When GPS is available Flight Limits Goggles Aircraft's altitude cannot exceed the Max Altitude Warning: Height limit reached specified value Max Radius Flight distance must be within the max radius Warning: Distance limit reached Aircraft Status Indicator Blinks green and red alternately When GPS is weak Flight Limits Height is restricted to 98 ft (30 m) Max Altitude when the GPS signal is weak. Max Radius Goggles Aircraft Status Indicator Warning: height limit reached.
DJI FPV User Manual Starting/Stopping the Motors Starting the Motors Normal/Sport mode A CSC is used to start the motors. Push both sticks to the inner or outer bottom corners to start the motors. Once the motors start spinning, release both sticks simultaneously. OR Manual mode Make sure the throttle stick is in the lowest position and press the start/stop button twice to start the motors. + Throttle Stick Stopping the Motors Normal/Sport mode There are two methods to stop the motors.
DJI FPV User Manual Manual mode: Press the start/stop button twice to stop the motors once the aircraft has landed. For flight safety, it is recommended to switch to Normal mode before landing. Stopping the Motors Mid-Flight When using Normal or Sport mode, the motors can only be stopped by performing a CSC mid-flight in an emergency situation such as if the aircraft has a stalled motor, is involved in a collision, is rolling in the air, is out of control, or is ascending or descending quickly.
Maintenance Goggles Cleaning Make sure to disconnect the goggles from the power outlet before cleaning and make sure that there are no cables connected. Clean the surface of the goggles with a soft, dry, clean cloth. To clean the foam padding, moisten the cloth with clean water and wipe the foam padding. Replacing the Foam Padding The foam padding is attached to the goggles with Velcro. When replacing the foam padding, peel it gradually from the left or right side.
DJI FPV User Manual Aircraft Follow the steps below to replace components of the aircraft such as the top shell, gimbal and camera, or landing gear. Gimbal and Camera (Incl. Top Shell) Detaching 1. Remove the four M1.6 screws on the front and remove the protective shell. 2. Remove the four M2 screws on both sides. 52 © 2021 DJI All Rights Reserved.
DJI FPV User Manual 3. Pry a corner of the top shell from the bottom side of the aircraft. 4. Facing the aircraft, hold the front frame arm and push in the direction shown to remove the top shell. 5. Remove the four M2 screws on the front. 53 © 2021 DJI All Rights Reserved.
DJI FPV User Manual 6. Remove the two M1.6 screws on the side before removing the metal piece. 7. Use an appropriate tool to lift and remove the FPC connector on the gimbal and camera. 8. Tear off one corner of the fixing tape to remove the gimbal and camera. 54 © 2021 DJI All Rights Reserved.
DJI FPV User Manual Installation 1. Prepare a new gimbal and camera, align the connector cable to the position, and secure with fixing tape. 2. Align and press down the FPC connector of the gimbal and camera to make sure they are securely connected. 3. Attach the metal plate on the right side and tighten the two M1.6 screws. 55 © 2021 DJI All Rights Reserved.
DJI FPV User Manual 4. Install the gimbal and camera and tighten the four M2 screws. 5. Prepare a new top shell to install. 6. Press the following positions in sequence to make sure that the top shell is firmly installed. 1 1 2 2 56 © 2021 DJI All Rights Reserved.
DJI FPV User Manual 7. Slightly bend the side of the top shell to insert the buckle into the aircraft slot and tighten the four M2 screws on both sides. 1 1 2 2 8. Install the protective shell from the top and make sure to align the slots. Tighten the four M2 screws on the front to complete the installation. Calibrating the gimbal and camera After replacing the gimbal and camera, download the calibration file of the camera to calibrate the gimbal and camera. 1.
DJI FPV User Manual Landing Gear Detaching 1. Remove the two M1.6 screws on the bottom of the left landing gear. 2. Remove the landing gear as shown. 3. Remove the antenna light board of the landing gear. 2 1 58 © 2021 DJI All Rights Reserved.
DJI FPV User Manual 4. Remove the antenna connector and 3-pin and 4-pin light wire connectors on both sides of the board. Installation 1. Check the mark inside the landing gear, and remove the antenna light board from the one marked L. Connect the 3-pin and 4-pin light wire connectors and antenna connector on the bottom of the left front motor and make sure they are secure. 1 L 2 2. Insert the board between the two clamping positions on the motor base. 59 © 2021 DJI All Rights Reserved.
DJI FPV User Manual 3. Make sure the groove of the landing gear is properly inserted into the corresponding position of the motor base. 4. Tighten the two M1.6 screws to complete the installation. 5. Repeat the steps above to install the landing gear on the right side. The landing gear is marked R. 60 © 2021 DJI All Rights Reserved.
Appendix Specifications Aircraft Takeoff Weight Approx.
DJI FPV User Manual Sensing System Forward Precision Measurement Range: 0.5-18 m Obstacle Sensing: Only available in Normal mode FOV: 56° (horizontal), 71° (vertical) Downward Infrared Sensor Measurement Range: 10 m Hovering Range: 0.5-15 m Vision Sensor Hovering Range: 0.5-30 m Auxiliary Bottom Light Single LED Operating Environment Non-reflective, discernible surfaces with diffuse reflectivity of >20%; Adequate lighting of lux >15 Camera Sensor 1/2.
DJI FPV User Manual Charging Temperature Range 41° to 104° F (5° to 40° C) Max Charging Power 90 W Goggles Weight Approx. 420 g (incl. headband and antennas) Dimensions 184×122×110 mm (excl. antennas) 202×126×110 mm (incl. antennas) Screen Size 2 inch×2 Screen Resolution (Single Screen) 1440×810 Screen Refresh Rate 144 Hz FOV 30° to 54°; Image size: 50-100% Interpupillary Distance Range 58-70 mm Operating Frequency 2.400-2.4835 GHz; 5.725-5.850 GHz Transmitter Power (EIRP) 2.4 GHz: ≤28.
DJI FPV User Manual Remote Controller Weight 346 g Dimensions 190×140×51 mm Operating Frequency 2.400-2.4835 GHz; 5.725-5.850 GHz Max Transmission Distance (unobstructed, free of interference) 10 km (FCC); 6 km (CE/SRRC/MIC) Transmitter Power (EIRP) 2.4 GHz: ≤28.5 dBm (FCC), ≤20 dBm (CE/SRRC/MIC) 5.8 GHz: ≤31.5 dBm (FCC), ≤19 dBm (SRRC), ≤14 dBm (CE) Operating Temperature Range -10° to 40° C (14° to 104° F) Battery Charger Input 100-240 V, 50/60 Hz, 1.8 A Output Main: 25.2±0.15 V, 3.57±0.
DJI FPV User Manual Calibrating the Compass It is recommended to calibrate the compass in the following situations when flying outdoors: 1. Flying at a location farther than 31 miles (50 km) away from the location the aircraft was last flown. 2. The aircraft has not been flown for more than 30 days. 3. A compass interference warning appears in the goggles and/or the aircraft status indicator blinks red and yellow alternatively.
DJI FPV User Manual Updating Firmware Use DJI Fly or DJI Assistant 2 (DJI FPV series) to update the firmware. Using DJI Fly After powering on the aircraft, goggles, and remote controller, make sure that all devices are linked. Connect the USB-C port of the goggles to the mobile device, run DJI Fly, and follow the prompt to update. An internet connection is required.
DJI Support http://www.dji.com/support This content is subject to change. Download the latest version from https://www.dji.com/dji-fpv If you have any questions about this document, please contact DJI by sending a message to DocSupport@dji.com. Copyright © 2021 DJI All Rights Reserved.