MAVIC 2 ENTERPRISE SERIES User Manual 2020.06 v1.
Searching for Keywords Search for keywords such as “battery” and “install” to find a topic. If you are using Adobe Acrobat Reader to read this document, press Ctrl+F on Windows or Command+F on Mac to begin a search. Navigating to a Topic View a complete list of topics in the table of contents. Click on a topic to navigate to that section. Printing this Document This document supports high resolution printing.
Using This Manual Legend Warning Important Hints and Tips Reference Read Before the First Flight Read the following documents before using the MAVICTM 2 Enterprise series: 1. In the Box 2. User Manual 3. Quick Start Guide 4. Disclaimer and Safety Guidelines 5. Intelligent Flight Battery Safety Guidelines It is recommend to watch all tutorial videos on the official DJITM website and read the Disclaimer and Safety Guidelines before first time use.
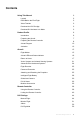
Contents Using This Manual 2 Legend 2 Read Before the First Flight 2 Video Tutorials 2 Download the DJI Pilot App 2 Download DJI Assistant 2 for Mavic 2 Product Profile 6 Introduction 6 Preparing the Aircraft 7 8 Preparing the Remote Controller Aircraft Diagram 10 Activation 13 Aircraft 15 Flight Modes 15 Aircraft LEDs and Status Indicator 16 Return to Home 17 Vision Systems and Infrared Sensing Systems 21 Advanced Pilot Assistance Systems 24 Flight Recorder 25 Password P
Flight Flight Environment Requirements 55 Flight Limits and GEO Zones 55 Pre-Flight Checklist 56 Starting/Stopping the Motors 57 Test Flight 58 Appendix 4 55 60 Specifications 60 Calibrating the Compass 64 Firmware Updates 65 Remote Controller LCD Screen Menu Information 66 After-Sales Information 67 © 2019 DJI All Rights Reserved.
Product Profile This section introduces Mavic 2 Enterprise series and lists the components of the aircraft and remote controller. © 2019 DJI All Rights Reserved.
Product Profile Introduction The DJI Mavic 2 Enterprise series features omnidirectional Vision Systems and Infrared Sensing Systems. DJI signature technologies such as Obstacle Sensing and the Advanced Pilot Assistance System*, help you capture complex shots effortlessly. Additional features like the built-in AirSense makes you aware of your surrounding airspace, and password protection helps you maintain secure access to your aircraft and protect your data.
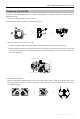
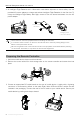
Mavic 2 Enterprise Series User Manual Preparing the Aircraft All aircraft arms are folded before the aircraft is packaged at the factory. Follow the steps below to unfold the aircraft. 1. Remove the gimbal cover from the camera. 2. Unfold the front arms, and then unfold the rear arms. 2 1 3 *Attach the gimbal cover when not in use. 1) Hold the gimbal in place and insert gimbal clamp between the aircraft and the gimbal.
Mavic 2 Enterprise Series User Manual 4. All Intelligent Flight Batteries are in Hibernation mode before shipment to ensure safety. Use the provided AC power adapter to charge and activate Intelligent Flight Batteries for the first time. To charge an Intelligent Flight Battery after flight, remove it from the aircraft and attach it to the AC power adapter. Power Outlet 100-240 V A A Charging Time: ~1 hour 30 minutes Unfold the front arms and propellers before unfolding the rear arms.
Mavic 2 Enterprise Series User Manual Refer to the figure below for how to replace the RC cable. The RC cable slider must be replaced if using a USB-C RC cable. You can also connect your mobile device to the remote controller using a USB cable if the mobile device is too big to place into the clamps. Plug one end of the cable into your mobile device and the other end into the USB port on the bottom of the remote controller. Do not use the Micro USB and USB ports simultaneously for video linking.
Mavic 2 Enterprise Series User Manual Aircraft Diagram Mavic 2 Enterprise (Model: L1ZE) 1 2 3 4 1. Forward Vision System 5 2. Propellers 6 3. Motors 4. Front LEDs 5. Antennas 7 6. Gimbal and Camera 8 7. Backward Vision System 8. Aircraft Status Indicator 9. Battery Buckles 9 10. Lateral Vision System 10 11. USB-C Port 11 12 12. Link Button/Linking Status Indicator 13. Extended Port (to connect accessories) 14. Extended Port Cover 13 14 15. Battery Level LEDs 15 16 17 16. Power Button 17.
Mavic 2 Enterprise Series User Manual Mavic 2 Enterprise Dual (Model: L1DE) 1 2 3 4 5 6 A B 1. Forward Vision System 2. Propellers 3. Motors 4. Front LEDs 5. Gimbal and Camera 7 A. Visual Camera 8 B. Thermal Camera 6. Antennas 7. Backward Vision System 9 8. Aircraft Status Indicator 10 9. Battery Buckles 11 12 10. Lateral Vision System 11. USB-C Port 12. Link Button/Linking Status Indicator 13 14 13. Extended Port (to connect accessories) 15 16 17 14. Extended Port Cover 15.
Mavic 2 Enterprise Series User Manual 1 12 2 3 11 10 4 5 17 16 15 8 1. Antennas Relay aircraft control and video wireless signals. 2. Return to Home (RTH) Button Press and hold the button to initiate RTH. The aircraft returns to the last recorded Home Point. Press again to cancel RTH. 3. LCD Screen Displays the aircraft and remote controller system status. 4. Removable Control Sticks The removable control sticks are easy to store. The default flight control is set to Mode 2.
Mavic 2 Enterprise Series User Manual 17. Zoom Adjustment Dial (Mavic 2 Enterprise) Turn to adjust the zoom of the camera. EV Adjustment Dial (Mavic 2 Enterprise Dual) Turn to adjust the exposure value of the camera. 18. C2 Button (Customizable) The default configuration is playback. Adjust the configuration in DJI Pilot based on your preferences. Activation The Mavic 2 Enterprise series requires activation before first time use.
Aircraft This section introduces the flight controller, Intelligent Flight Battery, and the Forward, Backward and Downward Vision Systems. 14 © 2019 DJI All Rights Reserved.
Aircraft The Mavic 2 Enterprise series contains a flight controller, vision systems, video downlink system, propulsion system, and an Intelligent Flight Battery. Refer to the aircraft diagram in the Product Profile section. Flight Modes The Mavic 2 Enterprise series has three flight modes, plus a fourth flight mode that the aircraft switches to in certain circumstances: P-mode (Positioning): P-mode works best when the GPS signal is strong.
Mavic 2 Enterprise Series User Manual Aircraft LEDs and Status Indicator The Mavic 2 Enterprise series has Front LEDs and Aircraft Status Indicators as shown in the figure below. Front LEDs Aircraft Status Indicator Front LEDs Aircraft Status Indicator The Front LEDs show the orientation of the aircraft and glow solid red when the aircraft is turned on to indicate the front of the aircraft (they can be turned off in the DJI Pilot).
Mavic 2 Enterprise Series User Manual Return to Home The Return to Home (RTH) function brings the aircraft back to the last recorded Home Point. There are three types of RTH: Smart RTH, Low Battery RTH, and Failsafe RTH. This section describes these three scenarios in detail. Description GPS Home Point If a strong GPS signal was acquired before takeoff, the Home Point is the location from which the aircraft launched. The GPS signal strength is indicated by the GPS icon ( ).
Mavic 2 Enterprise Series User Manual The colored zones and markers on the DJI Pilot battery level indicator bar reflect the estimated remaining flight time. They automatically adjust according to the aircraft’s current location and status. If the current battery level can only support the aircraft long enough to descend from its current altitude, a critically low battery level warning triggers and the aircraft descends and lands automatically. This cannot be canceled.
Mavic 2 Enterprise Series User Manual Failsafe RTH The Forward Vision System allows the aircraft to create a real-time map of its flight route as it flies. If the Home Point was successfully recorded and the compass is functioning normally, Failsafe RTH automatically activates after the remote control signal is lost for more than two seconds. When Failsafe RTH is activated, the aircraft starts to retrace its original flight route home.
Mavic 2 Enterprise Series User Manual The aircraft cannot return to the Home Point if the GPS signal is weak or unavailable. In Smart RTH and Low Battery RTH, the aircraft automatically ascends to an altitude of 65 ft (20 m). Once the altitude is 65 ft (20 m) or higher, move the throttle stick and the aircraft stops ascending and flies to the Home Point at its current altitude. The aircraft cannot avoid obstacles during Failsafe RTH if the Forward and Backward Vision Systems are unavailable.
Mavic 2 Enterprise Series User Manual Precision Landing performance is subject to the following conditions: a. The Home Point must be recorded upon takeoff and must not be changed during flight, otherwise the aircraft will have no record of the Home Point’s terrain features. b. During takeoff the aircraft must ascend vertically 7 m before moving horizontally. c. The Home Point terrain features must remain largely unchanged. d. The Home Point terrain features must be sufficiently distinctive. e.
Mavic 2 Enterprise Series User Manual 40° 40° 40° 3° 80° 80° 3° 77° 70° 77° 100° 5° 6° 65° 65° 6° 83° 100° 60° 4° 4° Calibrating Vision System Cameras The Vision System cameras installed on the aircraft are factory calibrated. If the aircraft experiences a collision, however, it may require calibration via DJI Assistant 2 for Mavic or DJI Pilot. The most accurate way to calibrate the Vision System cameras is by using DJI Assistant 2 for Mavic.
Mavic 2 Enterprise Series User Manual Follow the steps below to use the Downward Vision System: T P S 1. Ensure the aircraft is in P-mode and place the aircraft on a flat surface. Please note that the Downward Vision System cannot work properly on surfaces without clear pattern variations. 2. Turn on the aircraft. The aircraft hovers in place after takeoff. The Aircraft Status Indicators flash green twice, which indicates the Downward Vision System is working.
Mavic 2 Enterprise Series User Manual Keep the sensors clean at all times. DO NOT tamper with the sensors. Do not obstruct the Infrared Sensing System. The Vision System may not be able to recognize patterns on the ground in low light conditions (less than 100 lux). If the aircraft speed exceeds 31 mph (50 kph), the Vision System does not have enough time to brake and stop the aircraft at a safe distance from an obstacle. If the aircraft experiences a collision, camera calibration is required.
Mavic 2 Enterprise Series User Manual Flight Recorder Flight data including flight telemetry, aircraft status information, and other parameters are automatically saved to the aircraft’s internal data recorder. The data can be accessed using DJI Assistant 2 for Mavic. Password Protection The Mavic 2 Enterprise series supports password protection. This feature helps ensure secure access to your aircraft and its onboard data storage, thus preventing leakage of sensitive information.
Mavic 2 Enterprise Series User Manual Detaching the Propellers Press the propellers down onto the motors and rotate them in the unlock direction. Propeller blades are sharp. Handle with care. Only use original DJI propellers. Do not mix propeller types. Ensure that all propellers are in good condition before each flight. Do not use aged, chipped, or broken propellers. Ensure that the propellers and motors are installed securely before each flight.
Mavic 2 Enterprise Series User Manual 6. 7. 8. 9. Overcurrent Protection: The battery stops charging if an excess current is detected. Over-discharge Protection: Discharging stops automatically to prevent excess discharge. Short Circuit Protection: The power supply is automatically cut if a short circuit is detected. Battery Cell Damage Protection: DJI Pilot displays a warning message when a damaged battery cell is detected. 10.
Mavic 2 Enterprise Series User Manual Auto Heating: Insert the battery into the aircraft and power it on. When the temperature of the battery is below 43℉ (6℃) and the battery level is above 45%, it will warm up automatically and the temperature will remain between 46 to 50 ℉(8 to 10 ℃). Low Temperature Notice 1. Battery capacity is significantly reduced when flying in low-temperature environments of -4° to 41° F (-20° to 5° C).
Mavic 2 Enterprise Series User Manual Power Outlet AC Power Adapter Intelligent Flight Battery Battery Level LEDs During Charging LED 1 LED 2 LED 3 LED 4 0%~25% 25%~50% 50%~75% Fully Charged Battery Level LEDs During Charging Battery Level Battery Protection Battery Protection Mechanisms LED 1 LED 2 LED 3 LED 4 Blinking Pattern Battery Protection Item LED 2 blinks twice per second Overcurrent detected LED 2 blinks three times per second Short circuit detected LED 3 blinks twice per se
Mavic 2 Enterprise Series User Manual Removing the Intelligent Flight Battery Slide the battery latches on the sides of the Intelligent Flight Battery to open the battery compartment. Never insert or remove the battery while it is turned on. Ensure the battery is mounted securely. Gimbal and Camera Gimbal The Mavic 2 Enterprise series 3-axis gimbal provides stabilization for the camera, allowing you to capture clear and stable images and video. The gimbal has a tilt range of -90˚ to +30˚.
Mavic 2 Enterprise Series User Manual The Mavic 2 Enterprise Dual features a FLIR longwave infrared thermal camera and a visual camera, providing both infrared and visible light imaging simultaneously. The FLIR longwave infrared thermal camera provides high-sensitivity (<50 mK). The visual camera uses a 1/2.3’’ CMOS sensor, the lens is 24 mm (35 mm format equivalent), and focus at 0.5 m to infinity.
Mavic 2 Enterprise Series User Manual Video Edit Mavic 2 Enterprise supports MP4 and MOV video formats, providing H.264 code formats. Mavic 2 Enterprise Dual supports MP4 and MOV video formats, providing H.264 code formats, and supports capturing of visible light, thermal imaging, or a combination of them. The software below has been tested by DJI and is recommended for playing or editing videos.
Mavic 2 Enterprise Series User Manual Warning Escalation: The first (or "lowest") level warning occurs when the manned aircraft is detected. All detected aircraft will be displayed in the app (up to 10 aircraft at a time). Please pay attention to ensure flight safety. The second (or “middle”) level warning occurs two kilometers away from the manned aircraft. Please pay attention to avoid any hazards. The third (or “highest”) level warning occurs one kilometer away from the manned aircraft.
Mavic 2 Enterprise Series User Manual 1 2 4. Power on the aircraft, and then launch the DJI Pilot app to use the Beacon. The Auxiliary Bottom Light can be used as a beacon. You can simply enter Visual Navigation Settings and select Bottom Auxiliary Light as Night Light in DJI Pilot. Make sure that the accessories are correctly and securely mounted on the aircraft before using the accessories. This is to prevent the accessory from falling off during flight.
Remote Controller This section describes the features of the remote controller and includes instructions for controlling the aircraft and the camera. © 2019 DJI All Rights Reserved.
Remote Controller Built into the remote controller is DJI’s long-range transmission technology OcuSync 2.0, offering a maximum transmission range of 6.2 mi (10 km) and displaying video from the aircraft to DJI Pilot on your mobile device at up to 1080p. Easily control the aircraft and camera using the onboard buttons. An onboard LCD screen gives real-time aircraft data information and the detachable control sticks make the remote controller easier to store.
Mavic 2 Enterprise Series User Manual Charging the Battery Connect the provided AC power adapter to the power port on the remote controller. It takes approximately 2 hours and 15 minutes to charge the remote controller battery fully. Remove the RC cable from the remote controller before charging. Power Outlet AC Power Adapter USB Adapter Controlling the Camera 1. Use the Record button to start/stop recording. 2. Use the Focus/Shutter Button to auto focus and take photos. 3.
Mavic 2 Enterprise Series User Manual Controlling the Aircraft The control sticks control the aircraft’s orientation (yaw), forward/ backward movement (pitch), altitude (throttle), and left/right movement (roll). The control stick mode determines the function of each control stick movement. Three preprogrammed modes (Mode 1, Mode 2, and Mode 3) are available and custom modes can be configured in DJI Pilot. The default mode is Mode 2.
Mavic 2 Enterprise Series User Manual Remote Controller (Mode 2) ( Aircraft Remarks Indicates Nose Direction) Moving the left stick up or down changes the aircraft’s altitude. Push the stick up to ascend and down to descend. The more the stick is pushed away from the center position, the faster the aircraft will change altitude. Always push the stick gently to prevent sudden and unexpected changes in altitude. Moving the left stick to the left or right controls the orientation of the aircraft.
Mavic 2 Enterprise Series User Manual Flight Mode Switch Toggle the switch to select the desired flight mode. Position Flight Mode S S-mode P P-mode T T-mode T P S Regardless of which position the switch is in on the remote controller, the Mavic 2 Enterprise series begins in P-mode by default. To switch flight modes, first go to Camera View in DJI Pilot, tap and enable “Multiple Flight Modes”. After enabling multiple flight modes, toggle the switch to P and then to S or T to switch flight modes.
Mavic 2 Enterprise Series User Manual strong weak Ensure that the aircraft is flying within the optimal transmission zone. To maintain optimal transmission performance, adjust the remote controller and antennas according to the figure above. LCD Screen The LCD Screen displays various system statuses including real-time flight telemetry and battery levels. Refer to the figure below for the meaning of each icon on the LCD Screen.
Mavic 2 Enterprise Series User Manual Linking the Remote Controller The remote controller is linked to your aircraft before delivery. Linking is only required when using a new remote controller for the first time. Follow these steps to link a new remote controller: 1. Power on the aircraft and the remote controller. 2. Launch DJI Pilot. 3. Enter “Camera” and tap on and then tap the button to confirm. The remote controller is ready to link. 4.
DJI Pilot App This section introduces the main functions of the DJI Pilot app. © 2019 DJI All Rights Reserved.
DJI Pilot App The DJI Pilot app* is specifically developed for enterprise users. Manual flight integrates a variety of professional features that make flying simple and intuitive. Mission flight supports flight planning, and allows you to control the drone automatically, making your workflow much simpler and more efficient. Manual Flight Mission Flight S ENTERPRISE ZOOM M2E SPEAKER * For illustration purpose only, the DJI Pilot App in this manual is used on Android.
Mavic 2 Enterprise Series User Manual 3. Battery Level Indicator Bar : The battery level indicator provides a dynamic display of the battery level. The colored zones on the battery level indicator represent the power levels needed to carry out different functions. 4. Flight Mode : The text next to this icon indicates the current flight mode. Tap to configure the Flight Controller settings. These settings allow you to modify flight limits and set gain values. 5.
Mavic 2 Enterprise Series User Manual 12. Battery Settings 61% : Shows the current battery level. Tap to view the battery information menu, set the various battery warning thresholds, and view the battery warning history. 13. AF(CF)/MF : Tap to switch the focus mode. 14. General Settings : Tap to enter the General Settings menu to set units of measurement, enable/disable livestream and more. 15. Auto Exposure Lock AE : Tap to lock the exposure value. 16.
Mavic 2 Enterprise Series User Manual 25. Time and GPS Information Shows the current date, time and the longitude and latitude of the aircraft. 26. Accessory Shows the connecting accessory such as the beacon to set the accessory. , spotlight or speaker . Tap on the screen 27. Advanced Pilot Assistance System : Tap to enable/disable the APAS feature. The APAS feature is disabled if the Forward and Backward Vision Systems are disabled or unavailable. APAS 28. Back : Tap to return to the main menu.
Mavic 2 Enterprise Series User Manual 4. Flight Mode : The text next to this icon indicates the current flight mode. Tap to configure the Flight Controller settings. These settings allow you to modify flight limits and set gain values. 5. AirSense Status : The AirSense Status displays information about nearby manned aircraft to ensure flight safety, including the distance between DJI aircraft and manned aircraft. AirSense will instruct users to land if nearby aircraft are detected. 6.
Mavic 2 Enterprise Series User Manual the interference will not affect operation and overall flight experience. 10. FFC Calibration Tap this button to enable FCC calibration in IR or MSX Mode. Calibration is used to optimize image quality. During calibration, your screen may freeze momentarily. 11. HD Video Link Signal Strength : This icon shows the strength of the HD video downlink connection between the aircraft and the remote controller.
Mavic 2 Enterprise Series User Manual ROI (Region of Interest) Use this feature to manage color range distribution across the screen to maximize contrast for regions of highest interest. Select “Full” to evenly distribute the color spectrum across the entire image. For instance, if there is a large patch of sky (relatively low temperature) in your image, much of the color spectrum will be allocated to the lower range, meaning that other parts of the spectrum will have a lower contrast.
Mavic 2 Enterprise Series User Manual H 10.0 m : Height from the Home Point. HS 10.0 m/s : Aircraft horizontal speed. VS 2.0 m/s : Aircraft vertical speed. 113.95, 22.54 Coordinate: The longitude and latitude of the aircraft. : Shows the remaining capacity or recording duration of the internal storage. 12:45 : Shows the remaining capacity or recording duration of the microSD card. 24. Map Tap to view the map. 25.
Mavic 2 Enterprise Series User Manual position. When the POI function is enabled, the drone yaw can be set to center to POI so that the aircraft nose points at the POI during the mission. Tap this icon again to disable the POI function. 2. Reverse Path : Tap it to swap the start and end points to reverse the flight path. “S” refers to the start point. S E 3 Clear Waypoints : Tap to clear all the added waypoints. 4. Delete Selected Waypoint : Tap to delete the selected waypoint. 5.
Mavic 2 Enterprise Series User Manual Gimbal Pitch: This option will be available to set the gimbal pitch angle if “Set Each Waypoint” is set for “Gimbal Control” in “Route” settings. Actions: Tap to enter the action list. Tap + to add the desired waypoint action and set its corresponding parameters. Tap and hold the icon on the left of the added action, drag it to re-order the actions. To delete the action, swipe it to the left and choose an option. 10.
Flight This section describes safe flight practices and flight restrictions. 54 © 2019 DJI All Rights Reserved.
Flight Once pre-flight preparation is complete, it is recommended to use the flight simulator in DJI Pilot to hone your flight skills and practice flying safely. Ensure that all flights are carried out in an open area. Refer to the Remote Controller and DJI Pilot sections for information about using the remote controller and the app to control the aircraft. Flight Environment Requirements 1. Do not use the aircraft in severe weather conditions including wind speeds exceeding 10 m/s, snow, rain, and fog. 2.
Mavic 2 Enterprise Series User Manual GPS Signal Strong Blinking Green Flight Limits DJI Pilot App Aircraft Status Indicator Max Altitude Aircraft's altitude cannot exceed the specified value. Warning: Height limit reached. N/A Max Distance Flight distance must be within the max radius. Warning: Distance limit reached.
Mavic 2 Enterprise Series User Manual 8. Make sure that the accessories are correctly and securely mounted on the aircraft before using it. 9. Use only genuine DJI parts or parts certified by DJI. Unauthorized parts or parts from non-DJI certified manufacturers may cause system malfunctions and compromise safety. Starting/Stopping the Motors Starting the Motors A Combination Stick Command (CSC) is used to start the motors. Push both sticks to the inner or outer bottom corners to start the motors.
Mavic 2 Enterprise Series User Manual Test Flight Takeoff/Landing Procedures 1. 2. 3. 4. 5. 6. 7. 8. Place the aircraft in an open, flat area with the Aircraft Status Indicator facing towards you. Turn on the aircraft and the remote controller. Launch DJI Pilot and enter Camera View. Wait until the Aircraft Status Indicator blinks green indicating that the Home Point has been recorded and it is now safe to fly. Push the throttle stick up slowly to take off.
Appendix © 2019 DJI All Rights Reserved.
Appendix Specifications Aircraft Takeoff Weight (Without Accessories) 905 g (Mavic 2 Enterprise); 899 g (Mavic 2 Enterprise Dual) Max Takeoff Weight 1100 g Dimensions Folded: 214×91×84 mm (length×width×height) Unfolded: 322×242×84 mm (length×width×height) Diagonal Distance 354 mm Max Ascent Speed 5 m/s (S-mode), 4 m/s (P-mode) Max Descent Speed 3 m/s (S-mode), 3 m/s (P-mode) Max Speed 72 km/h (S-mode) (near sea level, no wind) Max Service Ceiling Above Sea Level 6000 m Max Flight Time 31 mi
Mavic 2 Enterprise Series User Manual Controllable Range Tilt: -90 to 30°, Pan: -75 to 75° Stabilization 3-axis (tilt, roll, pan) Max Control Speed (tilt) 120°/s Angular Vibration Range ±0.005° (Mavic 2 Enterprise); ±0.
Mavic 2 Enterprise Series User Manual Supported File System FAT32: ≤ 32 GB exFAT: > 32 GB Photo Format JPEG / DNG (RAW) Video Format MP4 / MOV (MPEG-4 AVC/H.264, HEVC/H.265) Supported SD Cards Supports a microSD with capacity of up to 128 GB. A UHS-I Speed Grade 3 rating microSD card is required. Operating Temperature Range HDR -10°C to 40°C HDR, 13 EV Camera (Mavic 2 Enterprise Dual) Thermal Camera Sensor Uncooled VOx Microbolometer Lens HFOV: 57° Aperture: f/1.
Mavic 2 Enterprise Series User Manual Video Recording Modes 4K Ultra HD: 3840×2160 30p 2.7K: 2688×1512 30p FHD: 1920×1080 30p Max Video Bitrate 100 Mbps Supported File System FAT32/exFAT Photo JPEG Video MP4, MOV (MPEG-4 AVC/H.264) Remote Controller Operating Frequency 2.400 - 2.4835 GHz; 5.725 - 5.
Mavic 2 Enterprise Series User Manual Live View Quality 720p@30fps / 1080p@30fps Latency (depending on environmental conditions and mobile device) 120 - 130 ms Required Operating System iOS 10.0 or later Android 5.0 or later M2E Beacon Dimensions 68×40×27.8 mm Interface Type USB Micro-B Power Avg. 1.6 W Luminous Intensity Min. Angle: 55 cd; light intensity: 157 cd Max.
Mavic 2 Enterprise Series User Manual Calibration Procedure Choose an open area to carry out the following procedure. 1. Tap the System Status Bar in DJI Pilot, select “Calibrate”, and follow the on-screen instructions. 2. Hold the aircraft horizontally and rotate it 360 degrees. The Aircraft Status Indicator will turn solid green. 3. Hold the aircraft vertically, with its nose pointing downward, and rotate it 360 degrees around a vertical axis. 4.
Mavic 2 Enterprise Series User Manual 1. With the aircraft powered off, connect the aircraft to a computer via the Micro USB port using a Micro USB cable. 2. Power on the aircraft. 3. Launch DJI Assistant 2 for Mavic and log in with your DJI account. 4. Select “Mavic 2” and click on Firmware Updates on the left panel. 5. Select the firmware version that you wish to update to. 6. Wait for the firmware to download. The firmware update will start automatically. 7.
Mavic 2 Enterprise Series User Manual ATTI MODE SPORT MODE TRIPOD Flight Status TAKING OFF LANDING GOING HOME MAX ALT.
DJI Support http://www.dji.com/support This content is subject to change. Download the latest version from http://www.dji.com/mavic-2-enterprise If you have any questions about this document, please contact DJI by sending a message to DocSupport@dji.com. MAVIC is a trademark of DJI. Copyright © 2019 DJI All Rights Reserved.