
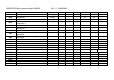
Technical data


1592022750 Quick reference guide IC 200CX Rel. 1.1 25/05/2009
Pag. 20/58
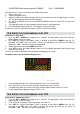
Starting from the Pr2 level push the UP key for 2 seconds and the bottom display will show Pr3. The
top display still shows PAS.
After selecting the level push the SET key and the top display will show the 0 blinking value where to
insert the password.
Set the password level using the UP and DOWN keys then confirm with SET key.
Dependening on the password value there will be the different level access, if the password is wrong
the instrument shows the password value again.
ATTENTION:
For all the programming levels Pr1, 2, 3: the CF family (or configuration parameters) can not be
changed if the unit is running in chiller or heat pump. To change this parameters is necessary
to set the unit in stand-by and then enter the programming again.
During the defrost the dF family can’t be programmed.
10.3 HOW TO CHANGE A PARAMETER VALUE
Enter the programming
1. Push the SET + DOWN keys together for 3 seconds;
2. Select the parameter label with up and down keys;
3. Push SET to enter the parameter value;
4. Change the value with UP or DOWN keys;
5. Push “SET” to confirm, after some seconds the display shows the next parameter;
6. Exit: Push SET + UP together when a parameter label is displayed or wait 15seconds without
pushing a key.
NOTE: a new parameter value is confirmed also after the 15 seconds of timeout is expired (without
pushing SET key to confirm).
10.4 CHANGE THE PASSWORD VALUE
Pr1 LEVEL
Remember that it is necessary to know the old password value.
1) Enter the Pr1 level
2) Select a parameter family.
3) Select “Pr1” on the bottom display; the current password value is on the top display. Push the
SET key to change the value that now is blinking.
4) Use the UP or DOWN key to insert the NEW PASSWORD value, then push SET to confirm the
new value.
5) The top display blinks for some seconds and then shows the next parameter.
6) Exit the programming pushing SET + UP together or wait the timeout.
Pr2 LEVEL
Remember that it is necessary to know the old password value.
1. Enter the Pr2 level
2. Select a parameter family.
3. Select the “Pr2” on the bottom display; the current password value on the top display. Push the
SET key to change the value that now is blinking.
4. Use the UP or DOWN key to insert the NEW PASSWORD value, then push SET to confirm the
new value.
5. The top display blinks for some seconds and then shows the next parameter
6. Exit the programming pushing SET + UP together or wait the timeout.
Inside the Pr2 level it is possible to change also the Pr1 password.
Pr3 LEVEL