
Install Instructions


WARRANTIES AND REMEDIES. DiversiTech Corporation (“Seller”) warrants that, at the time of shipment, the Products manufactured and sold by it hereunder will,
for a period of twelve (12) months from date of shipment, be free from defects in material and workmanship. Seller's obligations, and the purchaser and/or end user’s
(collectively “Buyer”) remedies, under this Warranty are limited to replacing and/or issuing an appropriate credit, at Seller's election, for any Products or parts thereof
which are demonstrated, to Seller's reasonable satisfaction, to have been defective at the time of shipment. Defective conditions in the Products caused by Buyer,
third parties, acts of God, abnormal use or stress of any other matters unrelated to Seller and beyond its reasonable control are specically excluded from coverage
under this Warranty.
Buyer agrees to notify Seller in writing within 30 days of the discovery of any defect which would give rise to a claim under the Warranty. Failure to so notify Seller
with respect to any claim shall result in the forfeiture by Buyer of coverage of that claim under the Warranty.
THE FOREGOING WARRANTY IS EXCLUSIVE AND IS GIVEN AND ACCEPTED IN LIEU OF ANY AND ALL OTHER WARRANTIES, EXPRESS OR IMPLIED,
INCLUDING, WITHOUT LIMITATION, THE IMPLIED WARRANTIES OF MERCHANTABILITY AND FITNESS FOR PURPOSE. IN NO EVENT SHALL SELLER BE
LIABLE FOR LOSS OF USE, REVENUE OR PROFIT, INCIDENTAL, SPECIAL OR CONSEQUENTIAL DAMAGES.
In the event that Buyer has a claim under this Warranty, Buyer will forward all relevant information (including a representative sample) and request authorization
from Seller's Sales Department to return the material. Seller will then determine whether the Product should be inspected at Buyer's facility (in which case, Seller
may supply its own inspector) or returned to Seller for inspection. If items are authorized to be returned to Seller's facility, they shall be packed in original or
equivalent packaging. All Products and parts therefore, not found defective by Seller will be returned to Buyer, transportation charges collect. In no event will Seller
be liable for any packaging expenses, inspection costs or labor charges incurred by Buyer in connection with the processing of claims under this Warranty or the return
of defective Products.
LIMITATION OF LIABILITY: The liability of Seller to Buyer arising out of the manufacture, sale, delivery, resale, repair or use of any of the Products, whether based on
a theory of contract or tort, shall not, in any event, exceed the cost of correcting defects or making replacements as required in the Warranty and such remedy shall be
to the exclusion of any and all other remedies, regardless of the legal theory under which liability is alleged. Seller’s warranty does not extend to any injury or
damage which results from or is in any way connected to the possession, sale, use, resale, transfer, misuse, misapplication or failure to inspect, maintain or repair the
Products. Seller shall not be responsible for any failure by Buyer to comply with any applicable federal, state or industry law or safety requirement regarding the
Product. Upon the expiration of the warranty period, all liability of Seller to Buyer shall terminate, and no action arising out of the sale of the Products may be
brought by the Buyer or user after expiration of the warranty period, regardless of the legal theory under which the action is brought. IN NO EVENT SHALL SELLER
BE LIABLE FOR LOSS OF USE, LOST REVENUES, LOST PROFITS, COSTS OR EXPENSES, (INCLUDING LEGAL FEES) OR FOR INDIRECT, INCIDENTAL, OR
CONSEQUENTIAL DAMAGES.
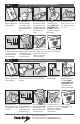
2. Glue ¾” reducer into
horizontal or vertical Tee
tting OR onto threaded
¾” plug that has been
threaded into auxiliary
drain outlet port.
1. Disconnect power to
HVAC unit at Main panel
before installation.
OFF
3. Option 1 - using the
horizontal Tee tting.
Glue the plug in the end
opening. Glue Tee tting
housing to the auxiliary
outlet port.
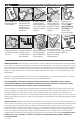
Red
White
Green
Yellow
Furnace / AC
From ThermostatTo Switch
6. Ensure that sensor
angle to ground does not
exceed 30 degrees, adjust
if necessary.
7. Wire the sensor per
the attached instructions
and diagram. Can be
connected with either
Red or Yellow wires.
8. Test sensor function by
lifting oat while the HVAC
unit is running to ensure
unit stops when the oat
ascends to trip point.
9. Test the connections for
leaks. Plug pan or line and ll
pan with water to verify water
height at sensor activation
and proper installation.
10. Place supplied
warning sticker on air
handler unit.
4. Option 2 - using the
vertical Tee tting. Glue
the plug into the bottom
opening. Glue Tee tting
housing to the auxiliary
outlet port.
Installation Instructions for Plugged, Auxiliary Application
5. Firmly press CS-1
ood sensor into top of
Tee tting. DO NOT
GLUE THE SENSOR TO
THE ASSEMBLY. Sensor
can be removed for
inspection and cleaning.
CS-1 13.003
CS-1