USB 3.0 to HDMI with Audio Quick Installation Guide Introduction The USB 3.0 to HDMI with Audio adds an HDMI port to your USB 2.0/3.0 enabled system. Key Features and Benefits • • • • • Supports standard and widescreen (16:9, 16:10) aspect ratio Connects up to 6 adapters per system Supports 24-bit color depth USB bus powered and hot pluggable Integrated 2.0/5.1 channel audio (32, 44.1, 48KHz, 16-bit, SNR=90dB) Serial Number Sticker For future product return or exchange, this serial number is required.
System Requirements • • Desktop or notebook PC with an available USB 2.0/3.0 port (USB 3.0 recommended) Windows® 8 (32-/64-bit) / 7 (32-/64-bit) / Vista (32-/64-bit) / XP (32-bit) with Service Pack 3 / Server 2008 (32-/64-bit) / Server 2008 R2 Package Contents • • • • USB 3.0 to HDMI with Audio USB Cable Driver CD Quick installation guide Layout USB 3.
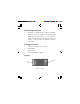
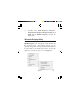
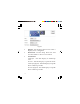
USB Cable HDMI Cable (not included) USB 3.0 to HDMI with Audio Computer HDMI Display Figure 2 Installation Make sure the proper version driver for your graphics card is installed, the USB 3.0 to HDMI with Audio is not designed to work with Windows' Standard VGA Graphics Adapter driver. IMPORTANT: Do not plug the USB 3.0 to HDMI with Audio into the computer until instructed to do so. Windows 8 (32-/64-bit) / 7 (32-/64-bit) / Server 2008 R2 1. 2. 3. Insert the driver CD. Close AutoPlay box.
. 5. 6. 7. Select I Accept. Connect your second monitor to the Adapter using an HDMI cable (not included) and turn it on. Wait for the installation screens to end, then plug the Adapter into the computer. Restart your computer. Windows Vista (32-/64-bit) / Server 2008 (32-/64-bit) 1. 2. 3. 4. 5. 6. 7. 4 Insert the driver CD. Close AutoPlay box. Click Start, in the Start Search box, type D:\setup.exe, press Enter. (Change D: to match your CD/DVD-ROM drive letter). At User Account Control, click Continue.
Windows XP (32-bit) 1. 2. 3. 4. 5. 6. Insert the driver CD. Click Start, then Run. Type D:\setup.exe, click OK. (Change D: to match your CD/DVD-ROM drive letter). Select I accept. Click Yes to restart Windows. Skip this step is not prompted. Connect your second monitor to the Adapter using an HDMI cable (not included) and turn it on. Plug the Adapter into the computer and the driver will install automatically. Click Yes to restart Windows. To Verify Windows Installation 1.
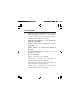
2. Double click USB Display Adapters, DisplayLink Display Adapter (C4301) and USB 3.0 to HDMI adapter should be displayed. Windows Display Utility After successful driver installation USB 3.0 to HDMI adapter icon will appear in the taskbar by the system clock. This utility allows you to quickly change the viewing modes and resolutions for the USB 3.0 to HDMI with Audio. Access the menu by clicking on the icon, see Figure 3.
Viewing Modes • • • • • • Check for updates (Windows 8 / 7 / Server 2008 R2 only): Connects to the update server to check for newer driver versions and download them if available. DisplayLink Manager: View Windows Display Properties. Audio Setup: View Windows Sound Properties. Video Setup: View Windows Dispaly Settings. Screen Resolution: Displays a list of available resolutions. Screen Rotation: Normal - No rotation is applied. Rotated Left - Rotates the extended or mirrored display by 270 degrees.
• • • 8 Extend to: Right - Extends the display to the right of the main display. Left - Extends the display to the left of the main display. Above - Extends the display above of the main display. Below - Extends the display below the main display. Extend (Default setting): This mode extends your desktop for easy viewing of multiple windows. Windows will move off the primary display and enter the extended display. Set as Main Monitor: Makes the USB 3.
IMPORTANT: In Windows XP, set the USB 3.0 to HDMI with Audio to Off before selecting Set as Main Monitor. • • • • Mirror: The USB 3.0 to HDMI with Audio will mirror your desktop. You will see the same image on both monitors. Off: This setting turns off the USB 3.0 to HDMI with Audio adapter. Optimize for Video (Not applicable in Windows XP): Configures the secondary display for optimum full screen video performance output. Note: Text may appear less clear.
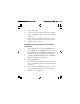
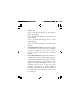
Figure 4 • • • 10 Display: Use the drop down list to select a display to be configured. Resolution: Use the drop down list and user the slider to choose a resolution. Orientation: Landscape - Sets the display to landscape view. Portrait - Sets the display to portrait mode. Landscape (flipped) - Sets the display to upside down landscape mode. Portrait (flipped) - Sets the display to upside down landscape mode.
• • Multiple displays: Duplicates these displays - Reproduces the main display on the second display. Extend these displays - Extends the main display onto the secondary display. Show Desktop only on 1 - The desktop appears on the display marked 1. The display marked 2 becomes blank. Shows Desktop only on 2 - The desktop appears on the display marked 2. The display marked 1 becomes blank. Make this my main display: When you check the box, it will make your USB 3.
Uninstalling the Driver Windows 8 / 7 / Server 2008 R2 1. 2. 3. 4. Click Start, Control Panel. Click Programs, then click Programs and Features. Select DisplayLink Graphics, then click Uninstall. Follow the on-screen instructions to uninstall the driver. Windows Vista / Server 2008 1. 2. 3. 4. Click Start, Control Panel. Click Classic View, double click Programs and Features. Select DisplayLink Graphics, click Uninstall. Follow the on-screen instructions to uninstall the driver. Windows XP 1. 2.
3. 4. Select DisplayLink Graphics, click Remove. Follow the on-screen instructions to uninstall the driver. Frequently Asked Questions Q1: How do I move an open window to the extended display? A1: When a window is Maximized (full screen) it can not be moved to the extended display. To shrink the window, click on the Restore Down button located in the upper right hand corner of the window to the left of the close button.
Q3: Why won't my DVD player work when I move it over to the extended display? A3: Some DVD playback software packages do not support playing on a second display adapter. Q4: Why can't I make the USB 3.0 to HDMI with Audio the primary display? A4: Some video cards ship their product with a utility that prevents other video cards from being set as the primary video card. Check the bottom right hand corner of the taskbar for the utility. Disable the utility before switching the USB 3.
Technical Support and Warranty QUESTIONS? SIIG’ s Online Support has answers! Simply visit our web site at www.siig.com and click Support. Our online support database is updated daily with new drivers and solutions. Answers to your questions could be just a few clicks away. You can also submit questions online and a technical support analyst will promptly respond. SIIG offers a 5-year manufacturer warranty with this product.
About SIIG, Inc. Founded in 1985, SIIG, Inc. is a leading manufacturer of IT connectivity solutions (including Serial ATA and Ultra ATA Controllers, FireWire, USB, and legacy I/O adapters) that bridge the connection between Desktop/ Notebook systems and external peripherals. SIIG continues to grow by adding A/V and Digital Signage connectivity solutions to our extensive portfolio.