
User Manual


DISPLAYS LIMITED
2
Install the Bounce Communicator 2 for Windows XP
System Requirements
In order to install and use the Bounce Communicator 2, your computer must meet the following requirements:
• An available USB port
• 10 Mb free disk space for utility and driver installation
• Windows XP
Prepare for installation
ATTENTION: You must install your software and drivers before you physically connect the Bounce
Communicator 2.
Turn on your desktop or laptop computer.
Before plugging in the ‘Bounce Communicator 2’.
Insert the Bounce CD. If it does not start automatically, double click the Start Up CD icon in My Computer,
Windows Explorer or on the desktop, then double click the Start icon.
Windows XP Users: The Bounce CD will automatically update the drivers needed on your system to support the
Bounce Communicator 2.
Bounce getting started guide
At this point you must have SQL Server Express and .NET framework 2.0 installed on your host machine.
*** Note if you have previously installed any older version of the Bounce software suite then you must
*** re-run the Database script DbaseCreate.bat - see the release notes and the 'SQL Express Database'
*** section below for more details
After a successful installation =>
Installing the Bounce Communicator
With the Bounce Communicator "UNPLUGGED" from the host PC run the Windows driver installation script
install.bat. This can be found at C:\Program\Files\ZBD\Displays\Bounce\BounceComms\CommunicatorDriver.
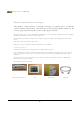
Now plug in the Bounce Communicator.
Plug the small square end of the included USB cable into the USB port
on the Bounce Communicator 2.
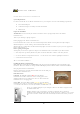
LED Information
USB LED: The USB LED is lighted RED when the Bounce
Communicator 2 USB is connected and is receiving power and is
unlighted when there is no USB power source or when the Bounce
Communicator 2 is not plugged in.
Status LED: The Status LED is lighted YELLOW when the Bounce
Communicator 2 driver is correctly installed and blinks YELLOW every
1.5 seconds. If the driver is not correctly installed, this LED will be off.
Locate an available USB port on your computer and insert the thin rectangular end of
the included USB cable.
Windows will detect the new hardware and walk you through the new hardware
installation wizard. Whilst going through the wizard choose not to look for a new version
of the driver and then ask the wizard to automatically install the driver from your local
PC.