DishPro 21 Multi-Dish Switch Installation Guide 120131
Inside_Front_Small.fm Page 2 Tuesday, January 7, 2003 4:08 PM Important Safety Instructions You must keep safety in mind when you install and use the DP21 switch. Refer to the safety instructions in the installation instructions that came with your system. In this Guide, the following notes tell you when you need to pay special attention: Marks a procedure where the following may happen: • Personal injury or death may occur. • Equipment or property may be damaged.
Instructions_Small.fm Page 3 Tuesday, January 14, 2003 2:08 PM Contents Introduction.....................................page 4 How to Install the DP21 Switch .....page 5 Operating with a DishPro Compliant Splitter .....................page 10 Wiring Diagrams .............................page 10 Limited Warranty ............................
Instructions_Small.fm Page 4 Tuesday, January 14, 2003 2:08 PM Introduction A DishPro 21 (DP21) Multi-Dish Switch allows you to receive signals from two DishPro LNBFs, and route these signals to a DishPro satellite receiver (see page 10 for wiring diagrams). This guide explains how to install a DP21 Multi-Dish Switch. Use this guide along with the DishPro Installation Instructions that are in the user guide that came with your receiver.
Instructions_Small.fm Page 5 Tuesday, January 14, 2003 2:08 PM How to Install a DP21 Switch The following instructions assume you have already pointed your dish for the strongest possible signal, that you have run Check Switch with the DishPro LNBF connected directly to the receiver’s Satellite In port, and that you have taken a software upgrade from the satellite. If not, follow the Dish installation instructions that came with your receiver. Connections 1.
Instructions_Small.fm Page 6 Tuesday, January 14, 2003 2:08 PM 2. 3. Connect the coaxial cables from a DISH 500 or a DISH 300 to the ports on the DP21 switch labeled To Dish as shown in the wiring diagrams that begin on page 10. Connect the cable from the satellite receiver port labelled Satellite In to the DP21 port labeled To Receiver Satellite In.
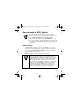
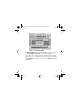
Instructions_Small.fm Page 7 Tuesday, January 14, 2003 2:08 PM Figure 1. Point Dish/Signal 4. The Check Switch procedure will run. When it finishes, you will see an Installation Summary screen similar to Figure 2 on page 8. This screen should identify the installed switch as a DP21. You should see every satellite location that your system is receiving on the Satellite line, and the word “All” on the Transp line under both 1 and 2.
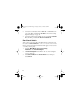
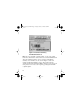
Instructions_Small.fm Page 8 Tuesday, January 14, 2003 2:08 PM Figure 2. Installation Summary with Identified Devices Note: If you use a DishPro compliant splitter, one side of the splitter blocks the communications between the receiver and the LNBF, but will allow the satellite TV signals to pass. You will see an Installation Summary screen similar to the one shown in Figure 3, which will identify the DP Single LNBF as a “Feed.
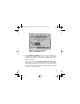
Instructions_Small.fm Page 9 Tuesday, January 14, 2003 2:08 PM Figure 3. Installation Summary without Identified Devices 5. 6. If the Installation Summary does not show that Check Switch completed successfully as shown in step 4, check your connections on all cables at the receivers, switches, and LNBFs, and then run Check Switch again.
Instructions_Small.fm Page 10 Tuesday, January 14, 2003 2:08 PM 7. If you still do not see the Satellite reception verified message, call the DISH Network Customer Service Center at 1-800-333DISH (3474). Operating with a DishPro Compliant Splitter When using a DishPro compliant splitter to split the signal from a DishPro single LNBF (as shown in Figures 4 and 5), the receiver whose DP21 switch is connected to the passing side of the splitter must be plugged into a live power outlet at all times.
Instructions_Small.fm Page 11 Tuesday, January 14, 2003 2:08 PM Figure 4. DISH 500 with DishPro Twin LNBF, DISH 300 with a Single LNBF, Two DP21 Switches, and a DishPro Compliant Splitter. Supports two receivers from three satellite locations.
Instructions_Small.fm Page 12 Tuesday, January 14, 2003 2:08 PM Figure 5. Two DISH 300s with Single DishPro LNBFs, Two DP21 Switches, and Two DishPro Compliant Splitters. Supports two receivers from two satellite locations.
Instructions_Small.fm Page 13 Tuesday, January 14, 2003 2:08 PM Figure 6. One Dish 500 with a Twin LNBF, One Dish 300 with a Single LNBF, and One DP21 Switch. Supports one receiver from three satellite locations and one receiver from two satellite locations.
Instructions_Small.fm Page 14 Tuesday, January 14, 2003 2:08 PM Limited Warranty This warranty extends only to the original user of the DISH Network™ DP21 Switch (“you,” “your”) and is limited to the purchase price of the switch. EchoStar Communications Corporation and its affiliated companies (“we,” “our,” “us”) warrant this switch control against defects in materials or workmanship as follows.
Instructions_Small.fm Page 15 Tuesday, January 14, 2003 2:08 PM USE OF, OR INABILITY TO USE, THIS DEVICE. UNDER NO CIRCUMSTANCES SHALL OUR LIABILITY, IF ANY, EXCEED THE PURCHASE PRICE PAID FOR THIS DEVICE. EXCEPT TO THE EXTENT PROHIBITED BY APPLICABLE LAW, ANY IMPLIED WARRANTY OF MERCHANTABILITY OR FITNESS FOR A PARTICULAR PURPOSE ON THIS DEVICE IS LIMITED IN DURATION TO THE DURATION OF THIS WARRANTY.
Instructions_Small.fm Page 16 Tuesday, January 14, 2003 2:08 PM The shipping charge, for receiving replacement equipment and returning the defective equipment, is a one time fee based on EchoStar's competitive bulk shipping rates (additional charges may apply outside of the continental US). This fee will be charged to your billing account or your valid credit card.
Instructions_Small.fm Page 17 Tuesday, January 14, 2003 2:08 PM Accessory Warranty An accessory is any DISH Network branded equipment, displaying the DISH Network logo, excluding the receiver, Smart Card, cables and hookups, and nonmechanical components. A one-year warranty becomes effective upon the activation of the DISH system or date of purchase, if bought separately. A proof of purchase is required to verify the purchase date. If an accessory has an expired warranty, no exchange will be issued.
Instructions_Small.fm Page 18 Tuesday, January 14, 2003 2:08 PM We will: Check the switch, including whether it is covered under the warranty. Replace any switch that we find is defective with a new or refurbished switch, if the defective switch is covered under the warranty. We will ship the replacement switch at our expense. If a defective switch is not covered under the warranty, we will tell you. We may assess you a flat rate charge for a replacement switch, including shipping and insurance.
Inside_Back_Small.fm Page 19 Tuesday, January 7, 2003 4:10 PM Copyright © 2003, EchoStar Technologies Corporation, Englewood, Colorado 80112. All rights reserved. The information in this Guide may change without notice. Revisions may be issued to tell you about such changes. You should address comments or questions about this Guide to Technical Publications, EchoStar Technologies Corporation, 94 Inverness Terrace East, Englewood, Colorado 80112. Document Number: 120131 Printed in China.