
Operation Manual
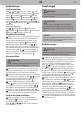


Using as a handheld
CAUTION!
Never use the squeegee on cold glass and win-
dows as it may cause damage.
1
Attach desired accessory as described, > “Attaching
accessories” on page 18.
2
Insert the plug into a mains
socket.
3
Turn steam control dial to ‘ON’ (Fig.
16
).
➔ The power-on indicator turns red. The steamer
starts heating up and will be ready after approx. 30 s.
4
Twist steam control dial to desired setting (Fig.
16
).
5
Push handheld steam trigger in short bursts to
produce steam (Fig.
18
).
6
Turn steam control dial to
‘OFF’. ➔ The steamer will cool down, the power-on
indicator will switch o.
7
Unplug the plug from the
mains socket.
8
When steamer is cooled down dis-
connect accessory.
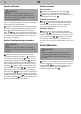
Attaching accessories
Attaching brushes
1
Push brush and jet nozzle together. Push hard un-
til you hear a click. (Fig.
10
).
2
Push jet nozzle into
the steamer until it clicks into place (Fig.
11
).
Attaching utility head
1
Stretch utility pad over utility head (Fig.
12
).
2
Push utility head into steamer. It will not lock into
place. Pull test to check it is secure.
Attaching squeegee
1
Stretch utility pad over utility head (Fig.
12
).
2
Align the tab on the squeegee with utility head
and pad, push together to lock into position (Fig.
13
).
3
Push utility head into steamer. It will not lock into
place. Pull test to check it is secure.
Storing the steamer
1
Stand steamer upright by pushing the main body
forward to lock into position (Fig.
4
).
2
Pull plug
from the mains socket and wind cord around the
quick cord release hooks (Fig.
22
).
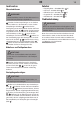
Maintaining the appliance
Emptying the water tank
WARNING!
Hot surface! Only empty the water tank when the
steamer is cooled down.
1
Switch o the steamer and pull the plug from the
mains socket. Let steamer cool down.
2
Push hand-
held release button and disconnect handle from the
main body (Fig.
5
).
!
3
Push accessory release button and disconnect
main body from oorhead (Fig.
6
).
4
Place main
body on at surface.
5
Twist water tank cap anti
clockwise and lift to remove (Fig.
7
).
6
Empty any
excess water over an empty sink (Fig.
9
).
7
Replace
water tank cap and twist clockwise to tighten.
Cleaning the microbre and utility pad
CAUTION!
Don’t use bleach or fabric softener when washing
the microbre and utility pad.
1
Wash microbre pad in the washing machine
(max. 40 °C) or handwash the utility pad (Fig.
19
).
2
Leave the cleaned pad to dry completely for at
least 24 h.
Clearing blockages
CAUTION!
Don’t use sharp objects to remove blockages.
1
Disconnect oorhead from the main body
(Fig.
6
).
2
Disconnect handle from the main body
(Fig.
5
).
3
Use a small thin object (e.g. a paperclip)
to insert into the nozzle and clear any blockage
(Fig.
20
).
4
Remove microbre pad from the oor-
head and insert a small, thin object (e.g. a paper-
clip) into the steam holes to remove any blockage
(Fig.
21
).
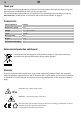
Accessories
• 1 carpetglider – 03250006 (Fig.
23
/A)
• 1 jet nozzle – 0325007 (Fig.
23
/B)
• 1 microbre pad – 0325001 (Fig.
23
/C)
• 1 crevice brush – 0325008 (Fig.
23
/D)
• 1 plastic brush – 0325009 (Fig.
23
/E)
Troubleshooting
WARNING!
Switch o the appliance before you start trouble-
shooting. Never use a faulty appliance.
Before you contact our Dirt Devil customer service
department or send the appliance to the Dirt Devil
customer service department, you will nd a lot of
additional information in the service area of our web-
site which will help you solve problems.
www.dirtdevil.de/service
!
EN
19