
Operation Manual


Preparatory work
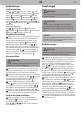
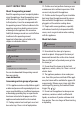
Getting to know the appliance
Fig.
1
:
1
handle;
2
handheld release button;
3
handheld steam trigger (hidden);
4
steam control
dial;
5
water tank cap;
6
oorhead;
7
carpetglider;
8
water tank;
9
power-on indicator;
10
main body;
11
handle of handheld steam cleaner;
12
measuring
jug (optional);
13
quick cord release hook;
14
cord;
15
oorhead release button;
16
quick cord release
hook
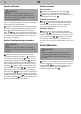
Accessories (optional):
Fig.
24
:
1
plastic brush;
2
wire brush;
3
crevice
brush;
4
utility head + pad;
5
squeegee;
6
jet
nozzle;
7
extension hose;
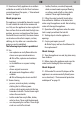
Unpacking and assembling
1
Unpack the contents and check they are com-
plete. If you notice any transport damage or if any-
thing is missing, contact your dealer immediately.
2
Connect main body and oorhead (Fig.
2
).
3
Connect main body and handle. Grip the body
while connecting or removing the handle (Fig.
3
).
4
Stand steamer upright by pushing the main body
forward to lock into position (Fig.
4
).
Filling the water tank
WARNING!
Hot surface! Only rell the water tank when the
steamer is cooled down.
1
When steamer needs to be relled during use,
switch steamer o and let it cool down.
2
Push
handheld release button and disconnect handle
from the main body (Fig.
5
)
3
Push handheld re-
lease button and disconnect main body from oor-
head (Fig.
6
).
4
Place main body on at surface.
5
Twist water
tank cap anti clockwise and lift to remove (Fig.
7
).
6
Use measuring jug to ll the tank with 330 ml
(2 x 165 ml) of water (Fig.
8
).
7
Replace water tank
cap and twist clockwise to tighten.
Connecting the appliance
1
Make sure the steamer is switched o.
2
Unwind
cord completely from the quick cord release hooks
(Fig.
1
/
13
and
16
).
3
Insert the plug into a mains
socket.
Cleaning
WARNING!
Take extra care when cleaning on stairs.
!
!
CAUTION!
Vacuum you carpets thoroughly and ensure hard
oor areas are free from grit and debris before
using the appliance.
NOTE:
The steamer will turn o if it overheats. Turn it o
and let it cool down for at least 2 to 4 hours.
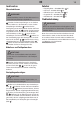
Cleaning hard oors
CAUTION!
Never use the steamer without a microbre pad
attached to the oorhead.
1
Place microbre pad on the oor with the white
side facing up. Place oorhead on the microbre pad
and make sure it covers the entire oorhead (Fig.
14
).
2
Insert plug into a mains socket.
3
Turn steam
control dial to ‘ON’ (Fig.
16
). ➔ The power-on indica-
tor turns red. The steamer starts heating up and will
be ready after approx. 30 s.
4
Twist steam control
dial to desired setting (Fig.
16
). ➔ Steam jet is activat-
ed automatically.
5
Place foot onto the oorhead
and pull handle backwards (Fig.
17
).
6
Move steam-
er slowly forwards and backwards across the oor.
7
Turn steam control dial to ‘OFF’. ➔ The steam-
er cools down, the power-on indicator goes out.
8
Unplug the plug from the mains socket.
9
When
steamer is cooled down hold corner of microbre
pad down with your foot and lift steamer to peel
away.
10
Air-dry or wash microbre pad.
Refreshing carpets
CAUTION!
Never use the appliance without a microbre pad
attached to the oorhead. Only use carpetglider
when refreshing carpets.
See >”Cleaning hard oors” on page 17. Use carpet-
glider additionally:
1
Push oorhead with microbre pad into the front
of the carpetglider, then place back of the oorhead
into the clip (Fig.
15
).
2
When steamer is cooled
down place your foot on the clip of the carpetglider
and lift the steamer to remove.
18
EN