M317.book Seite 1 Mittwoch, 30. März 2011 8:40 08 DE Bedienungsanleitung Handdampfreiniger GB Operating Manual Hand-held steam cleaner FR NL Bedieningshandleiding Handstoomreiniger ES Manual de instrucciones Limpiador manual a vapor IT TR Kullanim Klavuzu Manuel Buharlı Temizleyici Roya-15281 • A5 • 30.03.
Bedieningshandleiding................................................................. 64 - 83 Manual de instrucciones .............................................................. 84 - 103 GB 44 - 63 FR Mode d'emploi ............................................................................... NL 24 - 43 ES Operating Manual ......................................................................... Istruzioni per l'uso ........................................................................
D M317.book Seite 3 Mittwoch, 30.
M317.book Seite 4 Mittwoch, 30. März 2011 8:40 08 1 Übersicht Vielen Dank! 1 Übersicht Sie haben mit dem „AquaClean“ einen vielseitig einsetzbaren Handdampfreiniger erworben, der Ihnen künftig dabei helfen wird, eine Vielzahl von Reinigungsarbeiten im Haushalt schnell und wirkungsvoll auszuführen. Je nach Anwendungsgebiet können Sie dem Heißdampf wahlweise auch Desinfektionsmittel beigeben, falls dieses im Lieferumfang enthalten war oder Sie dieses durch Nachbestellung erworben haben.
M317.book Seite 5 Mittwoch, 30. März 2011 8:40 08 1 Übersicht DE Inhaltsverzeichnis Übersichtszeichnung ................................................................. 3 1 Übersicht ............................................................................. 4 Lieferumfang .............................................................................................................. 4 Technische Daten .....................................................................................................
M317.book Seite 6 Mittwoch, 30. März 2011 8:40 08 2 Sicherheitshinweise 2.1 2 zur Bedienungsanleitung Sicherheitshinweise WARNUNG: Warnt vor Gefahren für Ihre Gesundheit und zeigt mögliche Verletzungsrisiken auf. ACHTUNG: Weist auf mögliche Gefährdungen für das Gerät oder andere Gegenstände hin. HINWEIS: Hebt Tipps und Informationen hervor. 2.2 Für Schäden, die aufgrund der Nichtbeachtung dieser Anleitung entstehen, übernehmen wir keine Haftung.
M317.book Seite 7 Mittwoch, 30. März 2011 8:40 08 2.3 zu bestimmten Personengruppen Kinder sollten beaufsichtigt werden, um sicherzustellen, dass sie nicht mit dem Gerät spielen.
M317.book Seite 8 Mittwoch, 30. März 2011 8:40 08 2 Sicherheitshinweise 2.5 zur Stromversorgung Das Gerät wird mit elektrischem Strom aufgeladen und betrieben, dabei besteht grundsätzlich die Gefahr eines elektrischen Schlags. Achten Sie daher auf Folgendes: Transportieren Sie das Gerät niemals am Stromkabel. Achten Sie darauf, dass das Stromkabel nicht geknickt, eingeklemmt, überfahren wird oder mit Hitzequellen in Berührung kommt. Es darf außerdem nicht zur Stolperfalle werden.
M317.book Seite 9 Mittwoch, 30. März 2011 8:40 08 2.6 zur bestimmungsgemäßen Verwendung Das Gerät darf nur im Haushalt eingesetzt werden. Es ist für eine gewerbliche Nutzung nicht geeignet. Setzen Sie den Dampfreiniger ausschließlich im Haushalt zum Reinigen von normal verschmutzten Flächen ein, die der hohen Temperatur, dem Druck und der Feuchtigkeit des Heißdampfes standhalten. Beachten Sie dabei die Reinigungshinweise der Hersteller.
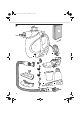
M317.book Seite 10 Mittwoch, 30. März 2011 8:40 08 3 Gerät vorbereiten 3.1 3 Auspacken Gerät vorbereiten 1. Packen Sie das Gerät samt Zubehör aus. 2. Überprüfen Sie den Inhalt auf Unversehrtheit und Vollständigkeit (Abb. 1). HINWEIS: Sollten Sie einen Transportschaden bemerken, wenden Sie sich umgehend an Ihren Händler. 3.2 ACHTUNG: Versenden Sie das Gerät stets in der Originalverpackung, damit es keinen Schaden nimmt. Heben Sie dazu die Verpackung auf.
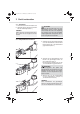
M317.book Seite 11 Mittwoch, 30. März 2011 8:40 08 3.3 Punktstrahldüse montieren Die Punktstrahldüse können Sie zum kraftvollen und gezielten Dampfreinigen von Fugen, Jalousien, WCs, Armaturen usw. nutzen. HINWEIS: Für eine größere Reichweite empfiehlt es sich, die Punktstrahldüse auf den Zubehörstutzen des Dampfschlauchs aufzusetzen (Abb. 5 und Abb. 6). Falls Sie den Handdampfreiniger lieber einhändig bedienen wollen, empfiehlt es sich, die Punktstrahldüse direkt auf den Gerätestutzen aufzusetzen (Abb.
M317.book Seite 12 Mittwoch, 30. März 2011 8:40 08 3 Gerät vorbereiten 3.4 Spezialdüsen montieren HINWEIS: Alle Spezialdüsen können ausschließlich auf die zuvor montierte Punktstrahldüse aufgesetzt werden. Alle Spezialdüsen werden auf die gleiche Art und Weise angebracht. A B Die Kunststoffbürste (Abb. 9/B) dient zum Beseitigen starker Verschmutzungen auf kratzunempfindlichen Flächen. A Der Spachtelaufsatz (Abb.
M317.book Seite 13 Mittwoch, 30. März 2011 8:40 08 3 Gerät vorbereiten Wassertank füllen WARNUNG: Gefahr eines elektrischen Schlags! Befüllen Sie niemals ein am Stromnetz befindliches Gerät mit Wasser. Tauchen Sie das Gerät zum Befüllen niemals in Wasser. Befüllen Sie den Wassertank stets vorsichtig und mithilfe eines Nachfüllbehälters. 1. Falls das Gerät vorher in Betrieb war: WARNUNG: Verbrühungsgefahr! Der Wassertank steht unter Druck, sobald das Gerät in Betrieb ist.
M317.book Seite 14 Mittwoch, 30. März 2011 8:40 08 3 Gerät vorbereiten 4. Entleeren Sie den Nachfüllbehälter in den Wassertank (Abb. 14). HINWEIS: Nur Wasser Der Wassertank fasst ca. 300 ml Wasser. Überfüllen Sie den Tank nicht. Beachten Sie im Tank befindliche Restmengen an Wasser. Sollte noch Wasser im Tank gewesen sein, ist der Tank nun mit Sicherheit ausreichend voll. Füllen Sie das Wasser stets langsam und vorsichtig ein. 14 5.
M317.book Seite 15 Mittwoch, 30. März 2011 8:40 08 3 Gerät vorbereiten Desinfektionsmitteltank füllen WARNUNG: Gefahr für die Gesundheit! Stellen Sie generell, insbesondere unmittelbar nach dem Befüllen des Desinfektionsmitteltanks und noch vor dem Dampfreinigen, sicher, dass Sie das Desinfektionsmittel für Kinder unzugänglich verstauen. Beachten Sie auch die Hinweise auf der Flasche des Desinfektionsmittels. DE 3.
M317.book Seite 16 Mittwoch, 30. März 2011 8:40 08 3 Gerät vorbereiten 3.7 bevor Sie das Gerät anschließen WARNUNG: Verletzungsgefahr! Prüfen Sie Gerät und Stromkabel vor jeder Benutzung. Ein beschädigtes Gerät darf nicht verwendet werden. ACHTUNG: Prüfen Sie vor Beginn der Reinigung, ob der jeweilige Untergrund für die Dampfreinigung geeignet ist. Beachten Sie immer die Reinigungshinweise der Hersteller.
M317.book Seite 17 Mittwoch, 30. März 2011 8:40 08 4 Gebrauch Dampfreinigen Gebrauch Verbrühungsgefahr bei laufendem Gerät! 1. Prüfen Sie, ob der Wassertank gefüllt ist. Falls nicht, füllen Sie ihn (ZKapitel 3.5, „Wassertank füllen“). Richten Sie den Dampfstrahl niemals auf Personen, Tiere oder Pflanzen. 2. Stecken Sie den Stecker in eine Schutzkontakt-Steckdose (Abb. 19/A). WARNUNG: Richten Sie den Dampfstrahl stets nur auf den zu reinigenden Untergrund.
M317.book Seite 18 Mittwoch, 30. März 2011 8:40 08 4 Gebrauch HINWEIS: WARNUNG: Verbrühungsgefahr bei Arbeitspausen! Bei Arbeitspausen, beispielsweise zum Wechseln der Aufsätze, ziehen Sie den Stecker aus der Steckdose. Sie können Dampfkraft und Reinigungswirkung auch über den Abstand zur zu reinigenden Fläche regulieren. Warten Sie dennoch mindestens 10 Minuten, bevor Sie die montierten Aufsätze abnehmen. 4.2 Dampfreinigen unter Einsatz von Desinfektionsmittel max 1.
M317.book Seite 19 Mittwoch, 30. März 2011 8:40 08 4 Gebrauch Dampfreinigen von Glasflächen DE 4.3 ACHTUNG: ! 30 cm Kalte Glasflächen können durch Wärmeschock zerspringen. Wärmen Sie Glasflächen stets vor. Arbeiten Sie an kalten Tagen nicht an Fenstern und Scheiben! 1. Wärmen Sie die zu reinigende Glasfläche vor, indem Sie aus einer Entfernung von ca. 30 cm weitgestreuten Dampf aufbringen (Abb. 23). 23 2. Verringern Sie nach einer Weile den Abstand auf ca.
M317.book Seite 20 Mittwoch, 30. März 2011 8:40 08 4 Gebrauch 4.5 Unmittelbar nach dem Dampfreinigen A B 1. Ziehen Sie noch vor Beendigung des Reinigungsvorgangs den Stecker aus der Steckdose (Abb. 27/A). 2. Bauen Sie die restlichen Dampfreserven durch Gedrückthalten der Dampftaste (Abb. 27/B) gezielt ab, bis kein Dampf mehr austritt (Abb. 27/C,D). D C 3. Lassen Sie das Gerät abkühlen (Abb. 27/ F), bis der rote Stift im Wassertankverschluss nach unten wandert (Abb. 27/ E,G).
M317.book Seite 21 Mittwoch, 30. März 2011 8:40 08 5 Problembehebung Bevor Sie das Gerät einsenden 5 Problembehebung DE 5.1 Überprüfen Sie anhand der Tabelle, ob Sie das Problem selbst beseitigen können. Problem mögliche Ursache / Lösung Die Dampfbereitschaftsanzeige (Abb. 1/8) leuchtet, doch selbst nach > 3 Minuten tritt bei Betätigen der Dampftaste (Abb. 1/2) kein Dampf aus. Der Überhitzungsschutz hat aufgrund eines leeren Wassertanks ausgelöst. Füllen Sie den Wassertank (ZKapitel 3.
M317.book Seite 22 Mittwoch, 30. März 2011 8:40 08 5 Problembehebung 5.2 Zubehör- und Ersatzteile Zubehörteile sowie Ersatzteile können nachbestellt werden. Artikelnr. Beschreibung 0317001 6-teiliges Bürstenset bestehend aus: 1 Kunststoffbürste, 1 Drahtbürste, 1 Fugenbürste, 1 Jetdüse, 1 Spachtelaufsatz, 1 Reinigungsnadel 0319002 3er-Set Desinfektionsmittel ACHTUNG: Verwenden Sie nur Originalersatzteile aus dem Lieferumfang oder solche, die Sie durch Nachbestellung erworben haben.
M317.book Seite 23 Mittwoch, 30. März 2011 8:40 08 6 Garantie Garantiebedingungen Garantie Wir übernehmen für das von uns vertriebene Gerät eine Garantie von 24 Monaten ab Kaufdatum. Innerhalb dieser Garantiezeit beseitigen wir nach unserer Wahl durch Reparatur oder Austausch des Gerätes oder des Zubehörs (Schäden an Zubehörteilen führen nicht automatisch zum Umtausch des kompletten Gerätes) unentgeltlich alle Mängel, die auf Material- oder Herstellungsfehlern beruhen.
M317.book Seite 24 Mittwoch, 30. März 2011 8:40 08 1 Overview Thank you! 1 Overview Your new ‘Aquaclean’ is a versatile hand-held steam cleaner that will help do a great many household jobs quickly and effectively. You can also optionally add disinfectant to the hot steam if this is included in the scope of delivery or if you have acquired it separately.
M317.book Seite 25 Mittwoch, 30. März 2011 8:40 08 1 Overview Table of Contents Overview drawing ....................................................................... 3 1 Overview ............................................................................ 24 GB Scope of delivery ...................................................................................................... 24 Technical data ........................................................................................................
M317.book Seite 26 Mittwoch, 30. März 2011 8:40 08 2 Safety instructions 2.1 2 About the operating manual Safety instructions WARNING: Warning concerning health hazards describing possible risks of injury. ATTENTION: Warning concerning possible dangers to the appliance or other objects. NOTE: Highlights tips and information. 2.2 Non-compliance with these instructions can lead to serious injuries or damage to the appliance.
M317.book Seite 27 Mittwoch, 30. März 2011 8:40 08 2 Safety instructions About certain groups of persons Children should be supervised in order to make sure that they do not play with the appliance. This appliance is not intended to be used by persons (including children) with impaired physical, sensory or mental abilities or insufficient experience or knowledge, unless they are supervised by a person responsible for their safety or have been instructed in the proper use of the appliance by this person.
M317.book Seite 28 Mittwoch, 30. März 2011 8:40 08 2 Safety instructions 2.5 About the power supply The appliance is charged and operated with electrical power which means there is always a risk of electric shock. So please observe the following: Keep the jet of steam away from the power cord of the appliance when in operation. Never touch the plug with wet hands. Power cords must not come into contact with any sources of heat or damp.
M317.book Seite 29 Mittwoch, 30. März 2011 8:40 08 2 Safety instructions About appropriate use The appliance may only be operated in households. It is not suitable for industrial or commercial use. Only use the steam cleaner in the home to clean regular dirt from surfaces that can withstand the high temperature, pressure, and moisture of hot steam. And follow the cleaning instructions of the material manufacturers.
M317.book Seite 30 Mittwoch, 30. März 2011 8:40 08 3 Preparing the appliance 3.1 3 Unpacking Preparing the appliance 1. Unpack the appliance and all its accessories. 2. Check the contents for completeness and possible damage (Fig. 1). NOTE: Immediately contact your dealer if you have found damage resulting from transport. 3.2 ATTENTION: Always transport or ship the appliance in its original packaging to avoid damage. Keep the packaging for such an event.
M317.book Seite 31 Mittwoch, 30. März 2011 8:40 08 3 Preparing the appliance 3.3 Attaching the pinpoint nozzle You can use the pinpoint nozzle to powerfully and accurately steam clean crevices, Venetian blinds, toilet bowls, bathroom fixtures, etc. For greater range we recommend fitting the pinpoint nozzle on the connection piece of the steam hose (Fig. 5 and Fig. 6).
M317.book Seite 32 Mittwoch, 30. März 2011 8:40 08 3 Preparing the appliance 3.4 Attaching the special nozzles NOTE: All special nozzles can only be fitted onto the previously mounted pinpoint nozzle. All special nozzles are attached in the same way. 2. If the cleaning effect of the jet of steam alone is not sufficient for your cleaning task, select a special nozzle. A The wire brush (Fig. 9/A) serves to remove stubborn dirt from very hard-wearing surfaces. B The plastic brush (Fig.
M317.book Seite 33 Mittwoch, 30. März 2011 8:40 08 3 Preparing the appliance Filling the water tank WARNING: Danger of electric shock! Never fill an appliance with water when it is connected to the mains. Never submerge the appliance in water to fill it. Always fill the water tank carefully using a refilling container. WARNING: Danger of injury! Do not add disinfectant or any other additives such as cleaning agents, alcohol, perfumes or chemicals into the water tank.
M317.book Seite 34 Mittwoch, 30. März 2011 8:40 08 3 Preparing the appliance 4. Empty the refilling container into the water tank (Fig. 14). NOTE: Water only The water tank holds about 300 ml of water. Do not overfill the tank. Be aware of any residual water in the tank. If there was already water in the tank, the tank is certainly full enough now. Pour the water in slowly and carefully. 14 5. Refit the water tank filler cap and fasten it by firmly turning it clockwise (Fig. 15). 6.
M317.book Seite 35 Mittwoch, 30. März 2011 8:40 08 3 Preparing the appliance Filling the disinfectant tank WARNING: Health hazard! Always make sure that the disinfectant is inaccessible to children, particularly just after filling the disinfectant tank and before steam cleaning. Also observe the instructions on the disinfectant bottle. WARNING: Health hazard! Only use the disinfectant supplied or ordered from us. The device has been designed for and tested with this disinfectant.
M317.book Seite 36 Mittwoch, 30. März 2011 8:40 08 3 Preparing the appliance 3.7 Before connecting the appliance WARNING: Danger of injury! Check appliance and power cord before each use. A damaged appliance must never be used. ATTENTION: Before starting cleaning, check whether the surface to be cleaned is suitable for steam cleaning. Always follow the cleaning recommendations of the material manufacturers.
M317.book Seite 37 Mittwoch, 30. März 2011 8:40 08 4 Use Steam cleaning Use 1. Check that the water tank is full. If not, fill it (ZChapter 3.5, "Filling the water tank"). WARNING: Danger of scalding when using the appliance! Never direct the steam jet at persons, animals or plants. Always point the steam jet downwards towards the surface to be cleaned. Even then, take care that parts of your body never get into the steam jet.
M317.book Seite 38 Mittwoch, 30. März 2011 8:40 08 4 Use NOTE: WARNING: Danger of scalding when interrupting work! Pull the plug from the socket if you interrupt work, e.g. to change attachments. You can also regulate steam power and cleaning effect by adjusting the distance to the surface to be cleaned. Wait at least ten minutes before removing the fitted attachments. 4.2 Steam cleaning using disinfectant max 1. Check that the disinfectant tank is full. If not, fill it (ZChapter 3.
M317.book Seite 39 Mittwoch, 30. März 2011 8:40 08 4 Use 4.3 Steam-cleaning glass surfaces ATTENTION: 30 cm Cold glass surfaces can shatter as a result of heat shock. Always warm glass surfaces before using steam on them. Do not work on window panes on cold days! 1. Warm the glass surface to be cleaned by applying steam from a distance of about 30 cm (Fig. 23). 2. After a time reduce the distance to about 20 cm to cover the glass surface evenly with steam. 23 3.
M317.book Seite 40 Mittwoch, 30. März 2011 8:40 08 4 Use 4.5 Immediately after steam cleaning A B 1. Before finishing cleaning work, pull the plug out of the socket (Fig. 27/A). 2. Release the remaining steam reserves by holding down the steam button (Fig. 27/B) until steam stops coming out (Fig. 27/ C,D). D C 3. Allow the appliance to cool off (Fig. 27/F) until the red pin in the water tank cap goes down (Fig. 27/E,G). This can take up to thirty minutes.
M317.book Seite 41 Mittwoch, 30. März 2011 8:40 08 5 Troubleshooting 5.1 Before you send in the appliance 5 Troubleshooting Problem Possible cause / solution The steam ready light (Fig. 1/8) is on, but even after > 3 minutes no steam is produced when the steam button (Fig. 1/ 2) is pushed. The overheating protection device has tripped due to an empty water tank. Fill the water tank (ZChapter 3.5, "Filling the water tank"). Water tank and/or heating elements are calcified.
M317.book Seite 42 Mittwoch, 30. März 2011 8:40 08 5 Troubleshooting 5.2 Accessories and spare parts You can order accessories and spare parts. 5.3 Item no.
M317.book Seite 43 Mittwoch, 30. März 2011 8:40 08 6 Warranty Warranty conditions Warranty We offer a warranty of 24 months from the date of purchase for the appliances we sell. Within this warranty period, we will correct all defects free of charge that are due to material or manufacturing faults, either by repair work or replacing the appliance or accessories, at our discretion (damage to accessory parts does not automatically lead to the entire appliance being replaced).
M317.book Seite 44 Mittwoch, 30. März 2011 8:40 08 1 Vue d’ensemble Merci beaucoup ! 1 Vue d’ensemble "Aquaclean" est un appareil de nettoyage manuel à vapeur polyvalent qui vous permettra d'effectuer rapidement et efficacement de nombreuses tâches de nettoyage domestique. Vous pouvez également vous servir de la vapeur chaude avec le produit de désinfection au cas où ce dernier a été fourni à la livraison ou a été commandé ultérieurement.
M317.book Seite 45 Mittwoch, 30. März 2011 8:40 08 1 Vue d’ensemble Sommaire Vue d'ensemble du produit........................................................ 3 1 Vue d’ensemble ................................................................. 44 Matériel fourni à la livraison ...................................................................................... 44 Caractéristiques techniques ..................................................................................... 44 Désignations ............
M317.book Seite 46 Mittwoch, 30. März 2011 8:40 08 2 Consignes de sécurité 2.1 2 concernant ce mode d'emploi Consignes de sécurité AVERTISSEMENT: Nous attirons votre attention sur les dangers pouvant mettre en péril votre santé et vous informons sur les éventuels risques de blessures. ATTENTION: Nous vous rendons attentifs aux risques éventuels pour l'appareil ou pour tout autre objet. Le non respect de ce mode d'emploi peut entraîner des blessures graves ou des dommages irréparables à l'appareil.
M317.book Seite 47 Mittwoch, 30. März 2011 8:40 08 2 Consignes de sécurité concernant certains groupes de personnes Les enfants doivent être surveillés afin de s'assurer qu'ils ne jouent pas avec l'appareil. Cet appareil ne convient pas aux personnes (y compris les enfants) qui ne sont pas en mesure de se servir de manière sûre de l'appareil, en raison de leurs capacités physiques ou sensorielles, de leurs capacités mentales, de leur inexpérience ou d'un manque de connaissances.
M317.book Seite 48 Mittwoch, 30. März 2011 8:40 08 2 Consignes de sécurité 2.5 concernant l'alimentation électrique L'appareil est chargé et entraîné par du courant électrique, entraînant ainsi par principe des risques d'électrocution. Respectez par conséquent les points ci-dessous : Ne saisissez jamais l'appareil par le cordon d'alimentation. Assurez-vous que le cordon d'alimentation n'est pas plié, coincé, écrasé ou encore en contact direct avec une source de chaleur.
M317.book Seite 49 Mittwoch, 30. März 2011 8:40 08 2 Consignes de sécurité concernant les conditions d'utilisation à respecter Cet appareil convient exclusivement à un usage domestique. Toute utilisation à titre professionnel est strictement interdite. N'employez l'appareil de nettoyage à vapeur seulement dans le cadre domestique et pour le nettoyage de surfaces lisses normalement sales qui résistent à des températures élevées, à la pression et à l'humidité générées par la vapeur chaude.
M317.book Seite 50 Mittwoch, 30. März 2011 8:40 08 3 Préparation de l'appareil 3.1 3 Déballage Préparation de l'appareil 1. Déballez l'appareil et les accessoires. 2. Vérifiez si le contenu est bien complet et ne présente aucuns dommages (Ill. 1). REMARQUE: Si vous constatez des défauts ou des dommages dus au transport, contactez immédiatement votre revendeur. 3.2 ATTENTION: Expédiez l'appareil uniquement dans son emballage d'origine afin d'éviter tout dommage.
M317.book Seite 51 Mittwoch, 30. März 2011 8:40 08 3 Préparation de l'appareil 3.3 Montage de la buse à jet ponctuel La buse à jet ponctuel sert à un nettoyage à la vapeur énergique et ciblé d'emplacements difficilement accessibles tels que les joints, les stores à lamelles, les WC, la robinetterie, etc. Pour disposer d'un plus grand rayon d'action, il est recommandé de placer la buse à jet ponctuel sur le manchon pour accessoires du tuyau flexible de vapeur (Ill. 5 et Ill. 6).
M317.book Seite 52 Mittwoch, 30. März 2011 8:40 08 3 Préparation de l'appareil 3.4 Montage de la buse spéciale REMARQUE: Toutes les buses spéciales être uniquement placées sur la buse à jet ponctuel préalablement montée. Toutes les buses spéciales se mettent en place de la même façon. 2. Au cas où l'efficacité de nettoyage du seul jet de vapeur n'est pas adaptée à la tâche de nettoyage à effectuer, utilisez une buse spéciale : La brosse métallique (Ill.
M317.book Seite 53 Mittwoch, 30. März 2011 8:40 08 3 Préparation de l'appareil Remplissage du réservoir d'eau AVERTISSEMENT: Risque d'électrocution ! Ne remplissez jamais un appareil qui est encore branché au secteur. Ne plongez jamais l'appareil dans de l'eau afin de le remplir. Remplissez toujours prudemment le réservoir d'eau et exclusivement au moyen d'un récipient de remplissage. 1.
M317.book Seite 54 Mittwoch, 30. März 2011 8:40 08 3 Préparation de l'appareil 4. Versez le contenu du récipient de remplissage dans le réservoir d'eau (Ill. 14). Seulement pour le produit de désinfection REMARQUE: Le réservoir d'eau contient environ 300 ml d'eau. Ne remplissez pas trop le réservoir. Tenez compte de l'eau se trouvant encore dans le réservoir. S'il y a encore de l'eau dans le réservoir, le réservoir doit être alors certainement suffisamment plein. Versez l'eau lentement et avec prudence.
M317.book Seite 55 Mittwoch, 30. März 2011 8:40 08 3 Préparation de l'appareil 3.6 Remplissage du réservoir pour produit de désinfection AVERTISSEMENT: Danger pour la santé ! Assurez-vous que le produit de désinfection soit hors de portée des enfants, en particulier immédiatement avoir rempli le réservoir pour produit de désinfection et également avant le nettoyage à la vapeur. Respectez aussi les consignes placées sur la bouteille du produit de désinfection.
M317.book Seite 56 Mittwoch, 30. März 2011 8:40 08 3 Préparation de l'appareil 3.7 avant de raccorder l'appareil AVERTISSEMENT: Risque de blessures ! Vérifiez l'appareil et le cordon d'alimentation avant chaque utilisation. N'utilisez jamais un appareil qui est endommagé. ATTENTION: Vérifiez avant le début du nettoyage si le type de matériau à nettoyer supporte un nettoyage à la vapeur. Observez toujours les indications de nettoyage des fabricants de matériaux.
M317.book Seite 57 Mittwoch, 30. März 2011 8:40 08 4 Utilisation de l'appareil Nettoyage à la vapeur Utilisation de l'appareil AVERTISSEMENT: Danger d'échaudures en cours d'utilisation de l'appareil ! Ne dirigez jamais le jet de vapeur vers des personnes, des animaux ou des plantes. Dirigez toujours le jet de vapeur vers la surface à nettoyer. Soyez vous-mêmes attentif à ce qu'aucune partie du corps ne se trouve sous le jet de vapeur.
M317.book Seite 58 Mittwoch, 30. März 2011 8:40 08 4 Utilisation de l'appareil AVERTISSEMENT: Danger d'échaudures en cours d'utilisation de l'appareil ! Lors des interruptions d'utilisation, par exemple lors du changement des embouts, retirez la fiche de la prise. REMARQUE: Vous pouvez aussi adapter l'intensité de la vapeur et l'effet de nettoyage en fonction de la distance entre l'appareil et la surface à nettoyer.
M317.book Seite 59 Mittwoch, 30. März 2011 8:40 08 4 Utilisation de l'appareil 4.3 Nettoyage à la vapeur de surfaces de verre ATTENTION: ! 1. Réchauffez les surfaces en verre devant être nettoyées en leur projetant de la vapeur depuis une distance d'environ 30 cm (Ill. 23). 2. Après un certain temps, réduisez la distance à env. 20 cm et nettoyez uniformément la surface de verre à la vapeur. 3. Arrêtez l'éjection de vapeur en relâchant la touche de vapeur. 4.
M317.book Seite 60 Mittwoch, 30. März 2011 8:40 08 4 Utilisation de l'appareil 4.5 Immédiatement après le nettoyage à la vapeur A B D C 1. Débranchez d'abord la fiche de la prise de courant avant même de finir d'utiliser l'appareil (Ill. 27/A). 2. Laissez s'échapper la pression résiduelle en maintenant appuyée la touche de vapeur (Ill. 27/B) jusqu'à ce que plus aucune vapeur ne s'échappe (Ill. 27/C,D). 3. Laissez se refroidir l'appareil (Ill.
M317.book Seite 61 Mittwoch, 30. März 2011 8:40 08 5 Élimination des anomalies 5.1 Avant de procéder à l'envoi de l'appareil 5 Élimination des anomalies Problème Cause possible / solutions Le voyant de disponibilité de vapeur s'allume (Ill. 1/8) et même après avoir appuyé la touche de vapeur durant > 3 minutes (Ill. 1/ 2), aucune vapeur n'est éjectée. La protection en cas de surchauffe s'est déclenchée car le réservoir d'eau est vide. Remplissez le réservoir d'eau (ZChapitre 3.
M317.book Seite 62 Mittwoch, 30. März 2011 8:40 08 5 Élimination des anomalies 5.2 Pièces de rechange et accessoires Vous pouvez commander ultérieurement les pièces de rechange et les accessoires. Numéro d'article Description 0317001 Jeu de brosses se composant de 6 objets : 1 brosse en matière synthétique, 1 brosse métallique, 1 brosse pour emplacements difficilement accessibles, 1 buse pour jet, 1 embout en forme de spatule, 1 aiguille de nettoyage 5.
M317.book Seite 63 Mittwoch, 30. März 2011 8:40 08 6 Garantie Conditions de garantie Garantie Nous assurons une garantie de 24 mois sur votre appareil à compter de la date d'achat. Pendant la garantie, nous nous réservons le droit de réparer ou de remplacer l'appareil ou ses accessoires gratuitement (des accessoires endommagés n'impliquent pas forcément le remplacement de l'appareil) afin de remédier à tout défaut lié au matériel ou à la fabrication.
M317.book Seite 144 Mittwoch, 30. März 2011 8:40 08 International Service D International Service DE Royal Appliance International GmbH Abt. Kundenservice Jagenbergstraße 19 41468 Neuss DEUTSCHLAND Tel.: +49 (0) 180 - 501 50 50* Fax: +49 (0) 2131 - 60 90 60 95 www.dirtdevil.de info@dirtdevil.de *0,14 €/Minute aus dem deutschen Festnetz (deutscher Mobilfunkhöchstpreis 0,42 €/Minute) CH Bluepoint-Service SAGL Via Cantonale 14 6917 Barbengo SWITZERLAND Tel.
M317.book Seite 145 Mittwoch, 30.
M317.book Seite 146 Mittwoch, 30. März 2011 8:40 08 Royal Appliance International GmbH Jagenbergstraße 19 41468 Neuss Germany +49 (0) 2131 - 60 90 0 +49 (0) 2131 - 60 90 60 95 info@dirtdevil.de www.dirtdevil.