
Operation Manual

26
4 Cleaning windows
4 Cleaning windows
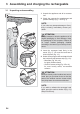
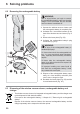
4.1 Topping up the fresh water
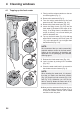
1. Firmly push the release catches on the wa-
ter tanks together (Fig. 3).
2. Remove the water tank (Fig. 3).
3. Turn the locking mechanism for the fresh
water hose 90° anti-clockwise (Fig. 3/1).
4. Remove the fresh water hose (Fig. 3/2).
5. Insert the filling funnel (Fig. 3/3) into the
fresh water (if included in the scope of de-
livery). If no filling funnel is included in the
scope of delivery, use a funnel which you
have for domestic use.
6. Top up the fresh water (Fig. 3/3) with tap
water which is warm to the touch (max. 35
°C!). In the process fill it up no higher than
the MAX mark (Fig. 1/13).
7. Reinsert the fresh water hose (Fig. 3/4).
8. Lock it in place by turning it 90° clockwise
(Fig. 3/5).
9. Place the water tank back in its console in
the window vacuum cleaner (Fig. 3).
10. Now push the water tank firmly into its con-
sole in the window vacuum cleaner (Fig. 3)
so that the release catches can be heard
and felt to click into place.
1
2
3
45
3
NOTE:
We recommend that you add commercially
available window cleaner to the fresh water.
Adhere to the instructions for batching and
application on the packaging of the window
cleaning agent.
NOTE:
When inserting the water tank, it is impera-
tive that you make sure that both nozzles
(Fig. 3/5) reach into both mounts (Fig. 1/14
and Fig. 1/15). Otherwise you will not be
able to securely fasten the water tank in its
console in the window vacuum cleaner.