
Manual
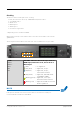


Table Of Contents
- About This Manual
- CHAPTER 1: Overview
- CHAPTER 2: Legal issues & facts
- CHAPTER 3: Installation
- CHAPTER 4: Operation
- CHAPTER 5: Managing Device
- CHAPTER 6: RAV.IO
- Introduction
- Connecting Audio Network
- Status - Overview
- Status - Sync
- Status - Network
- Status - Device
- Status - Input Streams
- Status - Output Streams
- Advanced - Overview
- Advanced - PTP Settings
- Advanced - PTP Unicast
- Advanced - PTP Profile Customized Settings
- Advanced - Current PTP Master
- Advanced - PTP Statistic
- Advanced - PTP Clock Setting
- Advanced - Network Advanced Settings
- Advanced - PTP Jitter
- NMOS - Overview
- NMOS - NIC1 & NIC2
- NMOS - Additional Settings
- Logging
- Statistic
- Switch
- RAV.IO - Firmware Update
- CHAPTER 7: DANTE.IO
- CHAPTER 8: Troubleshooting and Maintenance
- CHAPTER 9: Technical Data
- Index
- Appendix A - DSUB-25 Pin assignment
- Appendix B - DSUB-9 Pin assignment
- Appendix C - Dimensions
- Appendix D - System Update & License Installation

page 56 of 140 Prodigy.MC Manual - Version 2.4
CHAPTER 5: Managing Device
Local operation
The device is equipped with a touch-display, an encoder and two push buttons for
local control. For remote operation a network socket is provided at the rear panel
to operate the device via a browser based GUI or via globcon control.
HOME
Push-button to access the HOME screen.
Press shortly to call the top menu.
BACK
Push-button to return to previous page.
Press shortly to return to the previous page.
Display
Touch-Display to navigate the menu, adjust
settings and for monitoring.
tap, swipe - have fun!
CONTROL
Encoder to adjust values and confirmation
and for volume control of the phones
outputs.
Rotate to modify values. Push to confirm a setting or
to zero a value.
Phones volume control - active in HOME view:
push to enter volume control or to toggle the
selection between PHONES 1 and PHONES 2.
Rotate to modify values. Automatic timeout of the
control display is about 5 seconds.
NOTE
For remote operation via browser, enter the IP-Address in the navigation bar of your
browser. Local and remote display are identical.
For remote operation via globcon control, you need to install globcon on your
computer first - see page 16. Then follow the steps described in “CHAPTER 3:
Installation”on page 24.