
Manual
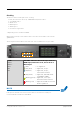


Table Of Contents
- About This Manual
- CHAPTER 1: Overview
- CHAPTER 2: Legal issues & facts
- CHAPTER 3: Installation
- CHAPTER 4: Operation
- CHAPTER 5: Managing Device
- CHAPTER 6: RAV.IO
- Introduction
- Connecting Audio Network
- Status - Overview
- Status - Sync
- Status - Network
- Status - Device
- Status - Input Streams
- Status - Output Streams
- Advanced - Overview
- Advanced - PTP Settings
- Advanced - PTP Unicast
- Advanced - PTP Profile Customized Settings
- Advanced - Current PTP Master
- Advanced - PTP Statistic
- Advanced - PTP Clock Setting
- Advanced - Network Advanced Settings
- Advanced - PTP Jitter
- NMOS - Overview
- NMOS - NIC1 & NIC2
- NMOS - Additional Settings
- Logging
- Statistic
- Switch
- RAV.IO - Firmware Update
- CHAPTER 7: DANTE.IO
- CHAPTER 8: Troubleshooting and Maintenance
- CHAPTER 9: Technical Data
- Index
- Appendix A - DSUB-25 Pin assignment
- Appendix B - DSUB-9 Pin assignment
- Appendix C - Dimensions
- Appendix D - System Update & License Installation

page 55 of 140Prodigy.MC Manual - Version 2.4
CHAPTER 5: Managing Device
Getting started
1. Check the hardware - the housing must be closed completely.
Empty slots require covering with a blank plate.
2. Check network connection with the MGMT port on the rear panel.
3. Check the power cabling and switch on the device.
4. After a few seconds the boot process of the device is complete. Check the
display on the front panel for the IP address.
NOTE
The device will look for a DHCP server in the network to obtain it’s IP address.
However the IP address can be changed manually via the touch display - see
“NETWORK SETTINGS” on page 66.