
Manual
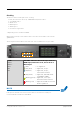


Table Of Contents
- About This Manual
- CHAPTER 1: Overview
- CHAPTER 2: Legal issues & facts
- CHAPTER 3: Installation
- CHAPTER 4: Operation
- CHAPTER 5: Managing Device
- CHAPTER 6: RAV.IO
- Introduction
- Connecting Audio Network
- Status - Overview
- Status - Sync
- Status - Network
- Status - Device
- Status - Input Streams
- Status - Output Streams
- Advanced - Overview
- Advanced - PTP Settings
- Advanced - PTP Unicast
- Advanced - PTP Profile Customized Settings
- Advanced - Current PTP Master
- Advanced - PTP Statistic
- Advanced - PTP Clock Setting
- Advanced - Network Advanced Settings
- Advanced - PTP Jitter
- NMOS - Overview
- NMOS - NIC1 & NIC2
- NMOS - Additional Settings
- Logging
- Statistic
- Switch
- RAV.IO - Firmware Update
- CHAPTER 7: DANTE.IO
- CHAPTER 8: Troubleshooting and Maintenance
- CHAPTER 9: Technical Data
- Index
- Appendix A - DSUB-25 Pin assignment
- Appendix B - DSUB-9 Pin assignment
- Appendix C - Dimensions
- Appendix D - System Update & License Installation

page 52 of 140 Prodigy.MC Manual - Version 2.4
USB
The USB port at the rear panel is used for legacy control of ANDIAMO devices via
globcon bridge.
USB USB 2.0 socket (Type B)
Connect here for legacy control.
GPIO
General Purpose Input and Output
Two MOSFET switches (2 x GPO) can be triggered. A power supply (12 V, max.
200 mA) is also provided. This allows to remote control external devices; e.g. a
recording light.
Two GPIs can be triggered by connecting the input pin with ground (GND) or by a
voltage source between input pin and ground. The high level of the voltage may
range between 2 V and 30 V due to a safety limiter in the input.
GPIO DSUB-9 socket (female)
Connect for GPIO application here.
Observe the pin out - see „Appendix B - DSUB-9 Pin assignment“ on page 135.