
Manual

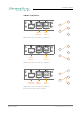

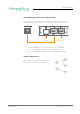
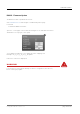


Table Of Contents
- About This Manual
- CHAPTER 1: Overview
- CHAPTER 2: Legal issues & facts
- CHAPTER 3: Installation
- CHAPTER 4: Operation
- CHAPTER 5: Managing Device
- CHAPTER 6: RAV.IO
- Introduction
- Connecting Audio Network
- Status - Overview
- Status - Sync
- Status - Network
- Status - Device
- Status - Input Streams
- Status - Output Streams
- Advanced - Overview
- Advanced - PTP Settings
- Advanced - PTP Unicast
- Advanced - PTP Profile Customized Settings
- Advanced - Current PTP Master
- Advanced - PTP Statistic
- Advanced - PTP Clock Setting
- Advanced - Network Advanced Settings
- Advanced - PTP Jitter
- NMOS - Overview
- NMOS - NIC1 & NIC2
- NMOS - Additional Settings
- Logging
- Statistic
- Switch
- RAV.IO - Firmware Update
- CHAPTER 7: DANTE.IO
- CHAPTER 8: Troubleshooting and Maintenance
- CHAPTER 9: Technical Data
- Index
- Appendix A - DSUB-25 Pin assignment
- Appendix B - DSUB-9 Pin assignment
- Appendix C - Dimensions
- Appendix D - System Update & License Installation

page 111 of 140Prodigy.MC Manual - Version 2.4
CHAPTER 6: RAV.IO
Switch
The module features two RJ45 sockets and an SFP cage managed by two
independent network interfaces (NIC 1 / NIC 2).
• Port 1 is fixed assigned to NIC 1.
• Port 2 and 3 can be assigned to either NIC 1 or NIC 2 on the SWITCH tab
NOTE
If you want to use a port that is not assigned to a NIC e.g. to patch the device‘s
management port (MGMT) into the audio network, you can link it to one of the
audio ports.
NOTE
To access the module‘s control page it is required to connect the management
network to one of the ports that is directly attached to a NIC - see next page.
To give the very best PTP synchronisation performance, the switch incorporates
advanced timestamping between the external PORTS and the internal NICs.
As a consequence, the on-board switch cannot be used to connect other PTP
devices via a single shared connection to the wider network.
Please connect all other PTP devices directly to your system’s network switch.