Dino-Lite Handheld Digital Microscope AM413T User’s Manual Thank you for choosing Dino-Lite Handheld Digital Microscope! Dino-Lite Handheld Digital Microscope has a wide scope of applications, such as, 1. Skin Check 2. Scalp Check 3. Industrial Inspection e.g. Printing Circuit Board(PCB)inspection, electronics device inspection 4. Visual Assistance 5. Printing Inspection 6. Textile Inspection 7. Jewelry Inspection 8. Science Learning 9. ….. etc.
Contents Product Specifications.............................................................. 3 Safety Precautions ................................................................. 3 Contents and Name of Parts ..................................................... 4 Connecting to PC .................................................................... 4 System Requirements............................................................................................. 4 Driver Installation Procedure..............
Product Specifications 1. Resolution:1.3M. 2. Built-in 1 optical lens. 3. Magnification power:10x~200x. 4. Measurement function (via software) 5. Microtouch function 6. Built-in LED light, with LED software switch 7. Frame rate: up to 30 FPS 8. Interface:USB (PC) Remarks: The magnification power is the ratio of the real size of the an observe object vs. the image show on a 15” monitor Safety Precautions 1.
cables to avoid trip over or Dino-Lite Handheld Microscope fall down. 11. To avoid electric shock, remove all electricity source before moving PC or TV. Contents and Name of Parts 1. Dino-Lite Handheld Digital Microscope Device 2. CD (user’s manual included) 3. USB Cable《USB2.0 / 1.1》 (1.8m) 4. Dock Connecting to PC System Requirements ● PC’s system requirements: 9 OS: Windows 98se, 2000, XP 9 CPU: Pentium IV 1.
9 Memory: 128MB 9 HDD storage space: at least 150MB ( for driver and application software installation) 9 Graphic card: 16-bit or above 9 CD-ROM driver 9 USB2.0 / 1.1 port Driver Installation Procedure ■ Power on PC and place installation CD into CD-ROM driver, do not connect USB Cable from Dino-Lite Handheld Digital Microscope to PC before driver installation. ■ Select driver installation, and follow the instructions to complete installation.
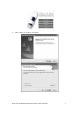
3. Click “Next” to continue, as shown.
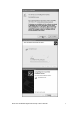
4. When the “Software Installation” warning message appears, click “Continue Anyway”. 5. Click “Finish” to complete the installation.
6. Plug USB Cable to Dino-Lite Handheld Digital Microscope to connect with PC, a “Found New Hardware Wizard” will then appear. Click “Next” to continue.
Dino-Lite Handheld Digital Microscope User’s Manual 9
Windows 2000 1. Place the installation CD into CD-ROM driver, the installation program should be started automatically. Otherwise, please execute the AUTORUN.EXE directly from the CD. 2. Select “Driver Installation” from Dino-Lite Handheld digital Microscope Installation menu screen as shown. 3. Click “Next” to continue, as shown.
Dino-Lite Handheld Digital Microscope User’s Manual 11
4. When the “Digital Signature Not Found” warning message appears, click “Yes” to continue the installation. 5. Click “Finish” to complete the installation. 6.
Windows 98se 1. Place the installation CD into CD-ROM driver, the installation program should be started automatically. Otherwise, please execute the AUTORUN.EXE directly from the CD. 2. Select “Driver Installation” from Dino-Lite Handheld digital Microscope Installation menu screen as shown. 3. Click “Next” to continue, as shown.
Dino-Lite Handheld Digital Microscope User’s Manual 14
4. Click “Finish” to complete the installation. 5.
Dino-Lite Handheld Digital Microscope User’s Manual 16
6. When the following message appears, please insert the Windows 98 Second Edition CD-ROM.
Dino-Lite Handheld Digital Microscope User’s Manual 18
Connecting Procedure The following procedure will show you how to properly connect Dino-Lite Handheld Digital Microscope with your PC. Connect USB Cable on Microscope Device to PC USB port. Operate Dino-Lite Handheld Digital Microscope The following procedure will show you how to operate Dino Digital Microscope. 1. To have up-right image, suggest placing Dino-Lite Handheld Digital Microscope as shown. 2. Put the to-be-observed object near the Dino-Lite Handheld Digital Microscope. 3.
4. The magnification power will be higher if Dino-Lite Handheld Digital Microscope is closer to the observed object. Remark: Can also use Video Setting function of DinoCapture for image adjustment. (Please refer to page 25) 5. When the object is located at the top of the front cap, there are two focus positions, each with different magnification power, can be found by rotating the focus knob.
Tool Bar Description Take Picture Take Video Take Time Lapsed Video Save as Mail Picture / Video Folder Picture / Video folder is on the left side of the program, which contains the thumbnails of picture or video captured by the program. The file in the folder will not be automatically deleted when leaving the program. But it is still suggested to save the picture or video and keep the folder clean for file security and program’s performance concern.
Blue frame –- The picture or video is selected. The selected picture or video can thus be opened, be saved, be copied , be shared, be mailed or be deleted. Take Picture The picture can be taken either by clicking the icon on Tool Bar or by selecting “Picture” under Capture Menu. Take Video The Video can be taken either by clicking the icon on Tool Bar or by selecting “Video” under Capture Menu.
Take Time Lapsed Video The Time Lapsed Video can be taken either by clicking the icon on Tool Bar or by selecting “Frames” under Capture Menu. Save Picture or Video The file can be saved as “jpg” or “bmp”, by either clicking in the Tool Bar or by selecting “Save as” under the File Menu . The selected file in the folder will then be saved as prompted below.
Mail Click “Mail” : The file name is same as system’s. The selected file can be mailed by clicking in the Tool Bar, or by selecting “Mail” under the File Menu. Share Click “share” in the File Menu.
Full Screen Display: The real time display can be enlarged to full screen by clicking on the upper right corner of the window. To return from full screen mode, please click “Alt + Tab”. Menu Function List 1. File Menu Open -- To open the selected picture or video. Save As -– To save the selected picture or video. Share –- Save the picture or video file to DinoShare folder, under the Shared Document. Mail -- To mail the selected picture or video.
Audio Setting The user can select the quality of audio file to be recorded. Video Setting The user can set the parameter of video. Note: The resolution setting is not useful.
The user can select the compressor for video recording. Note: The video quality may be varied with different compressor. Dino Cursor The Dino Cursor can be switched on or off. Video Thumbnail Auto-play The thumbnail auto play can be switched on or Off. If thumbnail auto play is enabled, the video will play when cursor move over. 3. Capture The picture, video and frame functions in Capture have the same functions as the buttons of in the Tool Bar. 4.
User can use “Program Updates” in Help to download the most updated DinoCapture from AnMo web site www.anmo.com.tw Open The Picture The opened picture can be displayed in full screen by clicking To return from full screen mode, just click the mouse left key.
Mail Previous Picture Next Picture Share the Picture by sending the file to DinoShare under the Shared Document Enlarge Shrinkage Open The Video Or Time Lapsed Video Function Description Play Stop Pause Dino-Lite Handheld Digital Microscope User’s Manual 29
Q&A Q1. Why the object cannot be found on the display of digital microscope? A: a. Please check all the connection of all necessary cable and adapter. Q2. Why cannot work, when connect to PC? A: a. Check driver installation is completed. b. The USB cable is connected to Dino-Lite Handheld Microscope and PC USB port. Q3. How to install driver? A: a. Do not connect USB cable to Dino-Lite Handheld Microscope before driver installation. b.
Copyright AnMo Electronics Corp. reserves all patents, trademarks, copyrights, and other intellectual rights regarding the user manual. Copying the manual in part or in full without the written permission of AnMo Electronics Corp. is prohibited. Illegal usage of part or all of the document may result in criminal penalty. Windows 98se, Windows 2000 and Windows XP are Microsoft company’s trademark.