
Use and Care Manual


10 www.dimplex.com
Installation Instructions
!
NOTE: Two people are required for installation.
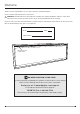
1. Prepare a wall with a framed opening, following the dimensions shown in Figure 3. The replace can either be
installed partially-recessed (2x4 frame) or ush-mounted (2x6 frame).
CAUTION: Decorative nishing material (such as brick) should be limited to ½" (13 mm) overhang to ensure
adequate ow of heated air out of the rebox area.
CAUTION: This replace is NOT load-bearing. Ensure the opening for the replace is framed in such a way that
the weight of the building materials will not create pressure on the top of the replace.
!
NOTE: For 2"x4" construction where the unit will be partially recessed, it is recommended to use XLFTRIM kit
(sold separately) to accomodate the protruing portion of the replace.
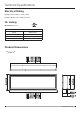
Figure3
Installation
2” x 6”
5 1/2" (14.0 cm)
16"
(40.6 cm)
2” x 4”
3 1/2" (9.0 cm)
XLF50: 50 5/8" (128.7 cm)
XLF74: 74 5/8" (189.7 cm)
XLF100: 100 5/8" (255.7 cm)
XLF60: 60 5/8" (154.0 cm)
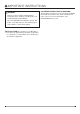
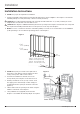
Figure4
!
NOTE: Wiring entry is located on the right side at
the bottom of the rebox. Plan the framing to allow
routing of the power cable to this location.
2. If a trimless installation is desired, remove the
factory trim by removing the screws that secure it.
3. Ensuring a minimum of 18" (47 cm) of slack, route
the supply power wire through a cable clamp (not
included) and in the opening in the back of the unit.
(Figure 4)
4. Lift the rebox into the opening in the frame using the
handles on the back of the replace.
5. Using a bubble level (supplied) ensure that the
replace is level within the framing. Adjust as required.
Grounding
Screw
Cable Clamp