
Instruction Manual

10 www.dimplex.com
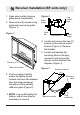
Wall Control Installation
1. Unpack the Wall Switch
Remote Control and all
hardware from its package.
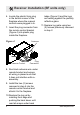
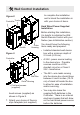
2. Release the Controller from
its Outer Housing by pushing
the front face into the Outer
Housing until you hear a click.
This will release the push-
lock latches and allow the
Controller to be removed from
the Outer Housing (Figure 5).
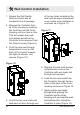
3. Push the wire lead storage
compartment cover on the
back of the Control towards
the right (as shown), and
remove (Figure 10).
Figure 10
4. Uncoil the two wire leads and
feed each of them through one
of the two holes located on the
wire lead storage compartment
cover (make sure orientation is
as shown as in Figure 11).
Figure 11
5. Replace the wire lead storage
compartment cover on the
Controller with wire leads fed
through and exposed.
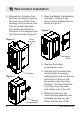
6. Feed the two wire leads from
the Controller through the two
holes in the back of the Outer
Housing as shown in Figure 12.
7. Gently pull the wire leads
through while pushing the
Controller into the Outer
Housing until you hear the push
lock latches click, locking the
Controller in place (Figure 13).