
Service Manual

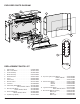
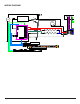

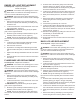
Table Of Contents
- Operation
- Maintenance
- Exploded Parts Diagram
- Replacement Parts List
- Wiring Diagram
- Log Set Assembly Replacement
- Flame Screen Replacement
- Ember LED Light Replacement
- Flame Base LED Replacement
- Back Log LED Replacement
- Flicker Motor Replacement
- Main Control Board Replacement
- Power Supply Replacement
- Blower Assembly Replacement
- Element Replacement
- Cutout Replacement
- Main Control Assembly Replacement
- Thermistor Replacement
- Top Front Lights Replacement
- Troubleshooting Guide

8 www.dimplex.com
LOG SET ASSEMBLY REPLACEMENT
Tools Required: Philips head screwdriver
WARNING: If the rebox was operating prior to servic-
ing, allow at least 10 minutes for the heating elements to
cool off to avoid accidental burning of skin.
WARNING: Disconnect power before attempting any
maintenance to reduce the risk of electric shock or damage
to persons.
1. Remove the front glass or any accessories that are
around the replace and will inhibit your ability to fully
access the unit.
2. Locate and remove the screw behind each of the front
legs of the rebox. (Figure 3)
!
IMPORTANT: Only handle the log-set by the plastic
grate, not the logs themselves.
3. Slide the rebox assembly forward and lift out.
!
NOTE: It may be necessary to slide the ember mat
forward and backward, and possibly out, as well to assist
with the removal.
4. Trace the wire from the back of the harness to the con-
nector that will be located in the middle slightly under
the ame screen.
5. Disconnect the old log set assembly and connect the
new one.
6. Place the connector back under the ame screen.
7. Install the replacement logs and secure with the two
screws that were previously removed.
8. Re-assemble the remainder of the rebox in reverse
order from the instructions above.
Figure 3
FLAME SCREEN REPLACEMENT
Tools Required: Philips head screwdriver
WARNING: If the rebox was operating prior to servic-
ing, allow at least 10 minutes for the heating elements to
cool off to avoid accidental burning of skin.
WARNING: Disconnect power before attempting any
maintenance to reduce the risk of electric shock or damage
to persons.
1. Remove the front glass or any accessories that are
around the replace and will inhibit your ability to fully
access the unit.
2. Locate and remove the screw behind each of the front
legs of the rebox. (Figure 3)
!
IMPORTANT: Only handle the log-set by the plastic
grate, not the logs themselves.
3. Slide the log set assembly forward and lift the log set
assembly and the ember mat out. (Figure 3)
!
NOTE: The log set assembly has a wire attached to
the unit which can be temporarily disconnected for easier
access.
4. On either side of the rebox gently remove the brick
panels by placing you nger in the gap and pulling
forward. The brick panels are held in place by magnets
and need minimal force to be removed.
5. Locate the two brackets securing the ame panel in the
unit at the bottom and remove the 4 screws.
6. Gently lift the ame panel out and replace with the new
one.
7. Re-assemble the unit in reverse order from the instruc-
tions above.
Log Set
Assembly
Back Log
LED
Ember
LED Light
Flame
Base LED
Back Log
Flicker
Motor
Flame Panel
Brackets