
& DWF5252B Service Manual


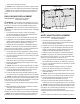

Table Of Contents
- Operation
- Maintenance
- Exploded Parts Diagram
- Replacement Parts List
- Wiring Diagram
- Partially Reflective Glass Replacement
- Switchboard Replacement
- Display/Control Board Replacement
- Power Cord Replacement
- Relay Board Replacement
- AC/DC Adapter Replacement
- Heater Assembly Replacement
- Flicker Rod Replacement
- Flicker Motor Replacement
- LED Light Strip Replacement
- Troubleshooting Guide

4 www.dimplex.com
MAINTENANCE
WARNING: Disconnect power before attempting any
maintenance or cleaning to reduce the risk of re,
electric shock or damage to persons.
Partially Reective Glass Cleaning
The Partially Reective Glass is cleaned in the factory
during the assembly operation. During shipment,
installation, handling, etc., the Partially Reective Glass
may collect dust particles; these can be removed by
dusting lightly with a clean dry cloth.
To remove ngerprints or other marks, the Partially
Reective Glass can be cleaned with a damp cloth. The
Partially Reective Glass should be completely dried with a
lint free cloth to prevent water spots. To prevent scratching,
do not use abrasive cleaners.
Fireplace Surface Cleaning
Use only a damp cloth to clean painted surfaces of the
replace. Do not use abrasive cleaners.
Servicing
Except for installation and cleaning described in this
manual, an authorized service representative should
perform any other servicing.
Figure 2
A
D
B
C
E
G
H
F
• Indicated by the second digit on the Floating Display™
changing to show: “H” (high), and “L” (low).
H. Sleep Timer
The Sleep Timer can be set to automatically shut off the
replace after a preset time (from 30 minutes to 8 hours).
→ To set the timer press the timer button on the remote,
repeatedly, until the desired time is displayed.
• The On Screen Display will display the different times as
it is adjusted. Once the timer has begun, pressing the
button will display the time remaining before the unit
turns Off.
!
NOTE: The Sleep Timer can be cancelled at any time
by pressing the button repeatedly until the sleep timer
displays nothing.
Resetting the Temperature Cutoff Switch
Should the heater overheat, an automatic cut out will turn
the heater off and it will not come back on without being
reset. It can be reset by unplugging the unit and waiting 5
minutes before plugging the unit back in.
CAUTION: If you need to continuously reset the heater,
unplug the unit and call technical support at 1-888-346-
7539.
Remote Control Battery Replacement
To replace the battery:
1. Slide battery cover open on the remote control. Cor-
rectly install one 3 Volt (CR2032 [longer life] or CR2025)
battery in the battery holder.
2. Close the battery cover.
Battery must be recycled or disposed of properly.
Check with your Local Authority or Retailer for recy-
cling advice in your area