Owner’s Manual Model DFI400LH (6909050141) DFI400RH (6909050142) DFI600LH (6909050161) IMPORTANT SAFETY INFORMATION: Always read this manual first before attempting to install or use the Optimyst® cassette. For your safety, always comply with all warnings and safety instructions contained in this manual to prevent personal injury or property damage. To view the full line of Dimplex products, please visit www.dimplex.
Table of Contents Welcome & Congratulations. . . . . . . . . . . . . . . . . . . . 3 IMPORTANT SAFETY INSTRUCTIONS . . . . . . . . . . 4 Installation. . . . . . . . . . . . . . . . . . . . . . . . . . . . . . . . . . 6 Assembly. . . . . . . . . . . . . . . . . . . . . . . . . . . . . . . . . . . 9 Operation. . . . . . . . . . . . . . . . . . . . . . . . . . . . . . . . . . 11 Maintenance. . . . . . . . . . . . . . . . . . . . . . . . . . . . . . . 13 Warranty . . . . . . . . . . . . . . . . . . . . . . . .
Welcome & Congratulations Thank you and congratulations for choosing to purchase an Optimyst® cassette from Dimplex, the world leader in electric fireplaces. Please carefully read and save these instructions. CAUTION: Read all instructions and warnings carefully before starting installation. Failure to follow these instructions may result in a possible electric shock, fire hazard and will void the warranty.
IMPORTANT SAFETY INSTRUCTIONS THIS UNIT IS FOR HOUSEHOLD / RESIDENTAL USE ONLY. THE ELECTRICAL RATING FOR THESE MODELS IS 120VAC, 60 HZ, 12 AMP. When using an electrical furnishing, basic precautions should always be followed, including the following: Read all instructions before using (this furnishing). D ANGER: To reduce the risk of electric shock always unplug this furnishing from the electrical outlet before cleaning.
IMPORTANT SAFETY INSTRUCTIONS only as described in this manual. Any other use not recommended by the manufacturer may cause fire, electric shock or injury to persons. ⑬ To reduce the risk of electric shock, this appliance has a three pronged plug. This plug will fit in a grounded outlet only one way. If the plug does not fit, contact a qualified electrician to install the proper outlet. Do not change the plug in any way. Always plug this appliance directly into a wall outlet/receptacle.
Installation WARNING: Ensure the power cord is not installed so that it is pinched or against a sharp edge and ensure that the power cord is stored or secured to avoid tripping or snagging to reduce the risk of fire, electric shock or injury to persons. Grounding Instructions This product must be grounded. If it should malfunction or breakdown, grounding provides a path of least resistance for electric current to reduce the risk of electric shock.
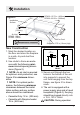
Installation Figure 2 Installation Surface DFI400: 15.75 in. (400mm) DFI600: 22.05 in. (560mm) 8 (2 .5 i 16 n. m m ) 6.7 in. (170mm) Air Inlet DFI400: 100cm2 DFI600: 150cm2 Exit for Cord Supports: 0.75 in (19 mm) high New Construction 1. Mark the desired location on the floor and store the fireplace in a safe, dry and dust free location. 2. Use studs to frame an enclosure with the following minimum internal/opening dimensions (Figure 2).
Installation ensure that the receptacle cord is positioned so that the face is perpendicular to the floor as in Figure 4. CAUTION: For continued protection against risk of fire, replace only with same type and rating of fuse, 10 amp fuse maximum. 5. The receptacle is intended for plugging in a Dimplex heater (supplied with the mantel), which will allow the heater to be controlled with the provided remote. (Figure 4) CAUTION: The receptacle cord is intended for use only with the Dimplex heater 6909070159.
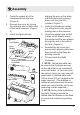
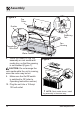
Assembly 1. 2. 3. Carefully unpack all of the components from the box. (Figure 5) Remove top cover by turning the retaining tabs on both ends of the water reservoir. (Figure 6) Install the light bulbs by Figure 5 Log Media Rock Media Media Tray Removable Refill Container Transducer Light Bulbs Housing Remote Control aligning the pins on the bulbs and the fixture and pressing down until they are fully inserted. (Figure 7) 4.
Assembly Figure 6 Top Cover Emitter Retaining Tab Fan Housing Transducer Wire Slot Water Tank 8. Install the media on top, log assembly or rock media and media tray, so that the opening is not blocked (Figure 7). Figure 7 CAUTION: Do not arrange the rock media while the unit is running, since the rocks may be hot. 9. Make sure the On/Off switch is switched to Off (refer to Operating Instruction section). 10. Plug the unit into a 15 Amp/ 120 volt outlet.
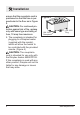
Operation Figure 8 C B A D Remote Control Sensor CAUTION: During operation ensure that the receptacle cord is positioned so that the face is perpendicular to the floor as in Figure 4. ! NOTE: Always ensure that the appliance is in an upright position before operating the unit. ! NOTE: When the cassette is used in an environment where background noise is very low, it may be possible to hear a sound which is related to the operation of the flame effect.
Operation individual requirements, turn the thermostat control clockwise all the way to turn on the heater. When the room reaches the desired temperature, turn the thermostat knob counter-clockwise until you hear a click. Leave thermostat in this position to maintain the room temperature at this setting. For additional heat, turn clockwise until you hear the click again and the heater will turn on. * Only applicable when the Dimplex heater has been plugged into the receptacle.
Maintenance W ARNING: Disconnect power before attempting any maintenance or cleaning to reduce the risk of fire, electric shock or damage to persons. Filling the water tank When the water tank is empty, the flame shuts off and you will hear 2 audible beeps, follow these steps. CAUTION: Allow at least five minutes for components to cool before disassembling the unit to refill. 1. Turn the On/Off switch to the off position (0) (Figure 8) 2.
Maintenance in front of the fire and observe which lamp needs to be changed. Filter Cleaning 3. Turn the unit off, and unplug the cassette. The air filter can be removed and gently rinsed with water to clean and dried on a towel before reinstalling. 4. Leave the appliance for 5 minutes to allow the lamps to cool down before removing them. ! NOTE: Replace the filter so that the course black filter is facing the front of the cassette. 5.
Warranty ONE YEAR LIMITED WARRANTY of such product. Products to which this limited warranty applies The limited 12 month warranty period also applies to any implied warranties that may exist under applicable law. Some jurisdictions do not allow limitations on how long an implied warranty lasts, so the above limitation may not apply to the purchaser. This limited warranty applies to your newly purchased Dimplex cassette and to newly purchased Dimplex fireplace surrounds (mantels) and trims.
Warranty such product or part, or if repair or replacement is not commercially practicable or cannot be timely made, Dimplex may, in lieu of repair or replacement, choose to refund the purchase price for such product or part. • Limited warranty service will be performed solely by dealers or service agents of Dimplex authorized to provide limited warranty services.
Replacement Parts Remote Control . . . . . . . . . . . . . . . . . . . . . . . . . . . . . . . . . . . . . . . . . . . . . 9600385600RP Remote Control Receiver . . . . . . . . . . . . . . . . . . . . . . . . . . . . . . . . . . . . . 9600580100RP Rock Media (DFI400RH). . . . . . . . . . . . . . . . . . . . . . . . . . . . . . . . . . . . . . 9600650100RP Media Tray (DFI400RH) . . . . . . . . . . . . . . . . . . . . . . . . . . . . . . . . . . . . . . 9600710100RP Log Set Assembly - DFI400LH . . . . . . .